In this tutorial, we will discuss about microservices but before we go to microservices, first let’s understand why we are here? Why there is so much of hype about microservices?
Before we get into microservices, it is very important to understand:
What is Monolithic application?
A monolithic application is an application where every part of a product is a part of single application or web application and usually the data of entire application is in a single data store.
Issues with Monolithic application?
Source code management in source control. It means each and every project’s module exists in single solution explorer of the project. So that we face lots of difficulties to maintain the project.
Code and Database Deployments and rollbacks are a nightmare.
Extremely big team, hence management nightmare. The side effect of this horizontal teams, which makes an organization move like a sloth due to interdendence.
Any changes or updates to the application require modifying and redeployment of entire code.
What is Microservices?
Microservices are smaller single responsibility services. It is an approach to dividing the application into smaller, independent services. Each services have an individual specific function that communicate with other services through Apis.
Design pattern are evolved as reusable solution to the problems that we encounter every day of programming. They are generally targeted at solving of object generation and integration. In other words, Design Pattern act as a templates that can be applied to the real-world problem.
The book is divided into two parts in which first part explaining about the Pros and Cons of Object Oriented Programming and the second part explaining the evolution of 23 classic software design patterns.
From then, Gang of Four design patterns has made a significant role in the software development life cycle.
Types of Design Patterns
There are 3 types of Design Patterns
Creational
This type deals with the object creation and initialization. This program makes the program more flexible and decide which objects need to be created for a given case.
Example: Singleton, Factory, Abstract Factory.. etc.
Structural
This type deals with class and object composition. This pattern focuses on decoupling interface and implementation of class and its objects.
Example: Adapter, Bridge.. etc
Behavioral
This type deals with communication between Classes and objects.
Example: Chain of Responsibility, Command, Interpreter… etc
Angular is a client-side(Browser) Framework which allows us to build Single-Page-Applications(SPA).
Angular job is to not only render static data like html and cs.s but also render dynamic data to the browser.
Angular is responsible for validating user input and sending it to the server.
Angular communicate with our backend with Node, Express, Mongo combination.
Angular provides a “Mobile-App” like user interface that means it never need to reload the page just change the parts of the page with JavaScript to Angular and therefore everything happens instantly in very reactive way.
What is NodeJS?
NodeJS is a open-source and cross-platform JavaScript runtime environment. It takes the request from the front-end application like angular. Angular could send a request to fetch the list of all the post and node reach out to the database then send back the response with all these post.
NodeJS is primarily used for server side scripting to build scalable network connections.
NodeJS often used to create RESTful API’s and microservices.
NodeJS executes Server-Side logic in general
What is Express?
Express is a Node Framework which simplifies writing Server-Side code and logic.
Express framework creates fast, secure and scalable NodeJS application.
It provide some extra feature to node to create our application faster. We can use middleware to handle request.
Express connect to the database like MySQL, MongoDB and other quickly.
What is MongoDB?
MongoDB is a NoSQL Database which stores “Documents” in “Collection” instead of “Records” in “Tables” as in SQL.
It enforce no data schema or relations. All data store in the form of documents or collection.
It easily connected to node/express(not to angular).
It’s a powerful database which can easily be integrated into a Node/Express environment.
Q1 : What is React? What is the Role of React in Software Development ?
Answer: 3 points need to remember about React :
React is open source Javascript Libraby.
React is used for user interfaces.
React simplifies the creation of SPA (Single Page Application) by using Reusable Component.
Q2 : What are the Key Features of React ?
Answer: There are 7 Key Features of React.
Virtual DOM
Component based architecture
Reusability & Composition
JSX(Java Script & XML)
Declarative Syntax
Community & Ecosystem
React Hook
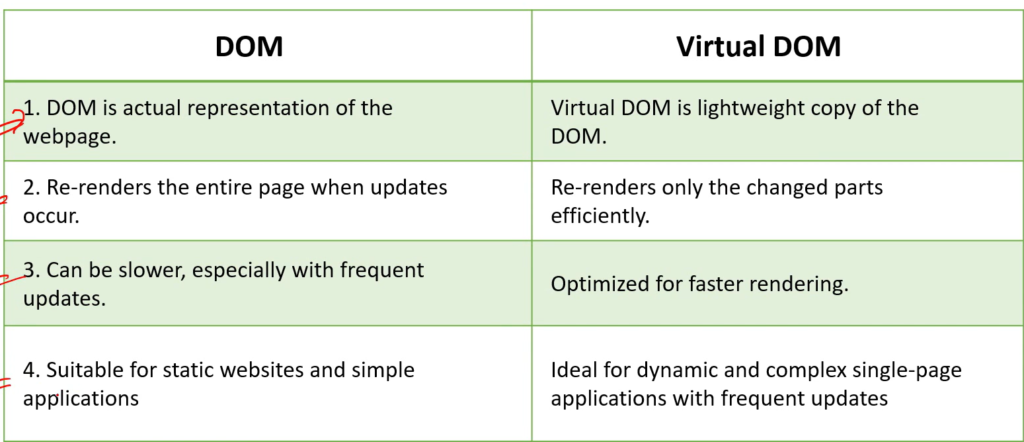
Q3 : What is Virtual DOM? Difference between DOM and Virtual DOM?
Answer : First we discuss about real DOM. whenever the user will do any changes in application basically we are updating the real DOM right, now what is Virtual DOM and why do we need it?
First of all DOM is a general and real concept in all the browsers. Without DOM our application can’t interact or handle JavaScript but Virtual DOM is specific for react only and it is not mandatory. It is developed by Facebook for improve the speed of the application.
Basically there is a performance problem in Real DOM. The problem is even if a user makes very small change in web application in the browser even then the whole layout will render in the DOM. For example, If a user change only one element in title of html even then browser will re-render or refresh whole layout of the entire page. It will very time consuming, that time consumption will increase the loaded time of the page and that will increase the speed and performance problem. To solve the problem we use Virtual DOM.
In React application, React user open react based website in there browser then in the background React library will make and exact copy of the DOM and show that copy to the front of user. So this exact copy of DOM is Virtual DOM. When the user make some changes to the elements in html it looks like user is interacting with real DOM but actually the user make changes in Virtual DOM.
The specialty of Virtual DOM is if the user makes some changes any element in HTML now Virtual DOM not render whole virtual DOM for small changes. Only the small specific part of the virtual DOM will be updated and In background React algorithm of React Library will keep comparing the changes between Virtual DOM and Real DOM and whatever change has made by user in Virtual DOM only those changes will be updated in Real DOM.
Q4 : What are React Components? What are main elements of it?
Answer : In React, a component is a reusable building block for creating user interfaces. It can be either functional or class-based.
Main element of React :
Import
Export
Q5 : What are the 5 advantage of React?
Answer: Advantage of React :
Simple to build Single Page Application by using Component.
React is cross platform and open source (Free to Use).
React is lightweight and very fast(Virtual DOM).
Large community and ecosystem.
Testing is easy.
Q6. What is the role of JSX in React?
Answer : JSX stands for JavaScript XML. The key point of JSX are :
JSX is used by React to write HTML-like code within JavaScript.
JSX makes easier to write and add HTML in React.
JSX uses camelcase notification for naming HTML attribute. For example, username in HTML is used as userName in JSX.
To insert a large number of HTML we have to write it in parenthesis i.e, ().
Q7. What is SPA(Single Page Application)?
Answer : A single Page Application(SPA) is a web application that is designed to be displayed as a single, static page. As the user clicks link and interact with the page of the website, subsequent content is loaded dynamically. The result is more fluid and faster without any page refresh.
Q8. What difference between Declarative and Imperative Syntax?
Answer :
Imperative
Procedural Programming Paradigm
Object Oriented Programming
Parallel Processing Approach
The User is allowed to make decisions and commands to the compiler.
Variable can be mutable
It provides step-by-step DOM mutations until we reach desired UI.
Imperative syntax(non-React) using JavaScript
function App(){ const element = document.createElement(“h1”); element.textContent = “Hello World”; document.body.appendChild(element); }
Declarative
Login Programming Paradigm
Functional Programming
Database Processing Approach
A compiler is allowed to make decisions.
Variable are typically immutable.
We doesn’t provide step-by-step instructions to reach the desired UI. Just tell React what to render in component’s logic, and React will figure out how best to display it to the user.
Declarative syntax using JSX
function App(){ return <h1> Hello World </h1>; }
Q9. How to pass data from Parent Component to Child Component in React?
Answer : In React, “props” are a mechanism for passing data from parent component to child component. Props are immutable means if the data are set by the parent component, they can not be changed by child component. The child component can only use it but should not modify.
// Parent component
function ParentComponent() {
    const message = "Welcome from parent!";
    return <ChildComponent greeting={message} />;
}

// Child component
function ChildComponent(props) {
    return <p>{props.greeting}</p>;
}
Q10. What are React Hooks? Why Hooks are introduced in React?
Answer : Before React version 16.8, functional component can’t handle state, logic and lots of other React features and we only used them for rendering very simple components to the UI. To resolve this problem React Hooks are introduced.
Each React Hooks name is prefixed with the word “use”. For example useState and useEffect.
useEffect : React useEffect() hook is used to eliminate the side effects(out side of the scope of React) of using class based component. The task of useEffect hook is updating the DOM, fetching data from API, setting up subscription and timer etc.
Here you notice the useEffect() hook contains 2 arguments :
First Argument return called effect, is either return a function or undefined. Effect is executed when the component is render depend on some condition.
Second Argument is an array of dependencies. If you want to control the effect to execute when the component is render then pass the array of dependencies as a second argument. Here we have passed empty array that means we want effect to be executed only on first render.
useState : useState() hooks is the initial state that returns 2 values.
First Value : Student, current state that initially hold blank array.
Second Value : SetStudent, function that update current state.
For using both hooks need to import hooks from React
import { useEffect, useState } from ‘react’
axios : Axios allows you to communicate with the API in your React application. Here, axios using to get Student Information from API.
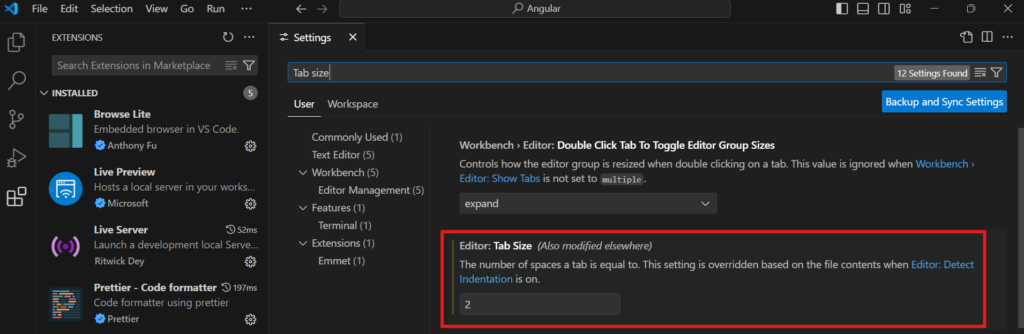
Step 12: After executing the react application the record will look like below:
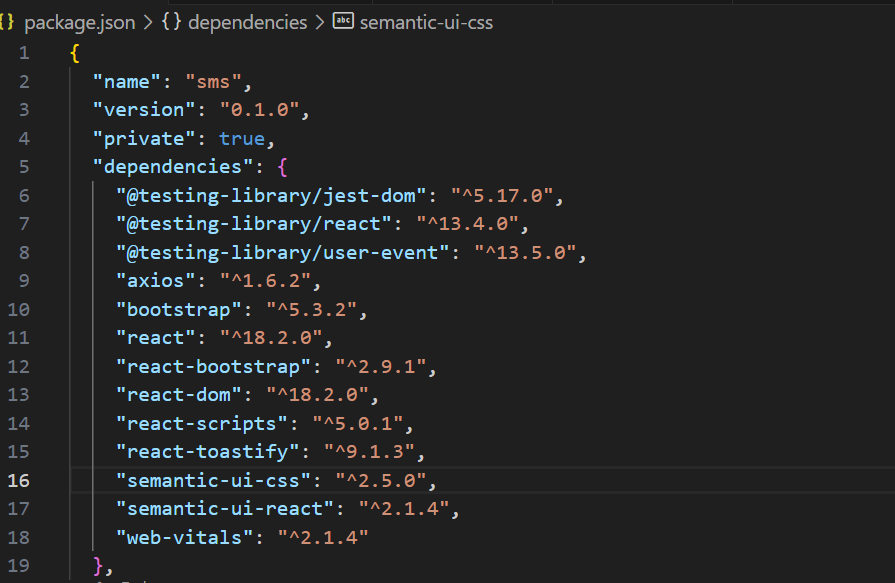
Step 13 : We can also use Semantic React UI instead of Bootstrap. To use Semantic React UI need to change some existing code:
import StudentList from './StudentList';
import {Grid} from 'semantic-ui-react';

function GridDisplay(props){
    return(
        <Grid>
            <Grid.Column width="10">
            <StudentList students={props.students}></StudentList>
            </Grid.Column>
        </Grid>
    );
}
export default GridDisplay;
App.js
import logo from './logo.svg';
import './App.css';
import GridDisplay from './Component/GridDisplay';
import { useEffect, useState } from 'react';
import axios from 'axios';

function App() {
  const[Student,SetStudent] = useState([]);

  useEffect(()=>{
    let ignore = false;
    axios.get("https://localhost:7077/api/Student/GetStudentInfos").then((response)=>{
      if(!ignore){
        SetStudent(response.data);
      }
    })
    return ()=>{ignore=true}
  },[]);

  return(
    <GridDisplay students= {JSON.stringify(Student)} ></GridDisplay>
  )
}
export default App;
After executing application the result look like below:
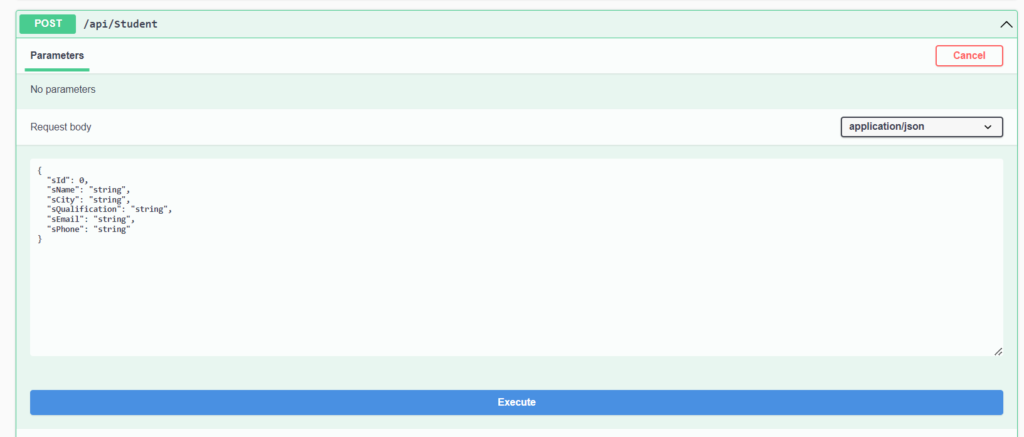
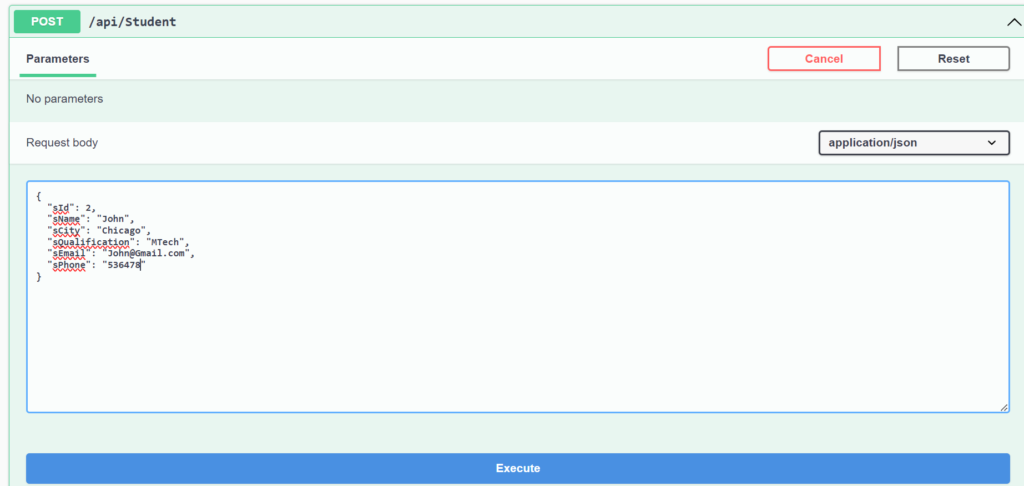
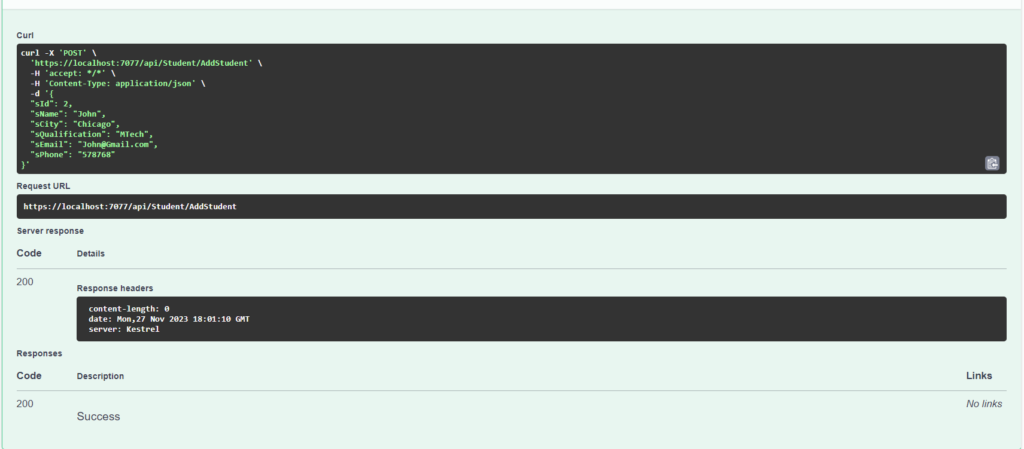
Step 14 : Add student’s record using interface. To insert details of student we required the form where user can submit the student details. After submitting the form request AddStudent api will call, before creating form we also require Add button where user click on the add button then Add Student form will be open.
In this article, we will discuss Onion Architecture with ASP .NET Core Web API and MySql Entity Framework Core. Using onion architecture our application becomes better testable, Flexible and Maintainable….
In this article, we will discuss Onion Architecture with ASP .NET Core Web API and MySql Entity Framework Core. Using onion architecture our application becomes better testable, Flexible and Maintainable….
In this article, we will discuss Onion Architecture with ASP .NET Core Web API and MySql Entity Framework Core. Using onion architecture our application becomes better testable, Flexible and Maintainable….
In this article, we will discuss Onion Architecture with ASP .NET Core Web API and MySql Entity Framework Core. Using onion architecture our application becomes better testable, Flexible and Maintainable….
In this article, we will discuss Onion Architecture with ASP .NET Core Web API and MySql Entity Framework Core. Using onion architecture our application becomes better testable, Flexible and Maintainable….
In this article, we will discuss Onion Architecture with ASP .NET Core Web API and MySql Entity Framework Core. Using onion architecture our application becomes better testable, Flexible and Maintainable….
In this article, we will discuss Onion Architecture with ASP .NET Core Web API and MySql Entity Framework Core. Using onion architecture our application becomes better testable, Flexible and Maintainable….
In this article, we will discuss Onion Architecture with ASP .NET Core Web API and MySql Entity Framework Core (Database First Approach). Basically onion architecture provides us a better way to build application. Using this architecture our application becomes better testable, Flexible and Maintainable.
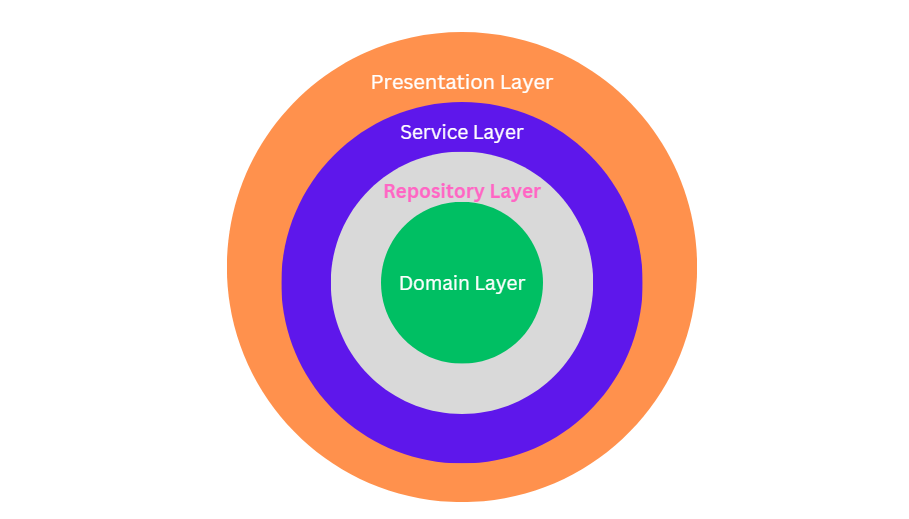
Onion Architecture in ASP .NET Core Web API
Domain Layer: Domain Layer basically a entity layer in which all database table exists.
Repository Layer: Repository is an abstraction of the data access layer. It hides the details of how exactly the data is saved or retrieved from the underlying data source.
Service Layer : A Service Layer is an additional layer that work as a mediator between controller and repository layer. A Service Layer contains business logic.
Presentation Layer : The Presentation Layer is the top most layer of the N-tier architecture used to display result to the user.
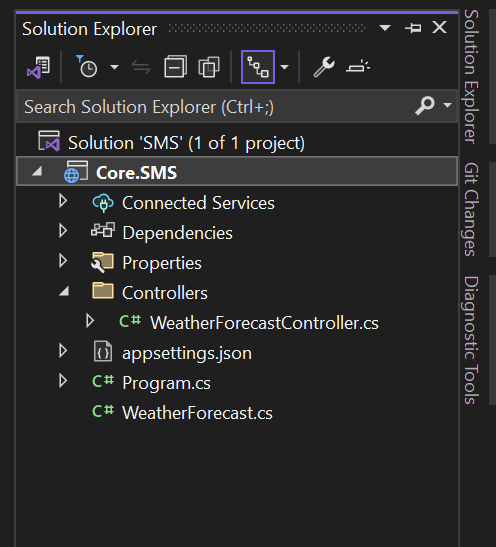
Step 2: I assume you have created a default Project API with WeatherForecastController. If not please see me.
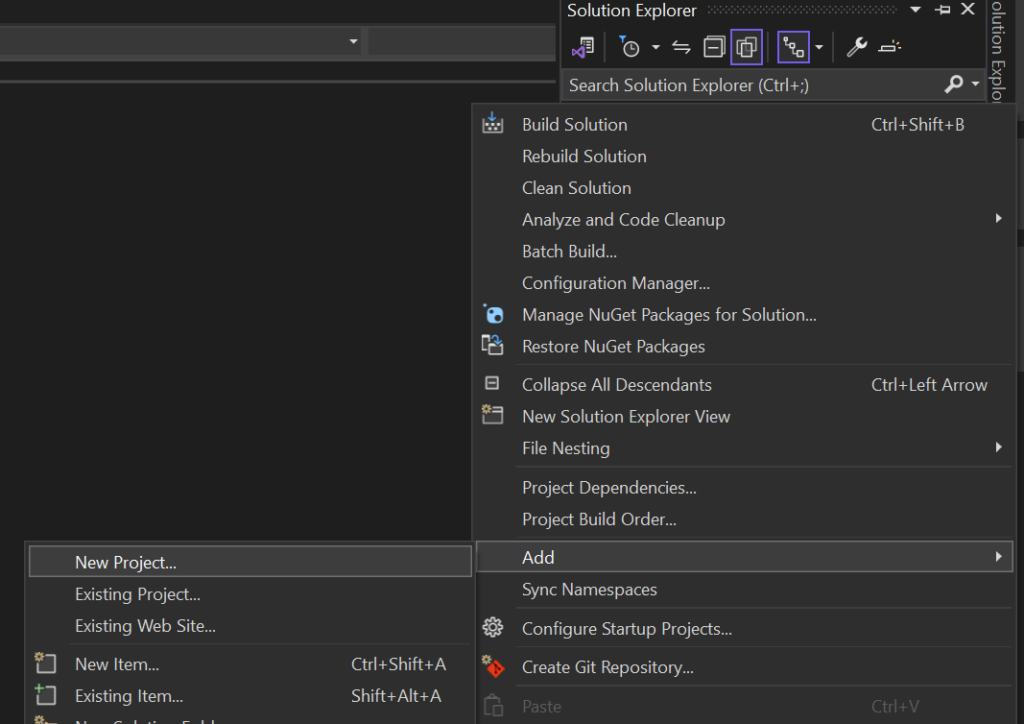
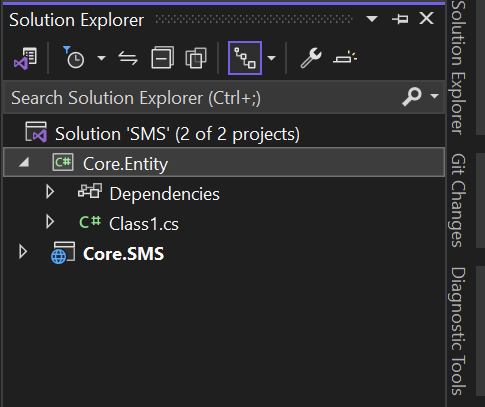
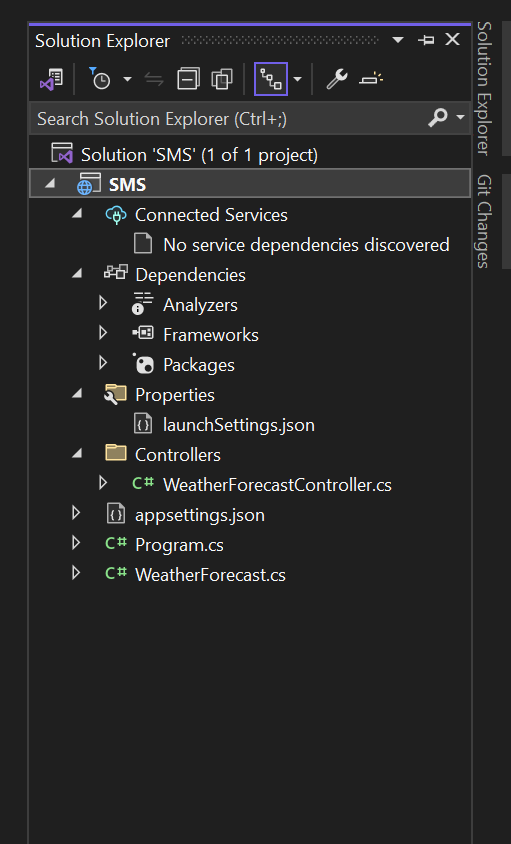
Step 3: Add Core.Entity class library under the SMS Solution Explorer.
Right Click on the solution => Add =>New Project => Class Library
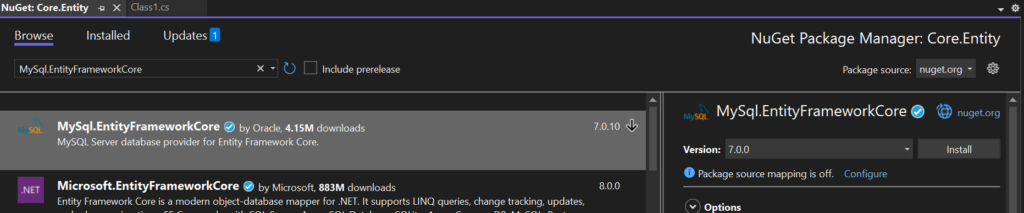
Step 4 : Add Entity Framework Tool and MySql Provider to Core.Entity class library.
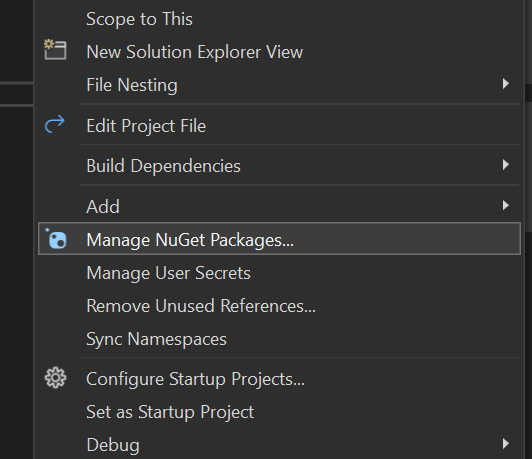
Right click on Core.Entity=>Manage NuGetPackage
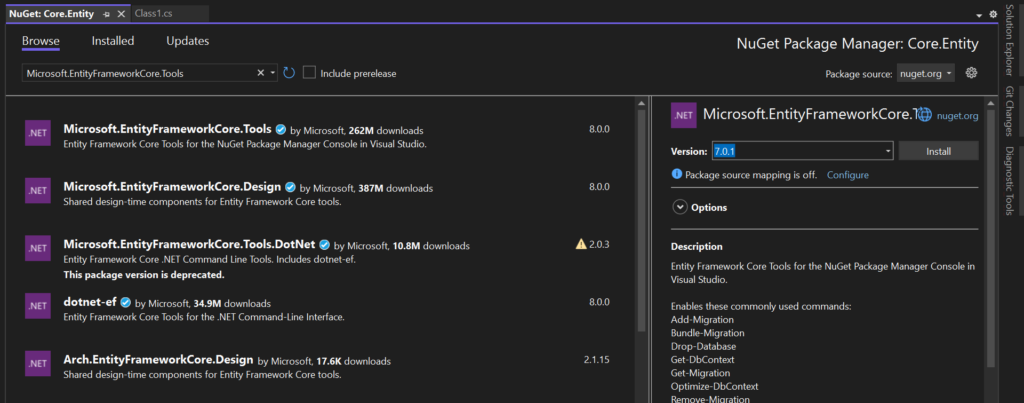
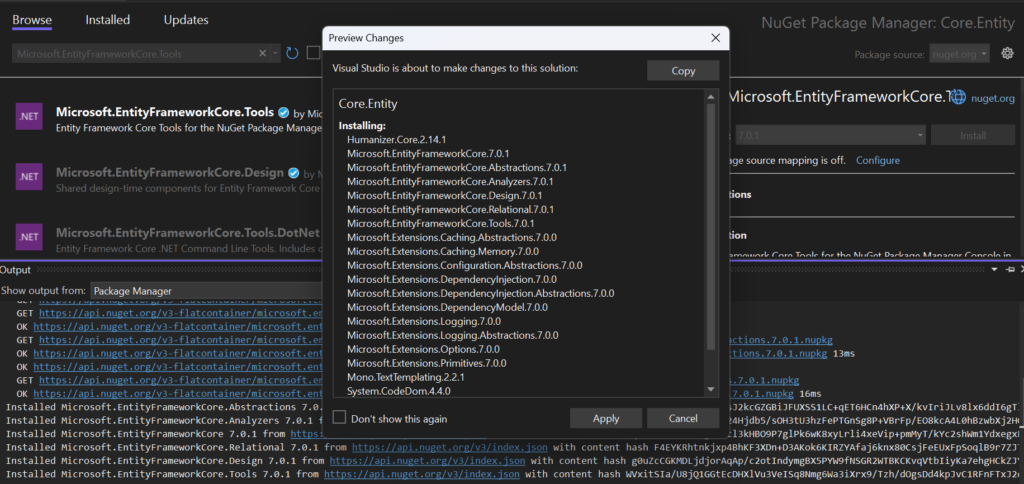
Go to Browse => In Search box type “Microsoft.EntityFrameworkCore.Tools” => Select Microsoft.EntityFrameworkCore.Tools => Install => Apply
Install MySql Server Provider “MySql.EntityFrameworkCore” same as “Microsoft.EntityFrameworkCore.Tools“
Step 5 : Build the solution.
Step 6 : Provide project library[Core.Entity] reference to Core.SMS
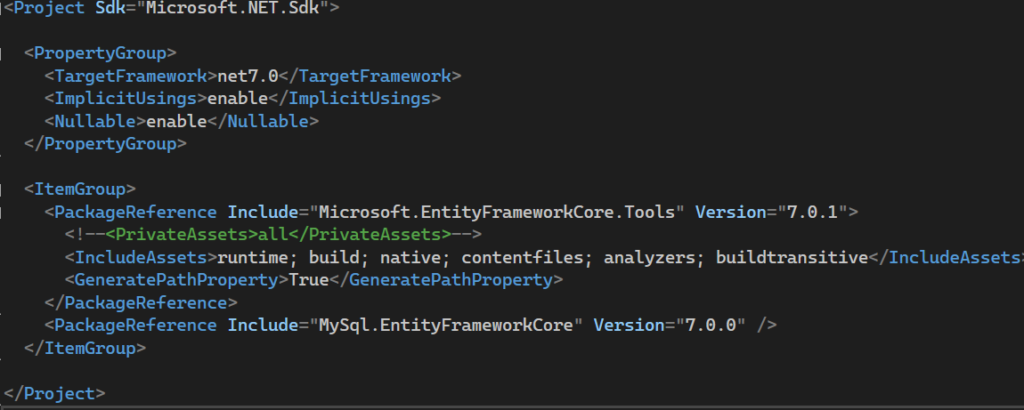
Step 7: Double click on Core.Entity then csproj will be open. Comment the blow line.
Step 8 : Now using below Scaffold-DbContext command to create a model from existing database. Here you will notice we are creating model in separate class library.
Go to Package Manager Console:
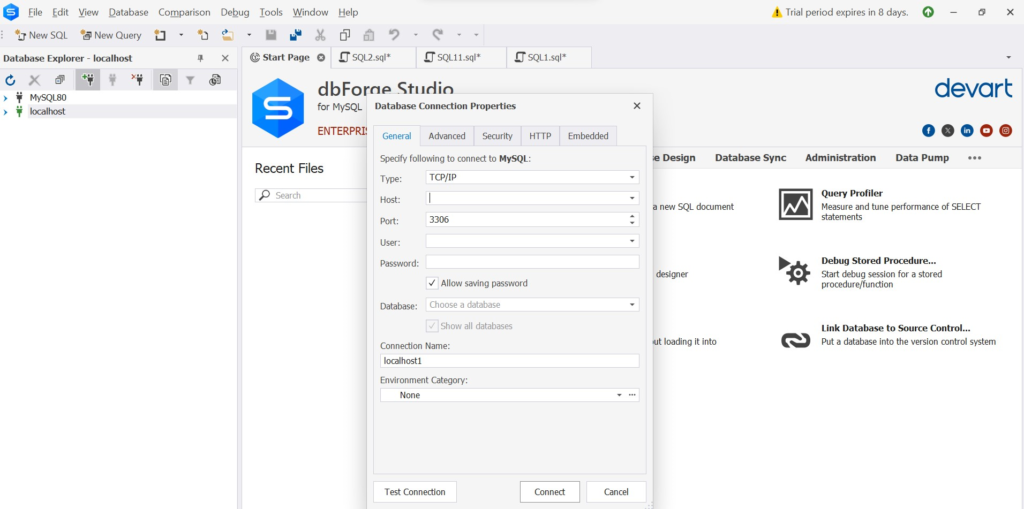
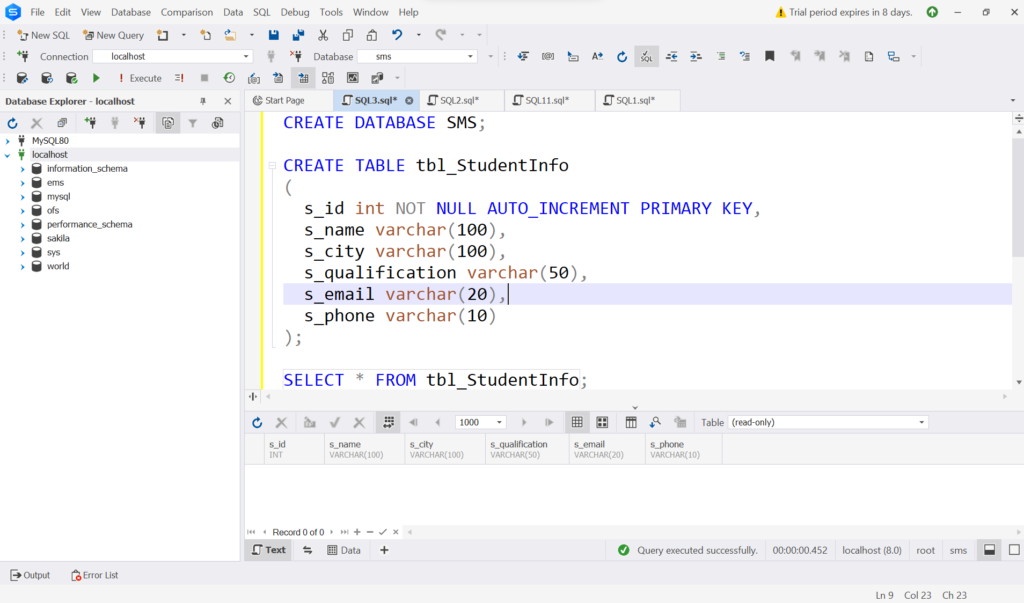
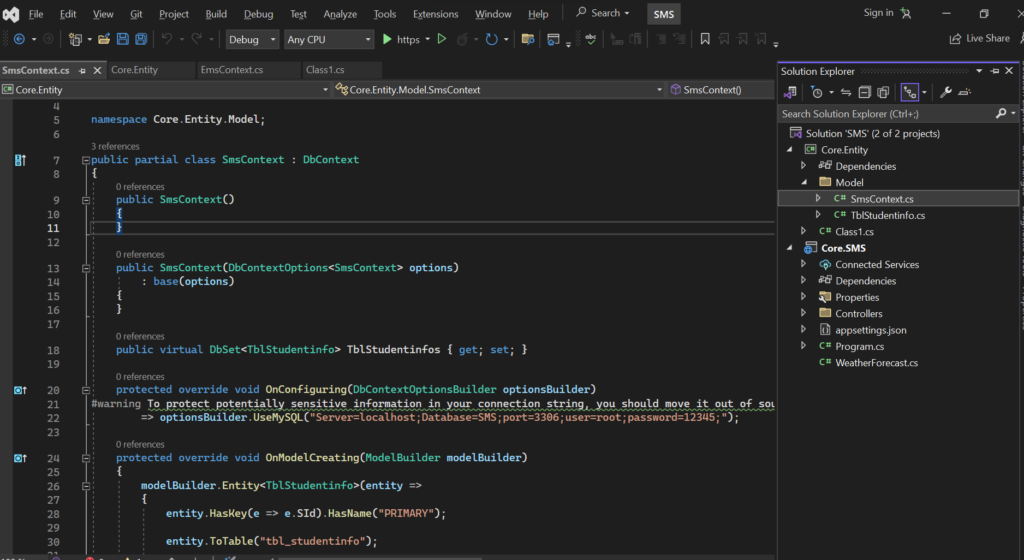
PM> Scaffold-DbContext “Server=localhost;Database=SMS;port=3306;user=root;password=12345;”MySql.EntityFrameworkCore -OutputDir Model -Project “Core.Entity” -Tables tbl_StudentInfo -f
Here you can see SmsDbContext has been created in Model folder under the Core.Entity Project
Now remove the Connection String from here and place it into appsetting.json in Core.Entity
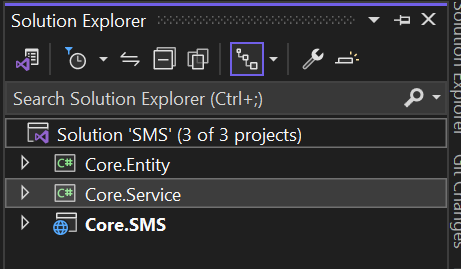
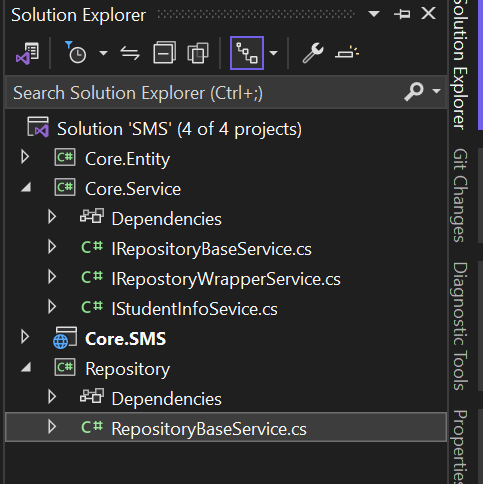
Step 13: Next we have to implement the interface inside the Repository Class Library. Create RepositroyBaseService class inside the SMS project solution.
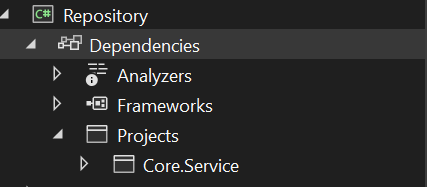
Add project reference Core.Service to Repository.
Implement IRepositoryBaseService interface in RepositoryBaseService class that is Abstract class.
using Core.Entity.Model;
using Core.Service;
using Microsoft.EntityFrameworkCore;
using System.Linq.Expressions;

namespace Repository
{
    public abstract class RepositoryBaseService<T> : IRepositoryBaseService<T> where T : class
    {
        private SmsContext _context;
        public RepositoryBaseService(SmsContext context)
        {
            _context = context;
        }

        public IQueryable<T> GetAllRecords() {
            return  _context.Set<T>().AsNoTracking();
        }
        public IQueryable<T> GetFilterRecords(Expression<Func<T, bool>> expression)
        {
            return _context.Set<T>().Where(expression).AsNoTracking();
        }
        public void CreateRecord(T entity)
        {
            _context.Set<T>().Add(entity);
        }
        public void UpdateRecord(T entity)
        {
            _context.Set<T>().Update(entity);
        }
        public void DeleteRecord(T entity)
        {
            _context.Set<T>().Remove(entity);
        }
    }
}
Step 14: Add new class StudentInfoService to implement RepositoryBaseService and IStudentInfoSevice interface inside the Repository.
using Core.Entity.Model;
using Core.Service;
using Microsoft.EntityFrameworkCore;

namespace Repository
{
    public class StudentInfoService : RepositoryBaseService<TblStudentinfo>,IStudentInfoSevice
    {
        public StudentInfoService(SmsContext smsContext):base(smsContext)
        {

        }
       public IEnumerable<TblStudentinfo> GetStudentInfos()
        {
            return GetAllRecords().OrderBy(m => m.SName).ToList();
        }
       public IEnumerable<TblStudentinfo> GetStudentInfoByCondition(Guid SId)
        {
            return GetFilterRecords(m => m.SId.Equals(SId)).ToList();
        }
       public void CreateStudent(TblStudentinfo entity)
       {
            CreateRecord(entity);
       }
       public void UpdateStudent(TblStudentinfo entity)
       {
            UpdateRecord(entity);
       }
       public void DeleteStudent(TblStudentinfo entity)
       {
            DeleteRecord(entity);
       }
    }
}
Step 15 : Now Create RepositoryWrapperService to implement IRepostoryWrapperService.
using Core.Entity.Model;
using Core.Service;
using System;
using System.Collections.Generic;
using System.Linq;
using System.Net.NetworkInformation;
using System.Text;
using System.Threading.Tasks;

namespace Repository
{
    public class RepositoryWrapperService : IRepostoryWrapperService
    {
        private SmsContext context;
        private IStudentInfoSevice studentInfo;
        public RepositoryWrapperService(SmsContext smsContext)
        {
            context = smsContext;
        }

        public IStudentInfoSevice studentInfoSevice
        {
            get
            {
                if(studentInfo == null)
                {
                    studentInfo = new StudentInfoService(context);
                }
                return studentInfo;
            }
        }
    }
}
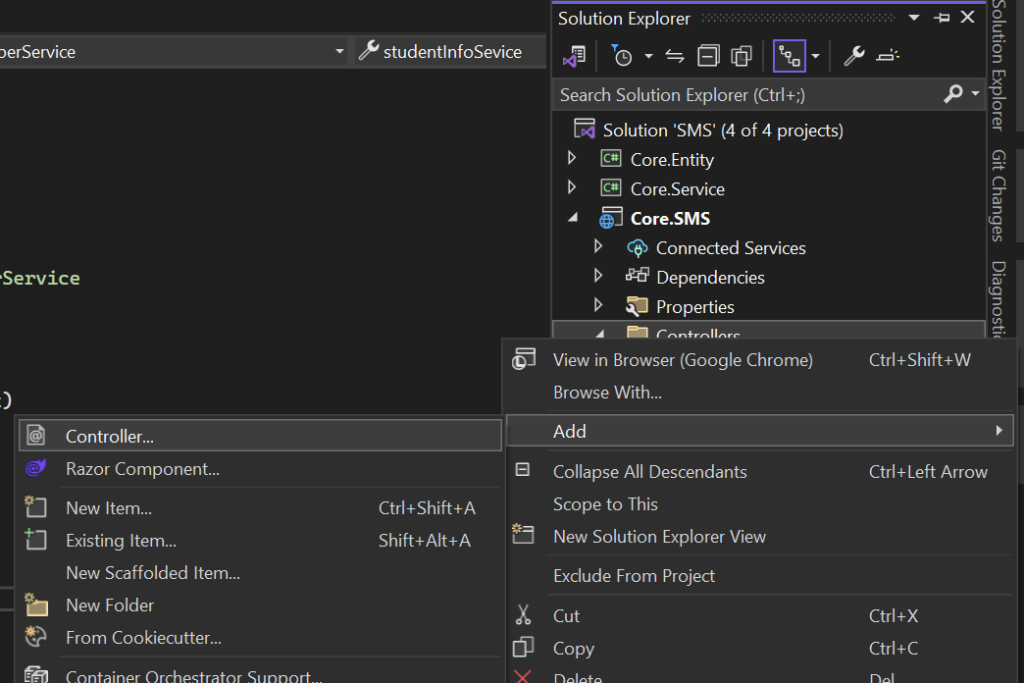
Step 16 : Create Controller under the Core.SMS Project file.
Right click on Controller folder => Add=>Controller
Under the Common section select API => select API controller-Empty => Click Add
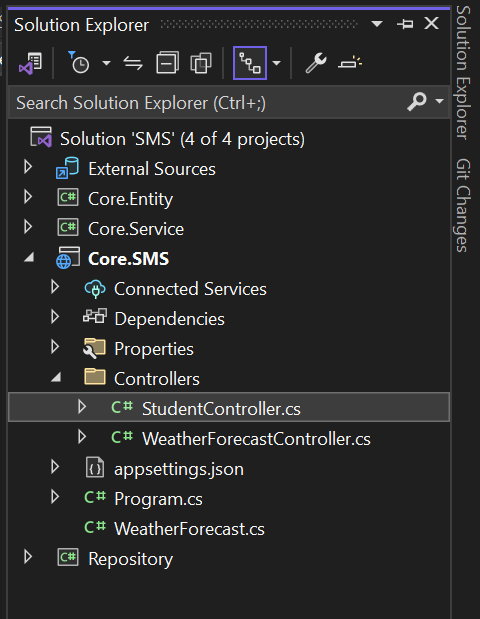
Rename the ValueController to StudentController.
Add Core.Service project reference to Core.SMS Project.
Now get all student records :
using Microsoft.AspNetCore.Http;
using Microsoft.AspNetCore.Mvc;
using Core.Service;
using Core.Entity.Model;
namespace Core.SMS.Controllers
{
[Route("api/[controller]")]
[ApiController]
public class StudentController : ControllerBase
{
private IRepostoryWrapperService _repostoryWrapperService;
private SmsContext SmsContext;
public StudentController(IRepostoryWrapperService repostoryWrapperService, SmsContext smsContext)
{
_repostoryWrapperService = repostoryWrapperService;
SmsContext = smsContext;
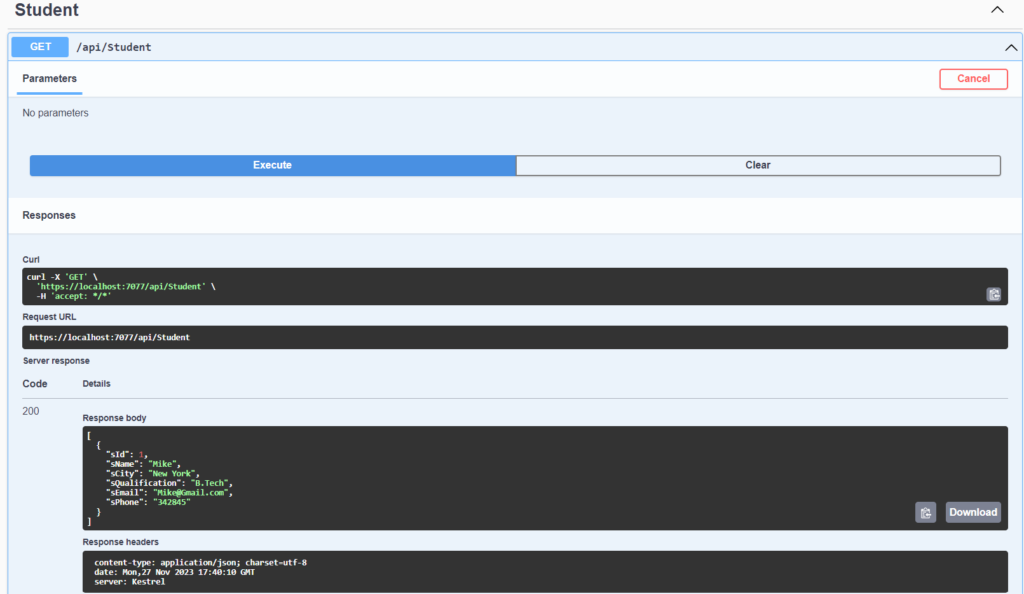
}[HttpGet]
public IActionResult GetStudentInfos()
{
var students = _repostoryWrapperService.studentInfoSevice.GetAllRecords();
return Ok(students);
}
}
}
Step 17: Go to Program.cs class to register IRepostoryWrapperService and RepositoryWrapperService. No need to register all the Services because here WrapperService work as a parent service.
Configure your connection string in Program.cs
var connectionString = builder.Configuration[“ConnectionStrings:SMSConnection”]; builder.Services.AddDbContext<SmsContext>(option => option.UseMySQL(connection));
Lifecycle
Transient :- Transient objects are always different, a new instance is provided to every controller and every service.
Scope :- A scope is typically associated with a single HTTP request. The same instance is shared within the same scope, but different scopes will have different instances.
Singleton :- A Singleton objects are the same for every object and every request.
using Core.Entity.Model;
using Core.Service;
using Microsoft.EntityFrameworkCore;
using Repository;
var builder = WebApplication.CreateBuilder(args);
var connectionString = builder.Configuration["ConnectionStrings:SMSConnection"];
builder.Services.AddDbContext<SmsContext>(option => option.UseMySQL(connectionString));
// Add services to the container.
builder.Services.AddScoped<IRepostoryWrapperService, RepositoryWrapperService>();
//builder.Services.AddScoped<IStudentInfoSevice, StudentInfoService>();
//Add Controller
builder.Services.AddControllers();
// Learn more about configuring Swagger/OpenAPI at https://aka.ms/aspnetcore/swashbuckle
builder.Services.AddEndpointsApiExplorer();//Set Cors Policy
builder.Services.AddCors(options =>
{
options.AddPolicy("CorsPolicy",
builder => builder.AllowAnyOrigin()
.AllowAnyMethod()
.AllowAnyHeader());
});
//Add Swagger Functionality
builder.Services.AddSwaggerGen();
var app = builder.Build();
// Configure the HTTP request pipeline.
if (app.Environment.IsDevelopment())
{
app.UseSwagger();
app.UseSwaggerUI();
}
app.UseHttpsRedirection();
app.UseAuthorization();
app.MapControllers();
//Allow Cors
app.UseCors("CorsPolicy");
app.Run();
Execute your API and See the Result:
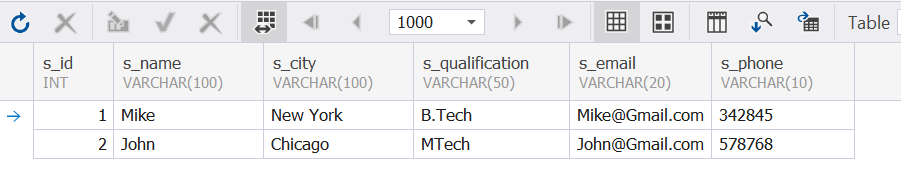
Now Add Student information to tbl_StudentInfo table:
In this Article, We will discuss about Asp.net Core Web Api. After reading this article you will completely aware with Web Api. At the end of the topics some interview Q&A are available.
Let’s Start :
Topics that will cover in this article is mentioned below :
What is API?
Why Web Api is popular than previous Api ?
Why Web Api is required?
How to create Web Api in Asp.net Core?
What is API ?
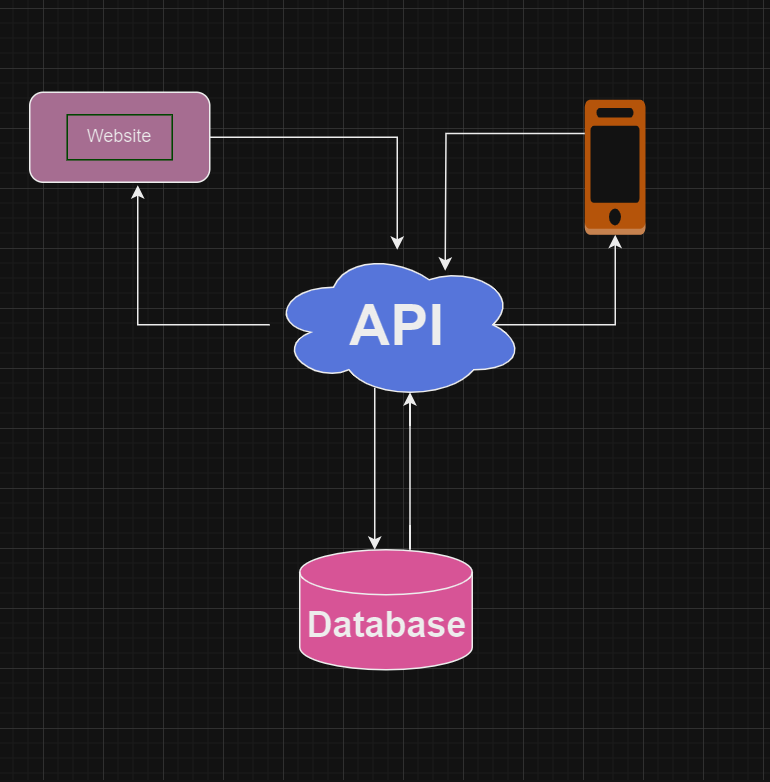
Application Programming Interface(API) is an intermediate software agent used to communicate between more than one applications with the help of HTTP Method.
In above diagram, API is directly connected with database and Web application or Mobile Application connected with the API. API can take the request from multiple source (Web Browser, Phone Devices or Google devices) and passes all request to the Database(SQL, MySQL, Oracle, NoSQL, MongoDb etc..) . Database process the request and passes response to the API. Now API get the response and provides the result to requesting devices.
Why Web API is popular than other API ?
Web API supports various formats like JSON, XML, BSON and url-encoded data. User just need to pass content-type to get expected result format otherwise by default Web API return result in XML format.
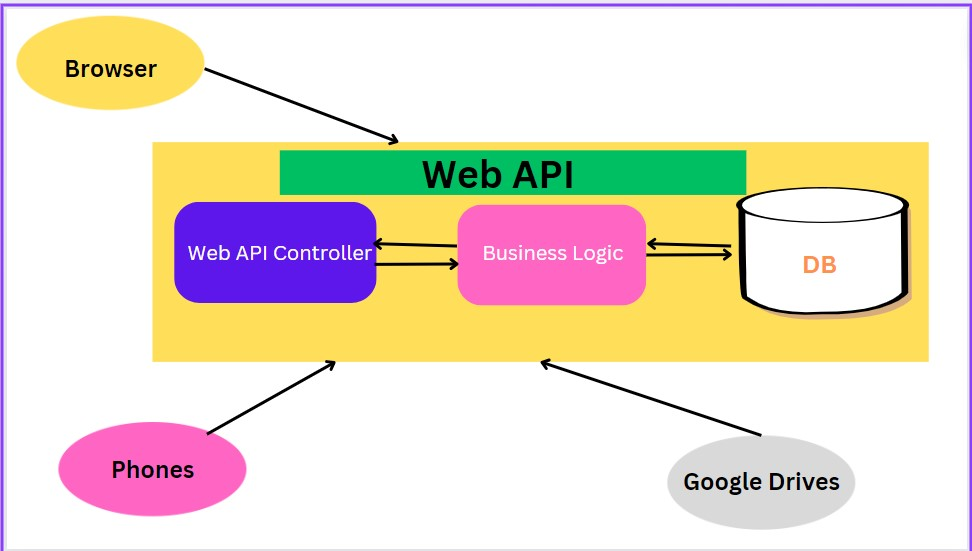
Web API use model-view-controller(MVC) architecture that allows better separation of concern that means it keep’s separate data access layer(DAL) from business access layer(BAL);
How to Get JSON Result ?
GET http://localhost:15192/api/customer/1 HTTP/1.1 User-Agent: Fiddler Host: localhost:15154 Content-Type: application/json
How to Get XML Result?
GET http://localhost:15192/api/customer/1 HTTP/1.1 User-Agent: Fiddler Host: localhost:15154 Content-Type: application/xml
How to Get BSON Result ?
GET http://localhost:15192/api/customer/1 HTTP/1.1 User-Agent: Fiddler Host: localhost:15154 Content-Type: application/bson
How to Get URL-Encoded Data ?
GET http://localhost:15192/api/customer/1 HTTP/1.1 User-Agent: Fiddler Host: localhost:15154 Content-Type:application/x-www-form-urlencoded
Why Web API Required ?
As we discussed, the user wants to access the result from different-2 devices like web browser, mobile, google devices etc. Here, Web API is works as a centralized services that takes request from multiple platform and passes the corresponding output.
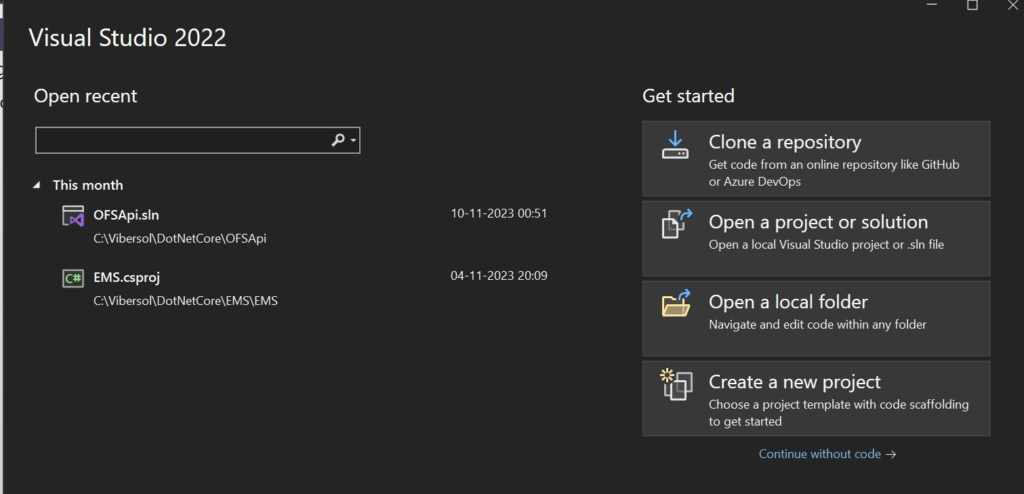
Step 2 : Open Visual Studio => Create a new project
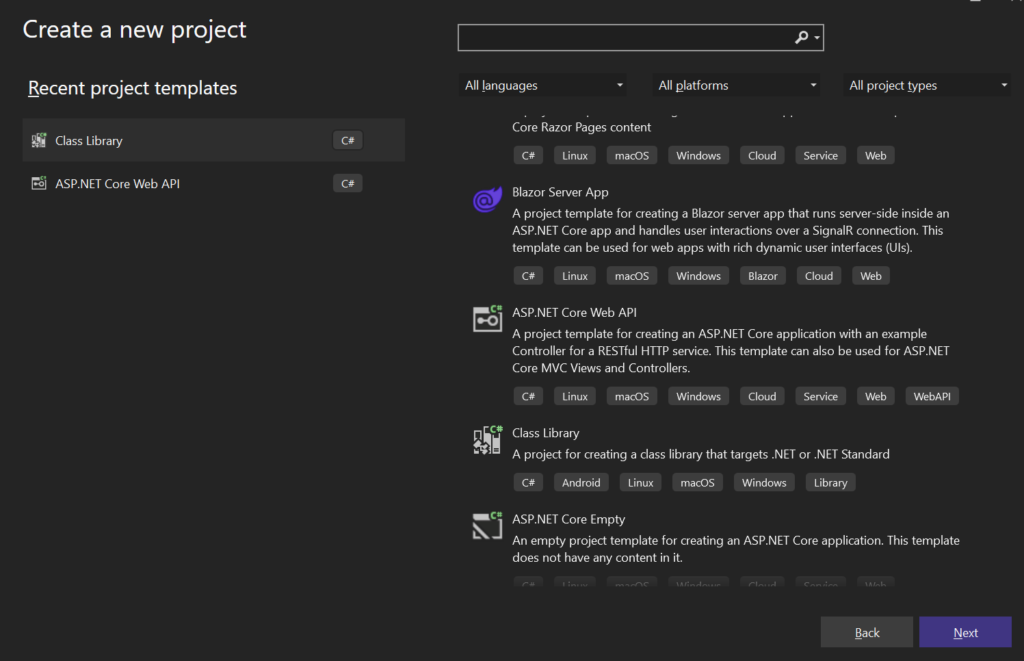
Step 3 : Select ASP.NET Core Web API => Click Next
Step 4: Configure your new project
Project Name : Enter your project name
Location: Browse your path where you want to save the project.
Solution Name : Enter the name of the solution where entire projects will store. By Default Project name and Solution name is same.
Step 5: Additional Information
Framework : Select Target Framework.
Authentication Type: None, Microsoft Identity Platform, Windows.
None : No authentication Required.
Microsoft Identity Platform : Authenticate with Microsoft Azure Active Directory. Azure AD creates and manages credentials that help enterprise user sign-in and access both internal and external resources.
Window Authentication: Users are authenticate with the help of Operating System. It is useful in intranet application where user are in the same domain.
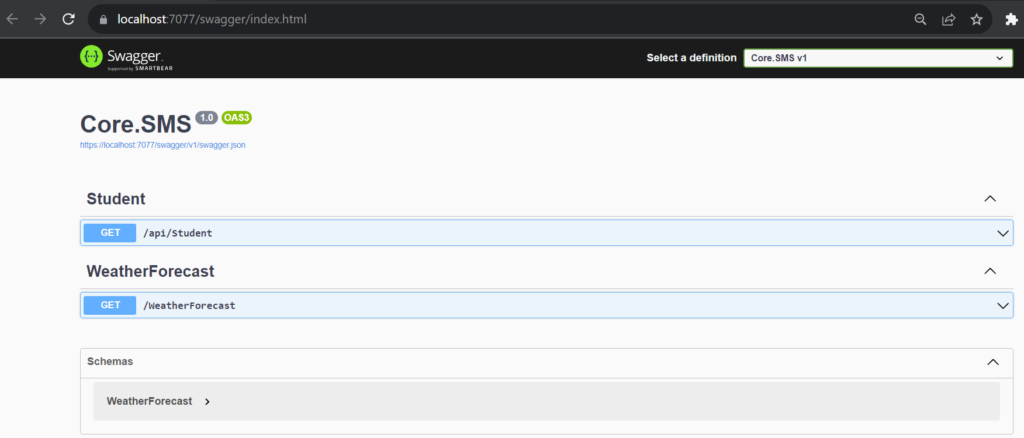
Step 6: By Default Microsoft has created one API(WeatherForecast). You can see the project structure:
Step 7: Lets execute(F5) the API without making any changes.
By Default Weather API is executed with the help of Swagger. It is an open source software tool to design, build and use RESTFul web api. Generally Web Api uses HTTP VERBS for (Create, Read, Edit and Delete) operation.
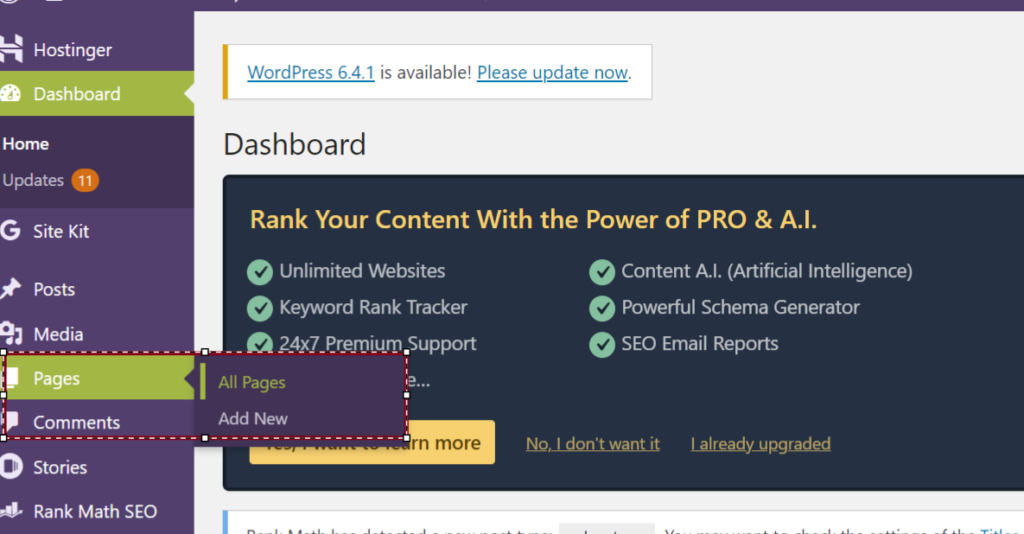
If you are blogger and get confused which option Page or Post have to choose to publish your article.
In this article we will explain you when you can choose Page and when choose Post.
In Content Management System(CMS) like WordPress, the term “PAGE” and “POST” refer 2 different type of content. Here are the key differences between page and posts:
In the context of websites, particularly those built on content management systems (CMS) like WordPress, the terms “page” and “post” refer to two different types of content. Here are the key differences between pages and posts:
Pages:
Static Content: Pages are typically used for static means in rear case it would be change otherwise it will remain same. Common Example are About Us, FAQ, Terms and Conditions, unchanging content.
Hierarchy: Pages are often organized hierarchically, creating a structured navigation system. For instance, you might have a main page like “Services” with subpages for specific services.
Navigation Menu: Pages are commonly added to the main navigation menu of a website, providing easy access for users.
No Time Sensitivity: Pages are not time-sensitive, meaning they don’t have a publication date and are not typically associated with a specific time or date.
Independent of Categories and Tags: Pages are not categorized or tagged like posts. They exist independently of these organizational elements.
Custom Templates: In many CMS, pages can have custom templates applied to them, allowing for more design flexibility.
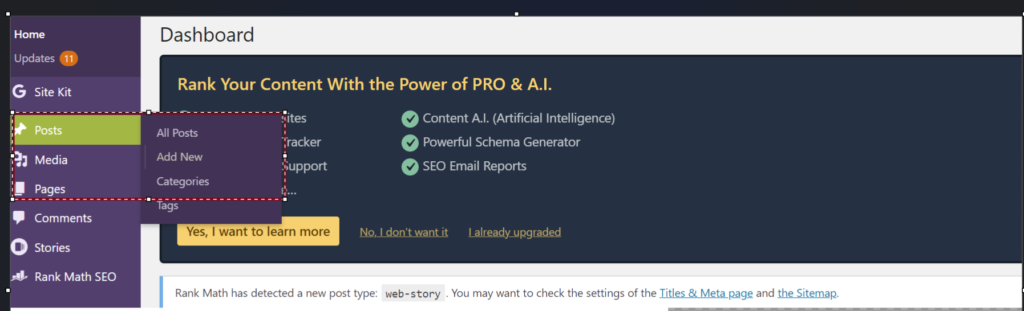
POSTS :
Dynamic Content: Posts are used for dynamic content that is regularly updated and may have a time-sensitive nature. Examples include blog posts, news articles, or any content that is added chronologically.
Categories and Tags: Posts are often categorized and tagged, making it easier for users to find related content. Categories help organize posts by topic, while tags provide more specific metadata.
Archives and RSS Feeds: Posts are typically included in archives, and their content is often made available through RSS feeds. This is important for readers who want to follow updates on a site.
Comments: Posts are more likely to have a commenting system, allowing readers to engage in discussions about the content.
Publication Date: Posts have a publication date and are displayed in reverse chronological order, with the most recent post appearing first.
May Have Excerpts: Posts may display excerpts on the main blog or archive pages, giving users a preview of the content before clicking through to read the full post.
Now I hope you better understood the basic difference between Page and Post. Pages are more static, to-the-point, “evergreen,” and are designed to be permanently there to stay. Posts are meant to be more transient and informal. And can be seen as a form of outreach to potential new visitors or sharers.
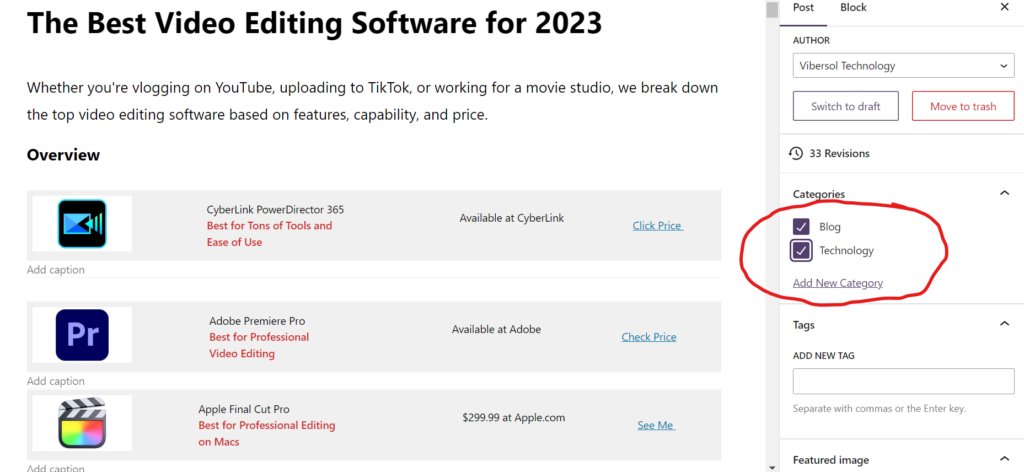
You can add post content into multiple category that you have created.
Whether you’re vlogging on YouTube, uploading to TikTok, or working for a movie studio, we break down the top video editing software based on features, capability, and price.
Overview
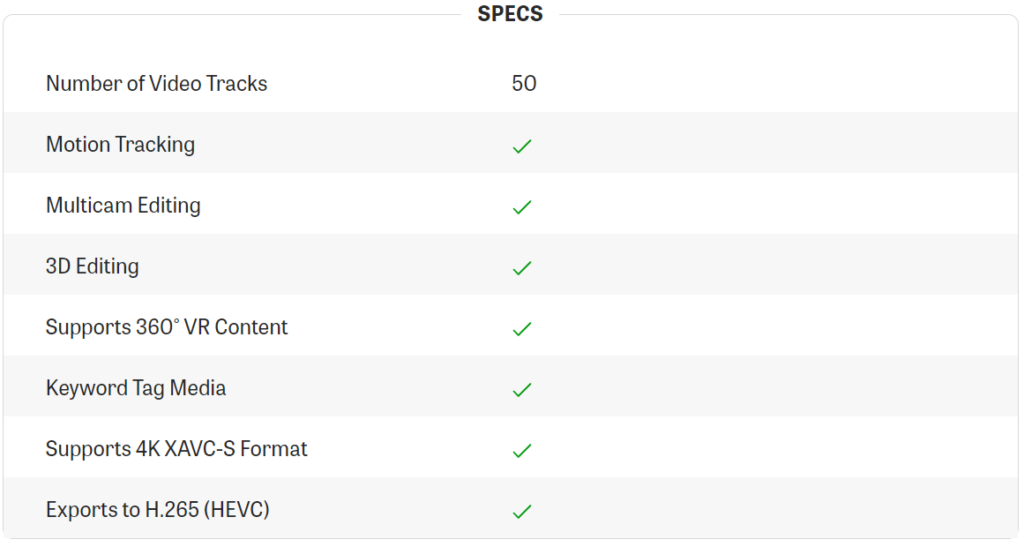
CyberLink PowerDirector 365 Best for Tons of Tools and Ease of Use
There’s nothing like moving images with sound when you want to make a strong impression. That’s why video is more important online than ever, whether on news sites, Instagram or YouTube. Couple that trend with the increasing availability of devices that can shoot high-resolution video—smartphones, GoPros, DSLRs, and mirrorless cameras—and the case for investing in powerful video editing software becomes clear. The best video editing software works for both professionals and hobbyists. It also keeps up with newer formats and supports 4K and higher resolutions.
More and more, we see features trickle down from professional-level software to the consumer category. Multicam editing, motion tracking, and advanced color grading have all made the leap. This trend is a boon to hobbyist movie editors, vloggers, and even people making videos for social media because the software designed for them simplifies procedures that are complex in pro-level apps. Another plus for people who use consumer-grade video editing apps is that they often get features relegated to separate apps in the pro world, like motion graphics, encoding, and color grading.
Below are your best options for video editing software. Read on after the product summaries to find our guide to choosing the best video editing software for your needs.
Our Experts Have Tested 16 Products in the Video Editing Category in the Past Year
Vibersol Tech has tested and rated thousands of products to help you make better buying decisions. See how we test. Table of Contents Best for Tons of Tools and Ease of Use Best for Professional Video Editing Best for Professional Editing on Macs Best for Easy Editing on Macs Best for Stop Motion and Motion Tracking Best for a Powerful Free Version and Pro-Level Tools Best for Fast, Fun Video Editing and Sharing Best for Color Grading and Keyframe Editing Best for Editing on a Budget Best for Digital Scrapbooking Multicam, Motion Tracking, and Yet More Motion Does the Software Support 4K Video? How About 8K? How to Edit Video on a PC Can You Edit Video on a Smartphone? What Are Color Grading and LUTs? Where Is the Action? Titles That Zing Speed Matters in Video Editing What’s the Best Free Video Editing Software? Do You Need 360-Degree VR Support? Audio Editing What About Apple Video Editing Software? What’s Not Here? The Final Shot Compare Specs: Our Picks Side by Side
Deeper Dive: Our Top Tested Picks
CyberLink PowerDirector 365
Best for Tons of Tools and Ease of Use
Why We Picked It
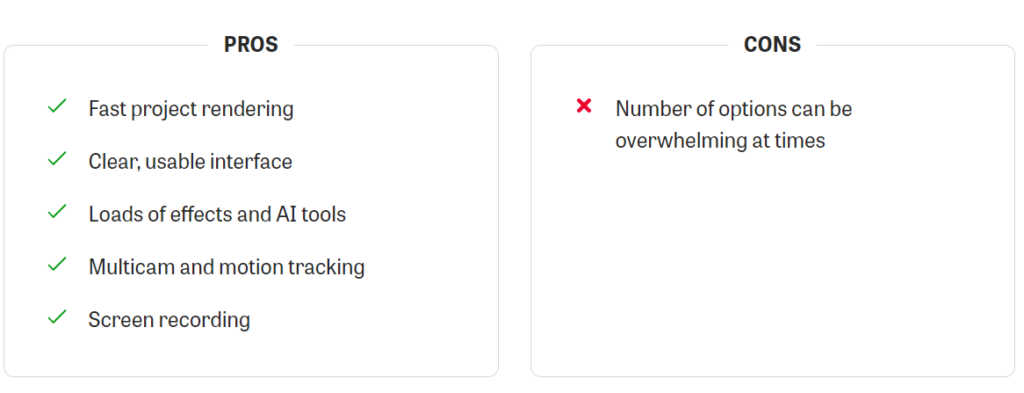
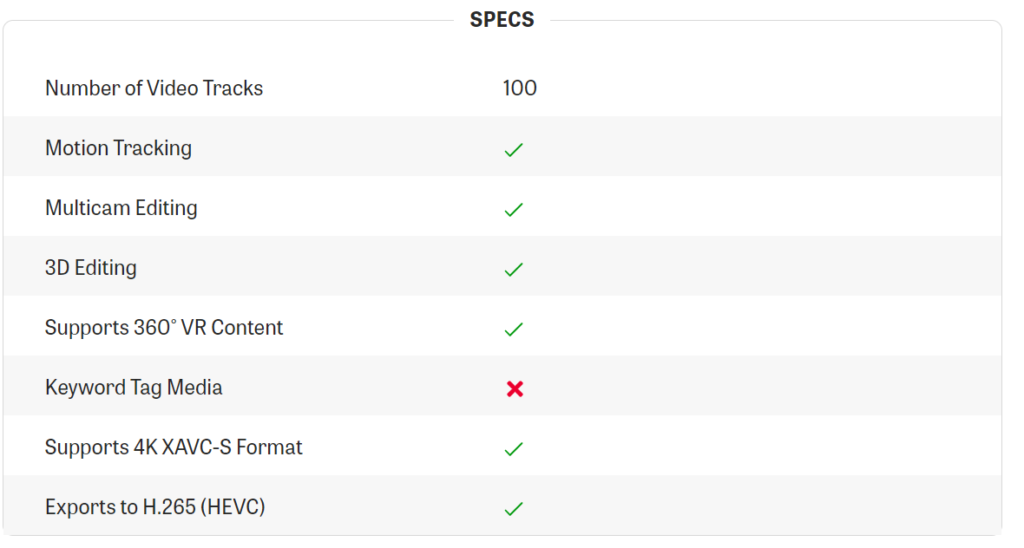
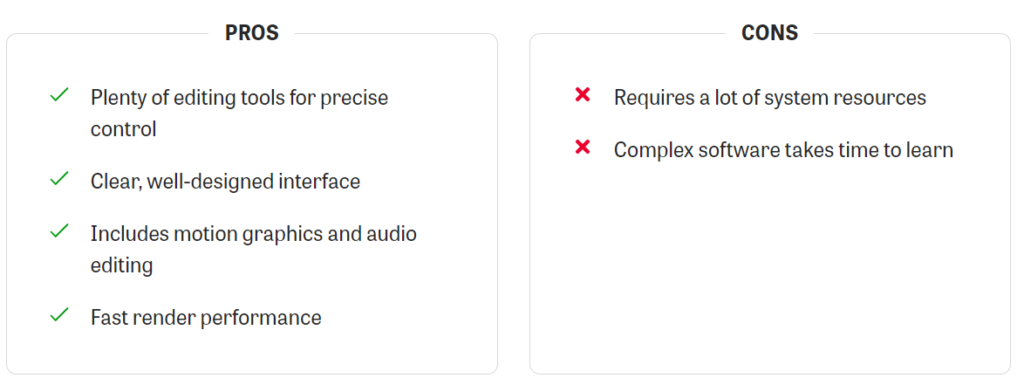
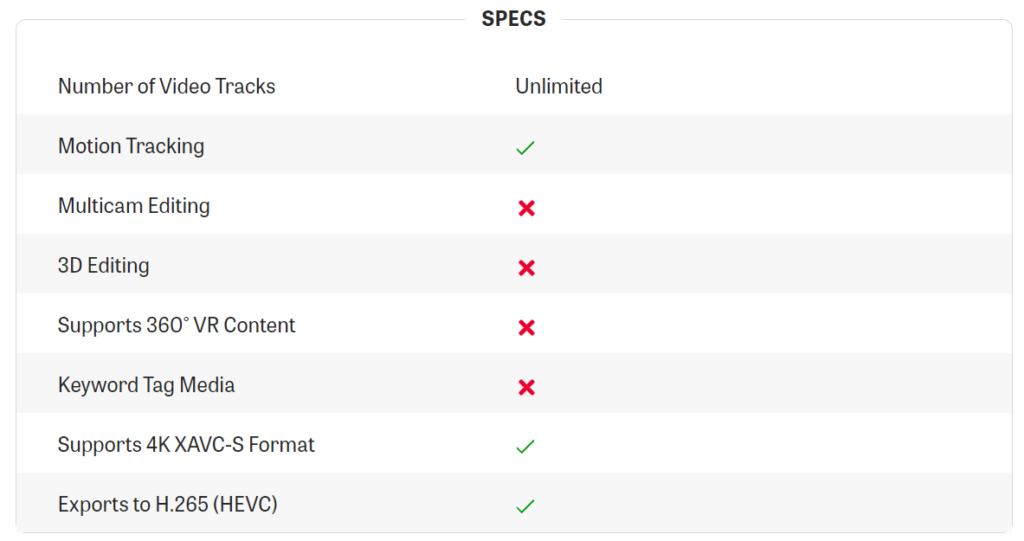
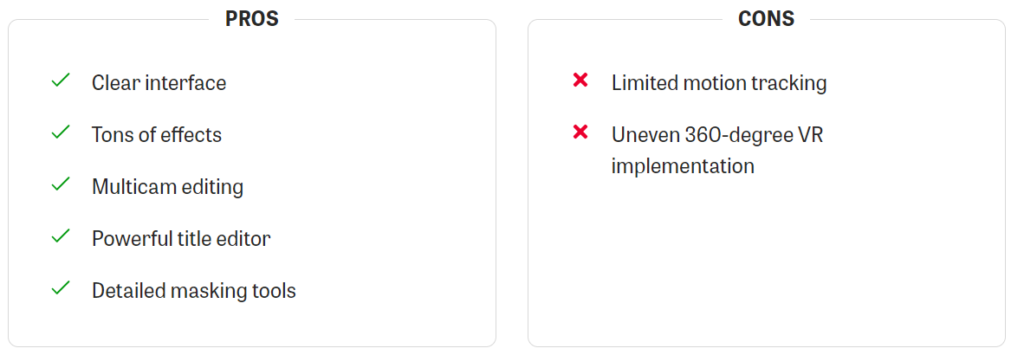
CyberLink has long been an industry leader in speed and support for new video formats and effects, and it’s long been a PCMag Editors’ Choice winner among video editors. Despite its massive feature set, the program interface is clear and not as intimidating as fully pro-level software. It lets you do everything from the simplest clip trimming and joining to VR to multicam to keyframed effects. You can get it either by one-time purchase or subscription.
Who It’s For
PowerDirector is suited to serious video enthusiasts and YouTubers who want to do the most with their clips without needing a degree in film. Even professionals may find that it has everything they need.
Adobe Premiere Pro
Best for Professional Video Editing
Why We Picked It
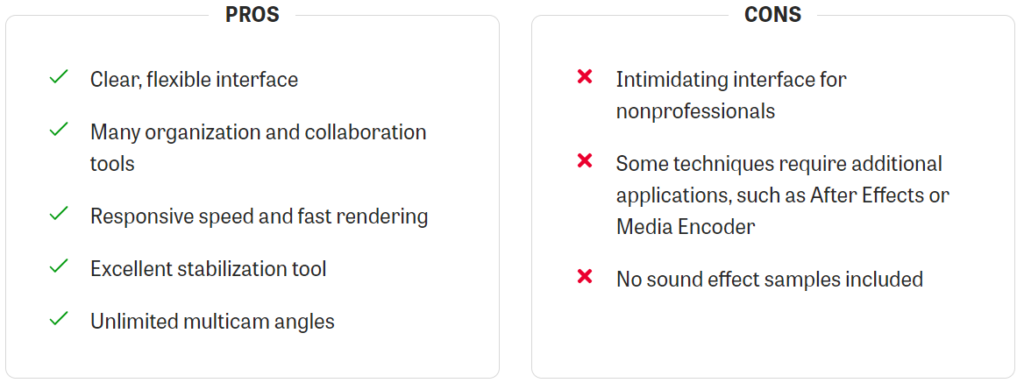
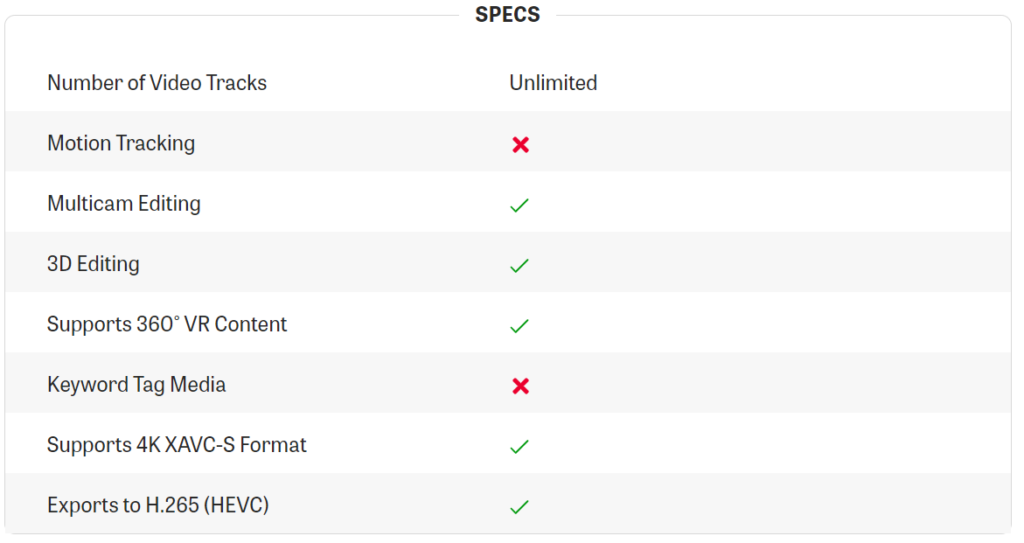
Premiere Pro is an industry standard among professional video editing applications, coming from the leader in creative design software, Adobe. It offers all the effects, color tools, and collaboration and output options any pro could want. Recent updates have added impressive auto-captioning and the ability to edit video based on the text, as well as a new unified Color Manager and collaboration features. The program runs on both macOS and Windows. Premiere Pro is only available by subscription, so the cost is low upfront, but it adds up in the long run. That’s somewhat ameliorated by the frequent and sometimes impressive updates subscribers get.
Who It’s For
As its name suggests, Premiere Pro is for professional video editors. That said, plenty of serious amateurs use and enjoy it. It’s especially strong for those who need to collaborate with others, as well as teams who use Adobe’s Creative Cloud suite of applications.
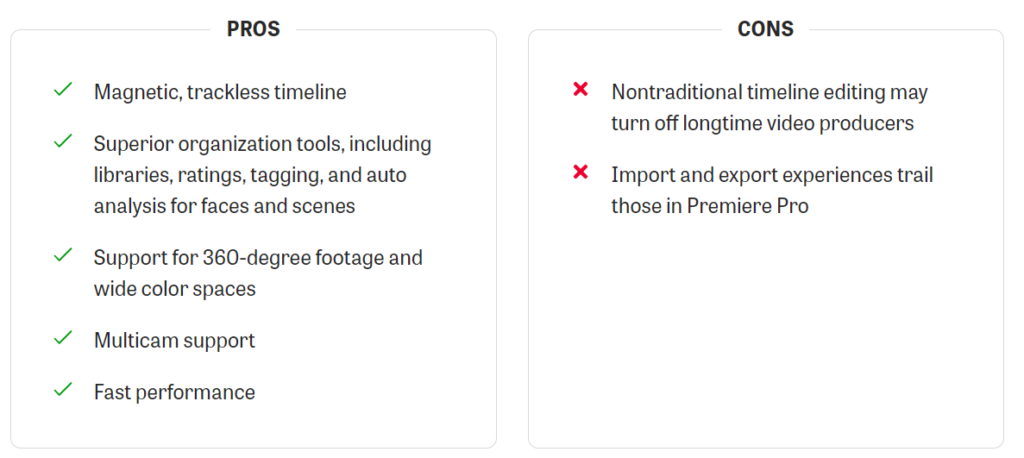
Apple Final Cut Pro
Best for Professional Editing on Macs
Why We Picked It
Final Cut Pro has a rethought, modern interface with a “trackless” timeline. An editor who works in this interface for a while will come to enjoy its flexibility and realize that it offers just as deep a set of tools and capabilities as any app with a more traditional interface. A new iPad version of the app (requiring a $4.99-per-month subscription) dovetails nicely with the desktop application. Also new is an AI-powered Scene Removal Mask tool that removes the background in video without requiring a green screen.
Who It’s For
PROS
As evidenced by the number of top Hollywood movies and shows made in Final Cut Pro, the software is a good fit for professionals, but its usability makes it a fine choice for amateur enthusiasts as well, particularly those wanting to move up from Apple iMovie.
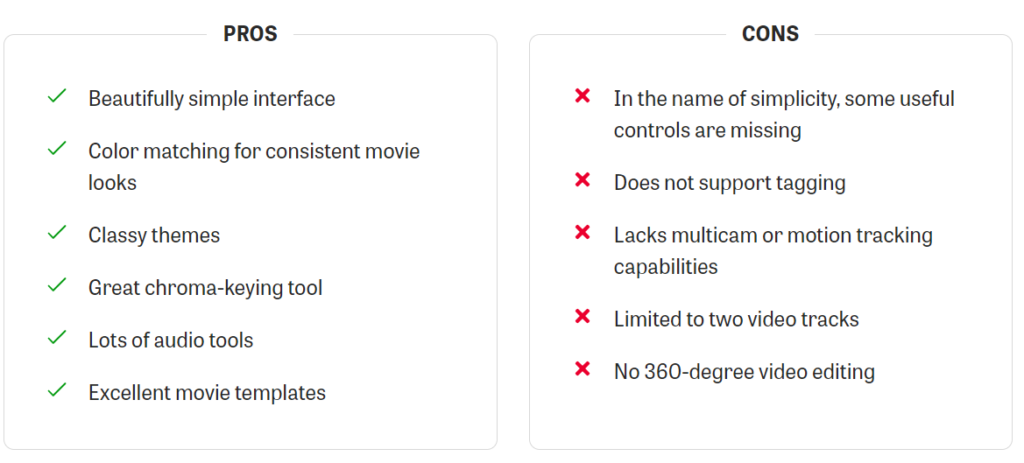
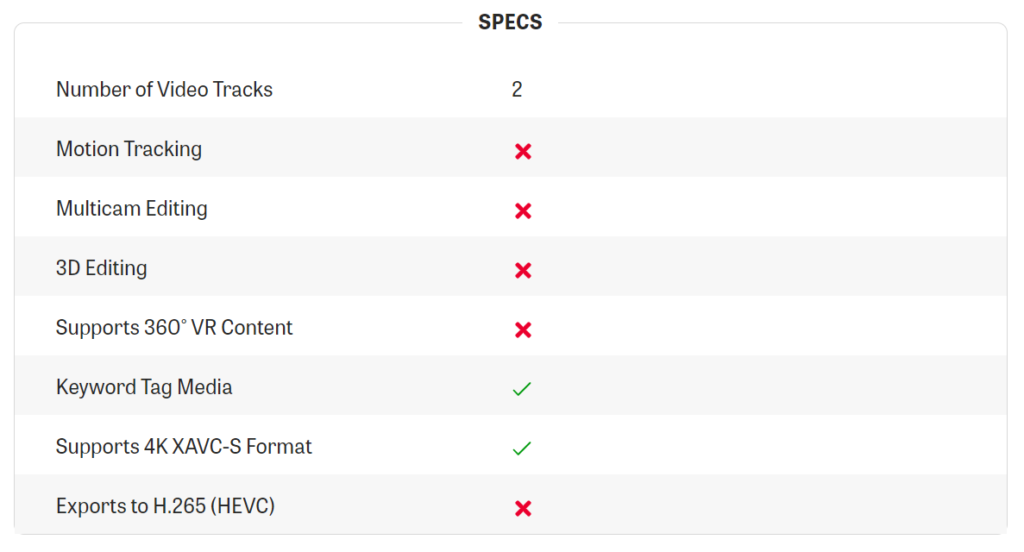
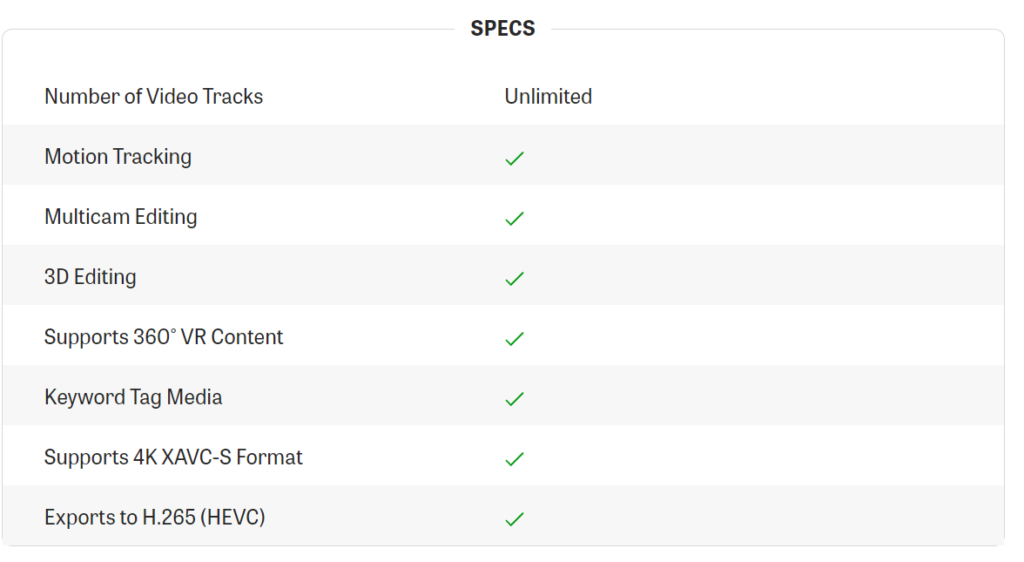
Apple iMovie
Best for Easy Editing on Macs
Why We Picked It
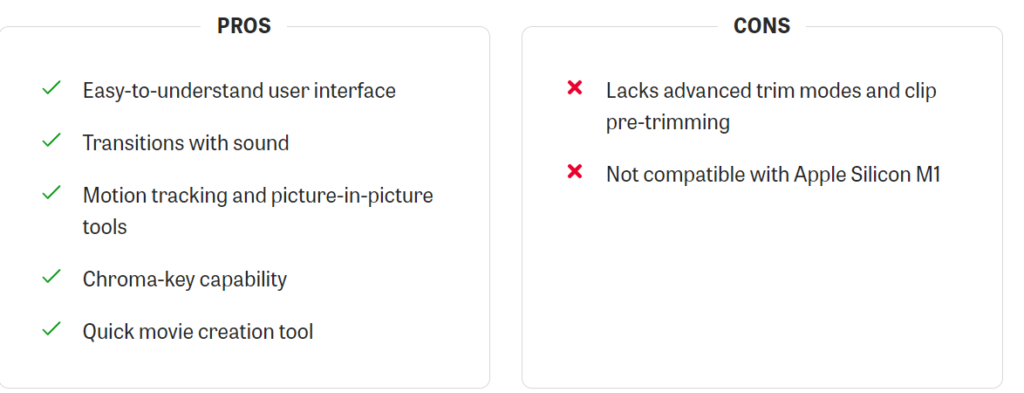
Simplicity joins a generous set of video editing tools in Apple’s entry-level app. We love the new Storyboards features that helps people craft compelling digital movies, rather than leaving them to their own devices. You also get somewhat advanced tools like chroma-keying, picture-in-picture, and audio filters. Moving up to Final Cut Pro from iMovie makes for a smooth transition, too.
Who It’s For
iMovie targets nonprofessionals like people who want to put together a video of that family vacation or Junior’s soccer match. But its Storyboard feature makes it a great starting point for those interested in filmmaking. Of course, it’s only for users of Apple hardware, as with most things Apple.
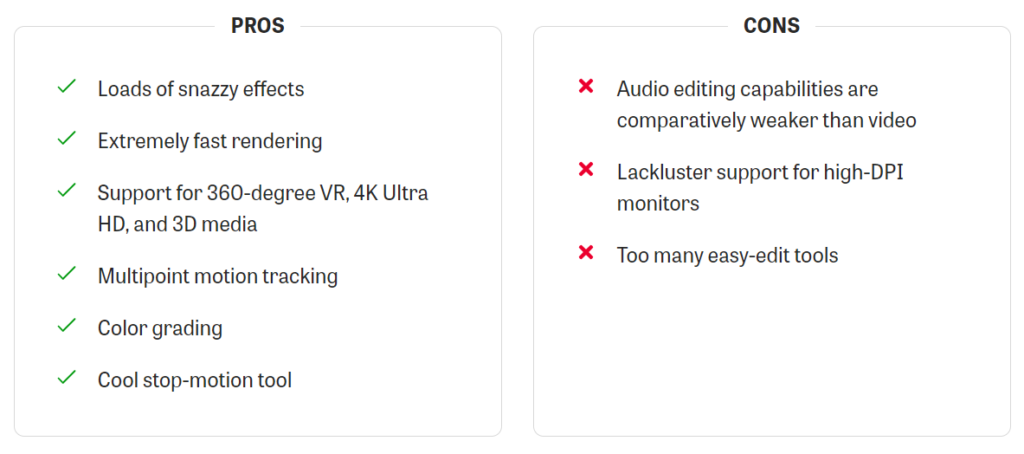
Corel VideoStudio Ultimate
Best for Stop Motion and Motion Tracking
Why We Picked It
Corel first got our attention with its awesome stop-motion tool, and then reinforced that impression by being the first in this group with powerful motion tracking tools. It continues to add useful new tools while delivering fast performance and ease of use.
Who It’s For
VideoStudio is aimed squarely at the amateur videographer, YouTuber, and TikToker. VideoStudio is also a value play, with a reasonable one-time license price.
DaVinci Resolve
Best for a Powerful Free Version and Pro-Level Tools
Why We Picked It
Davinci Resolve is a top-end professional video editing program that, while not the easiest to use, has a full-capability free version, making it appealing to amateurs as well as pros. The node-based editing workflow offers the ultimate in effects control, and the software is replete with keyframing, color grading, and audio tools. It renders video projects with category-leading speed (as long as you select hardware GPU encoding), and the company also makes cameras, consoles, and other hardware that tie in smoothly with the software.
Who It’s For
Resolve targets professional video editors and has been used in may top-of-the-line Hollywood productions, including Avatar, Dune, and Snakes on a Plane. But that’s not to say a determined amateur can’t take advantage of its generous free version and go as deep (or as shallow) into its toolset as they like.
Movavi Video Editor
Best for Fast, Fun Video Editing
Why We Picked It
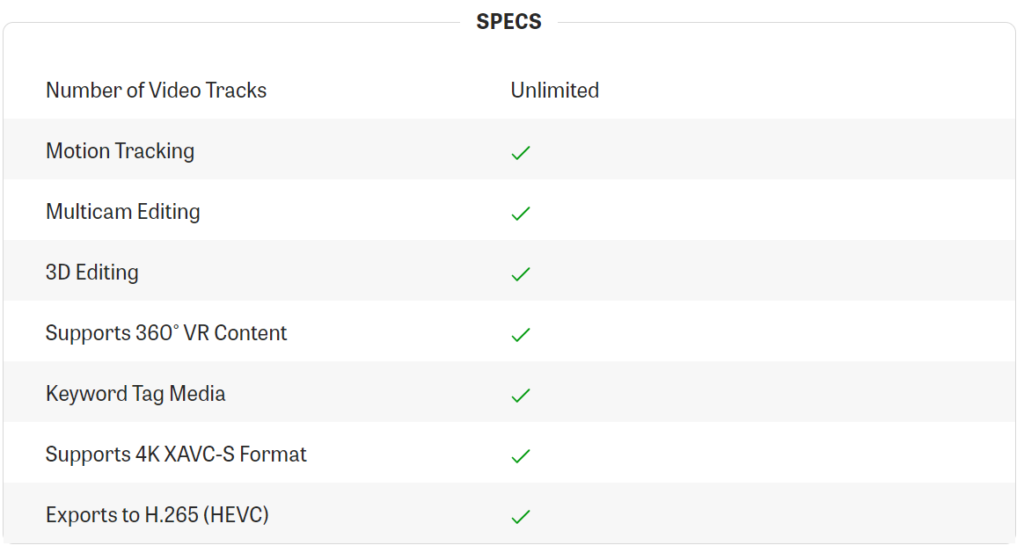
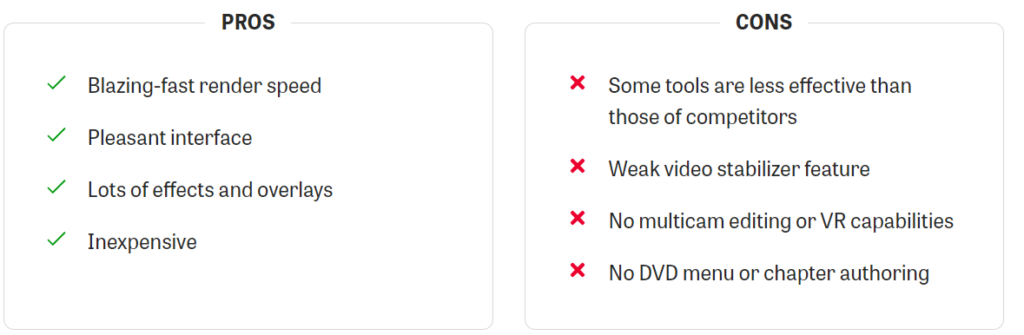
Movavi is hardly a household name in video editing software, but it features a truly pleasing interface housing all the tools hobbyist video editors and YouTubers are likely to want. Good-looking effects and transitions are included as are a selection of soundtrack music. Exporting is among the fastest, and you can directly upload to YouTube or Vimeo. It’s also reasonably priced, with both one-time and subscription options. Versions are available for both macOS and Windows.
Who It’s For
Those just getting into video editing will appreciate Movavi’s clear interface and appealing set of tools for both video and audio. Everyone will appreciate its fast rendering and built-in uploading. It’s also good for those who don’t want to spend a lot of money on video editing software.
Pinnacle Studio Ultimate
Best for Color Grading and Keyframe Editing
Why We Picked It
Pinnacle is a solid and longtime player in the video editing field. It packs a healthy helping of near-pro-level capabilities into a fairly intuitive interface. Pinnacle has mask motion tracking, titling, and great audio tools, among other features. For speed, this snappy video editing software is among the best. You don’t need to pay a subscription, either, though it’s not the lowest-priced option.
Who It’s For
Pinnacle Studio is video editing software for people who want more advanced tools than the company’s consumer-friendly app Corel VideoStudio. If you need mulitcam, keyframing, and the like, it’s a good choice for you. Those who don’t want to pay a subscription will appreciate its one-time pricing.
Wondershare Filmora
Best for Editing on a Budget
Why We Picked It
Filmora is a reasonably priced and easy-to-use video editing app that continues to receive new features. It has nifty features and capabilities, such as color matching, audio-syncing for limited multicam, motion tracking, and speech to text. It’s also a fine performer when it comes to export speed. Versions are available for both macOS and Windows.
Who It’s For
Filmora is for amateurs who want to keep getting new effect ideas for their videos but don’t want to dig into the weeds of a Premiere Pro or DaVinci Resolve. It’s available as either an annual subscription or a reasonably priced perpetual license.
GET IT NOW
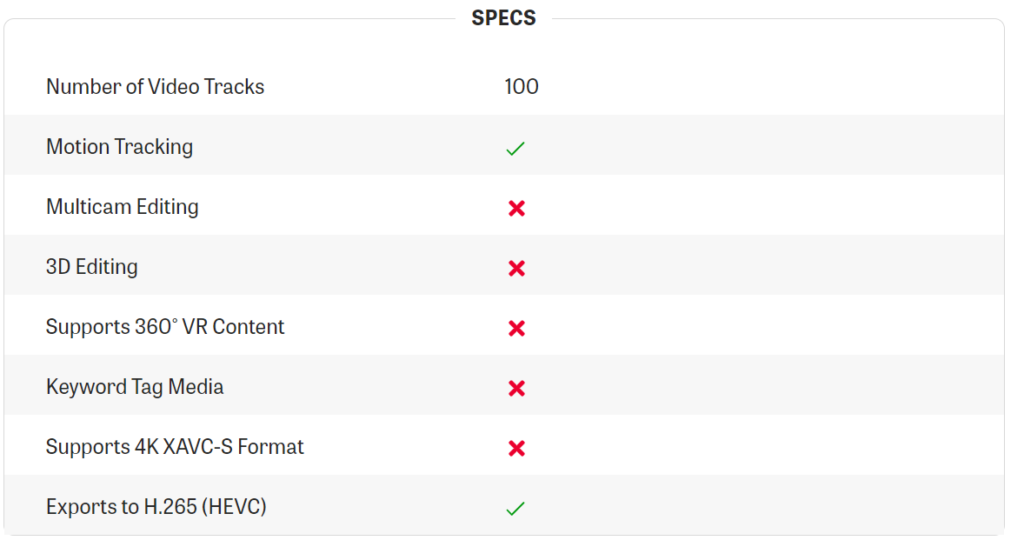
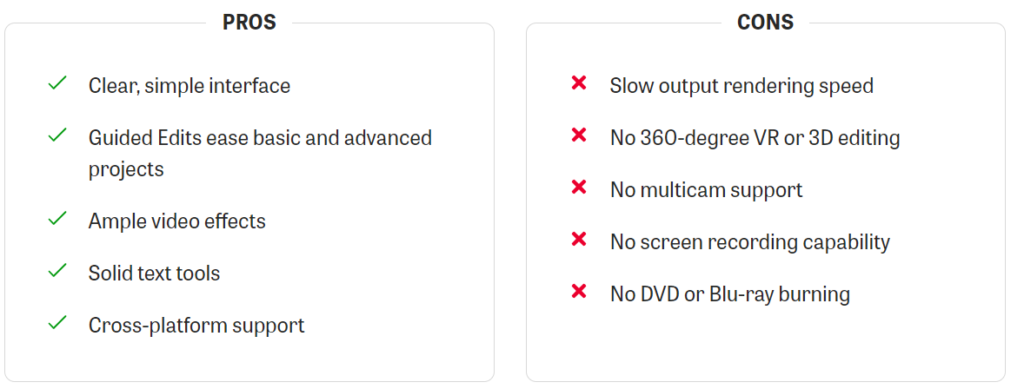
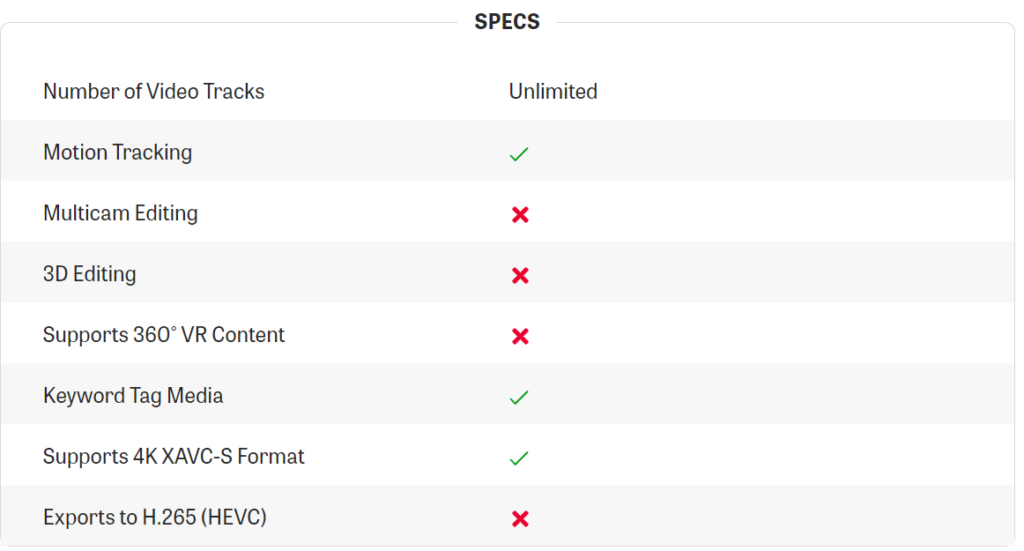
Adobe Premiere Elements
Best for Digital Scrapbooking
Why We Picked It
Premiere Elements makes it easy to achieve a lot of the effects that would be complex in Premiere Pro. The consumer level program contains many of the editing tools of a pro-level application, but it cloaks these in easy-to-use features and Guided Edits. If you want to have some fun with your video without stressing your brain with concepts like timecodes and keyframes, Premiere Elements is a good choice.
Who It’s For
Adobe characterizes the audience for Premiere Pro as “memory keepers”—those members of the family who want to preserve fun outings and events, spiff them up, and share them with friends and family. It’s also for people who don’t want to pay the subscription required by most of Adobe’s other software, while getting a good selection of the features. The software is available for both macOS and Windows.
Want to create beautiful images but feel like you can’t because you’re not artistic or tech-savvy?
With recent developments in AI art generation, you can now create images from scratch using only text input. You don’t need any artistic skills or experience.
It is important to select the right type of AI art generator to create special, legitimate, and sophisticated artwork.
In this article, we’ll be looking at AI art generators. I’ve tried each tool on this list and will share what I think, the images they create, as well as when each would be best to use.
Here’s a list of the best AI Image Generators:
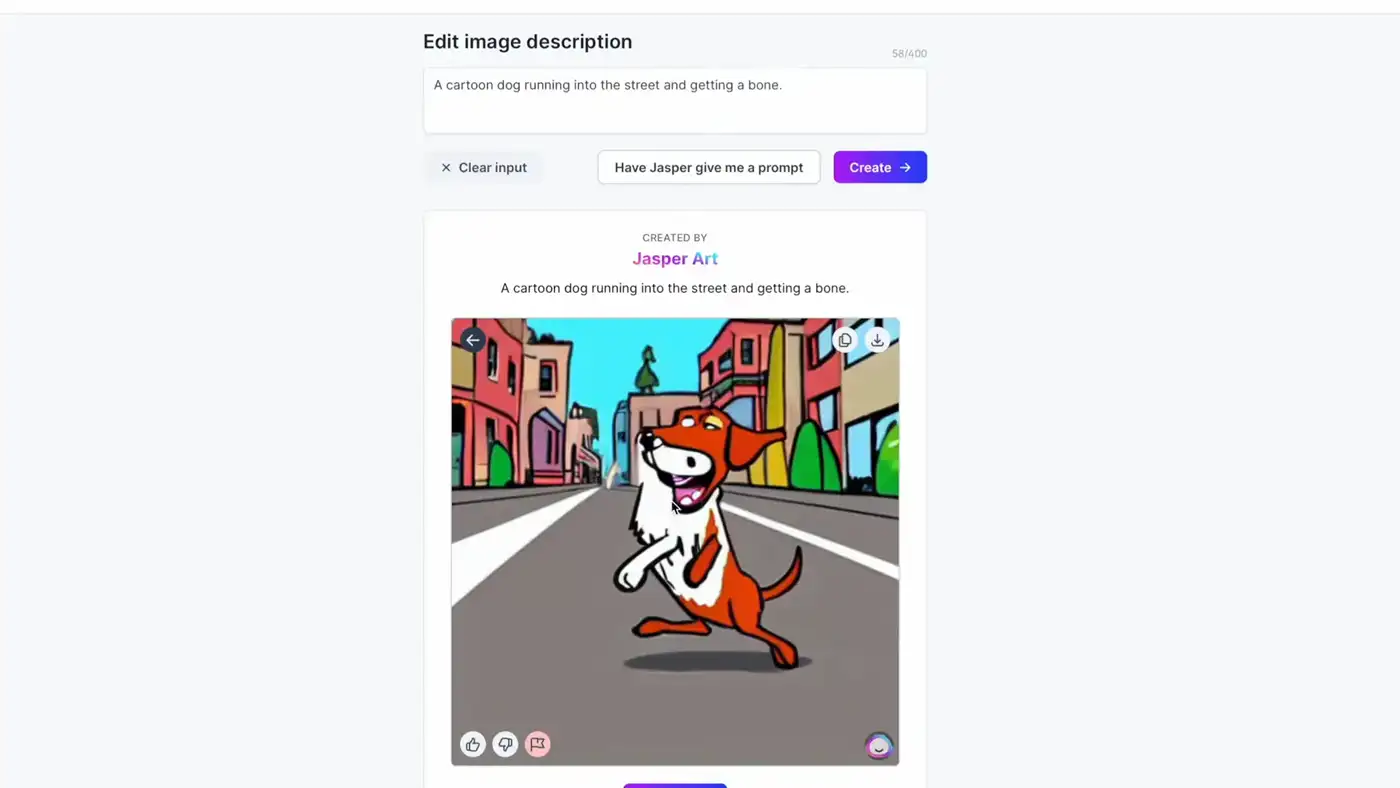
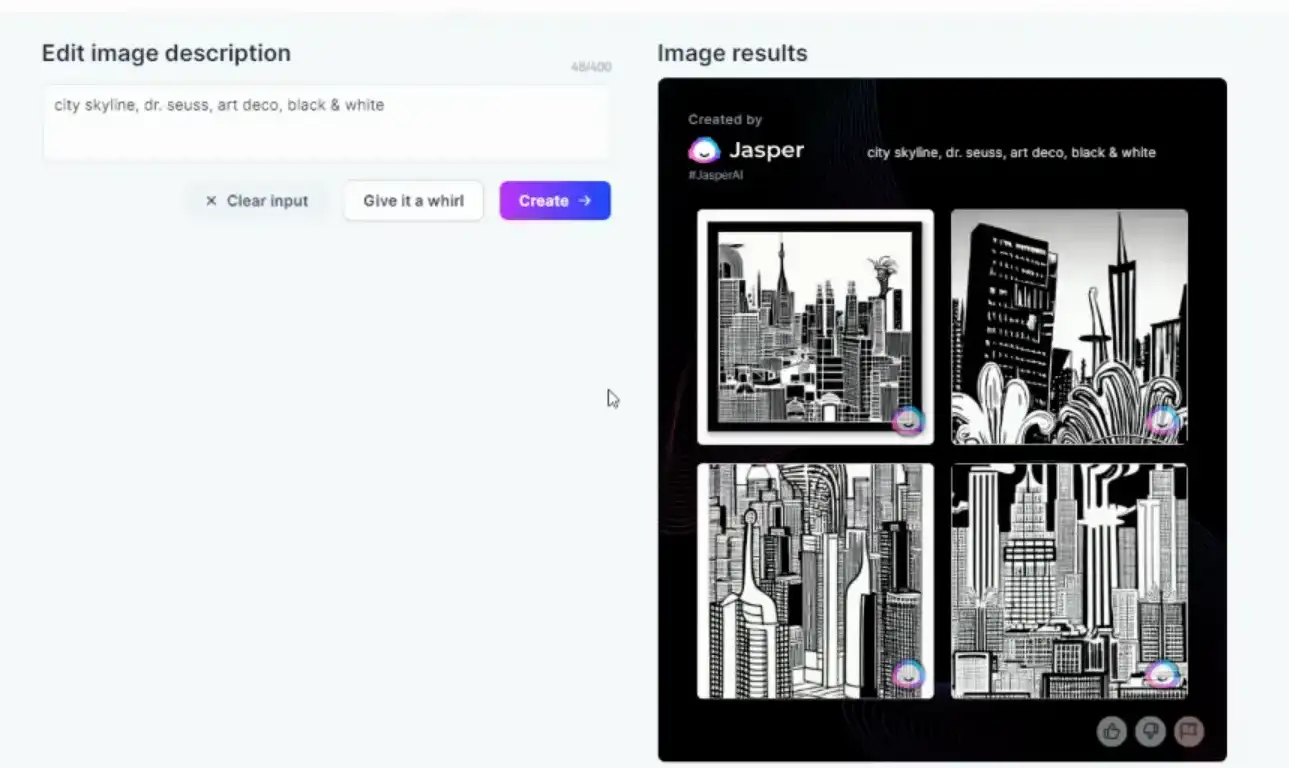
1. Jasper Art
Jasper Art is the best AI art generator tool. Here’s why:
The process is simple. Write some descriptive words in the tool and Jasper Art will generate stunning images as an output.
Make art based on your imagination. You can explore distinct art styles until you find one that works best for you.
It’ll come up with your image for you. Unsure of what kind of image you want? You just need to write some descriptive words into the tool, and it will do the rest by itself.
Originality. It’s the best alternative instead of traditional stock photos.
So if you want to find a good all-in-one AI art generator, try Jasper Art!
The artistic styles of a photo can be aggressive, monochromatic, somber, or cheerful.
The keywords can be ambient, realistic, or high resolution.
If you need help using the tool, there is a support chat you can use.
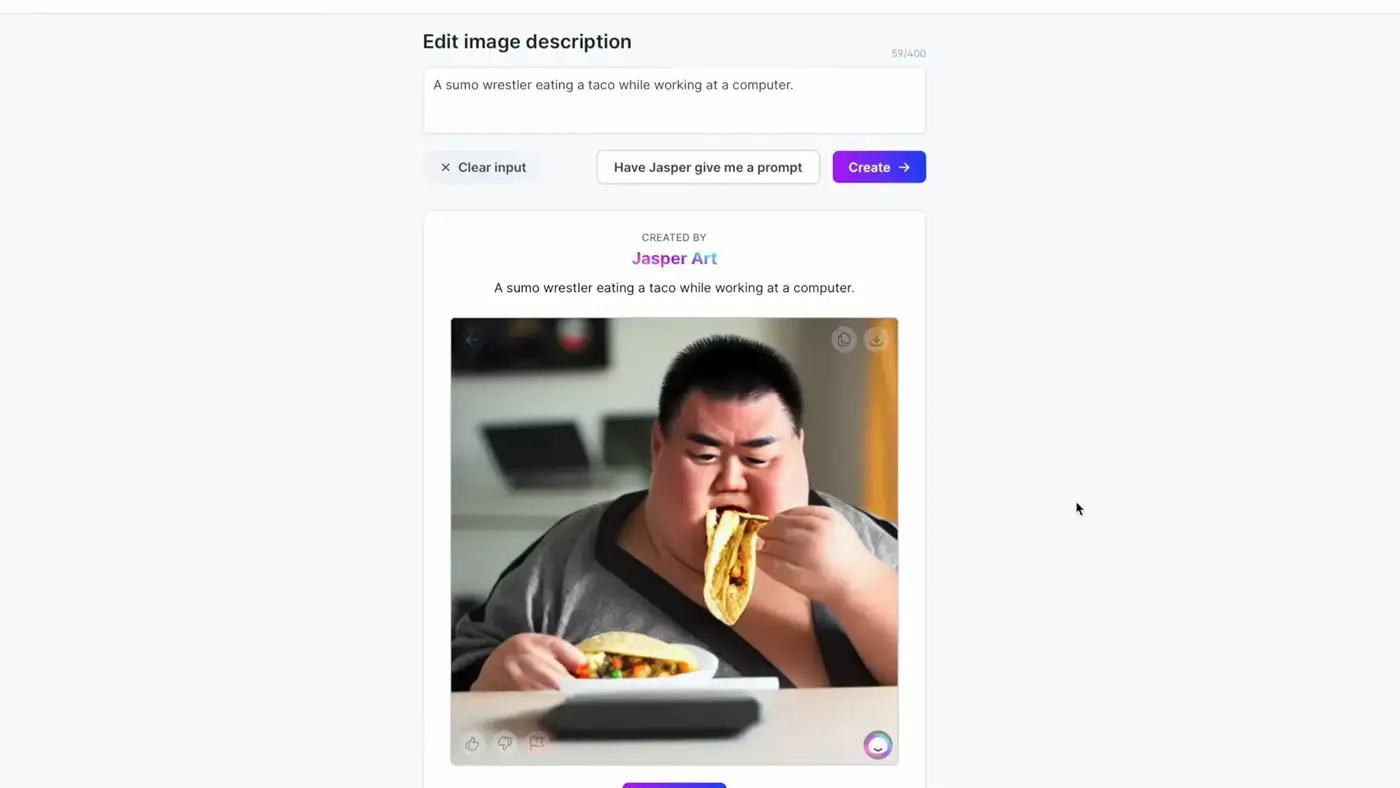
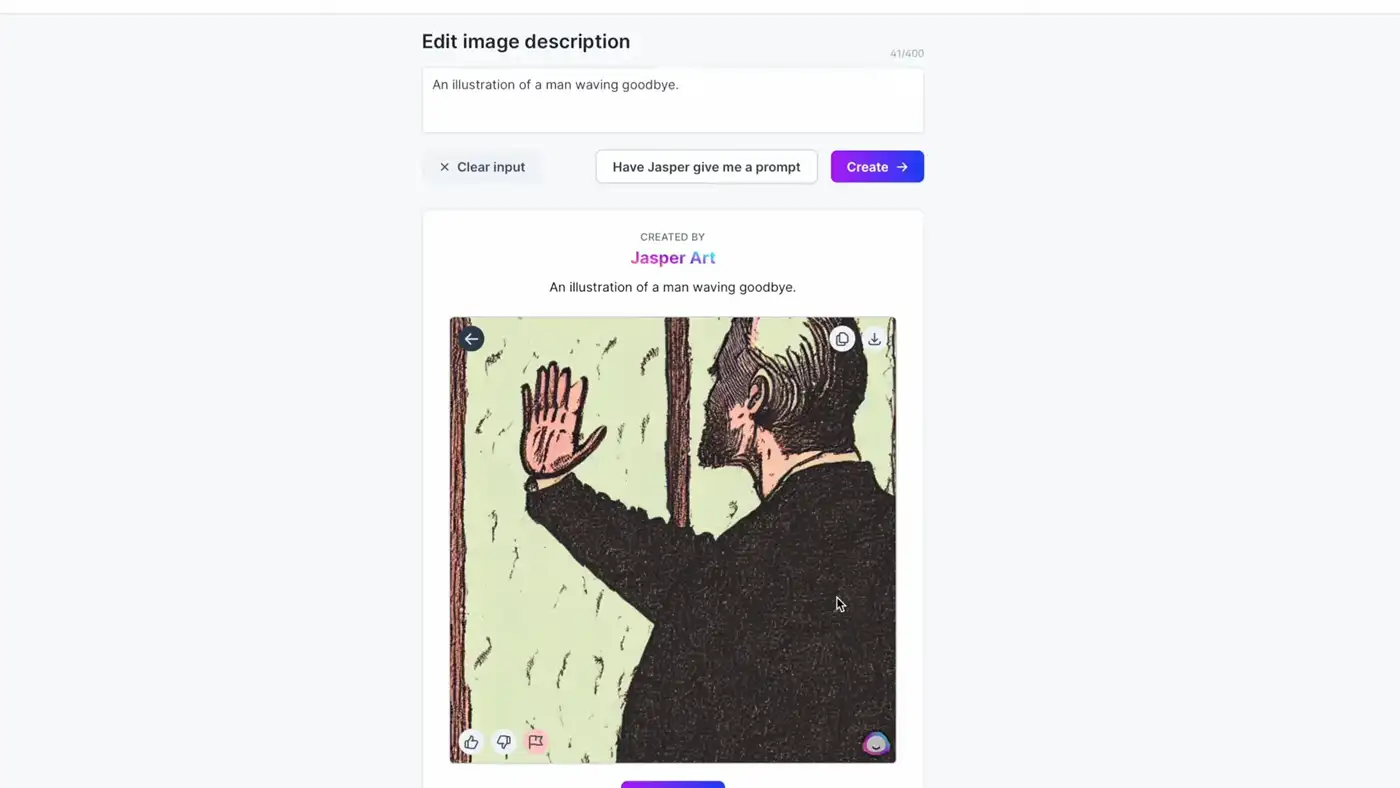
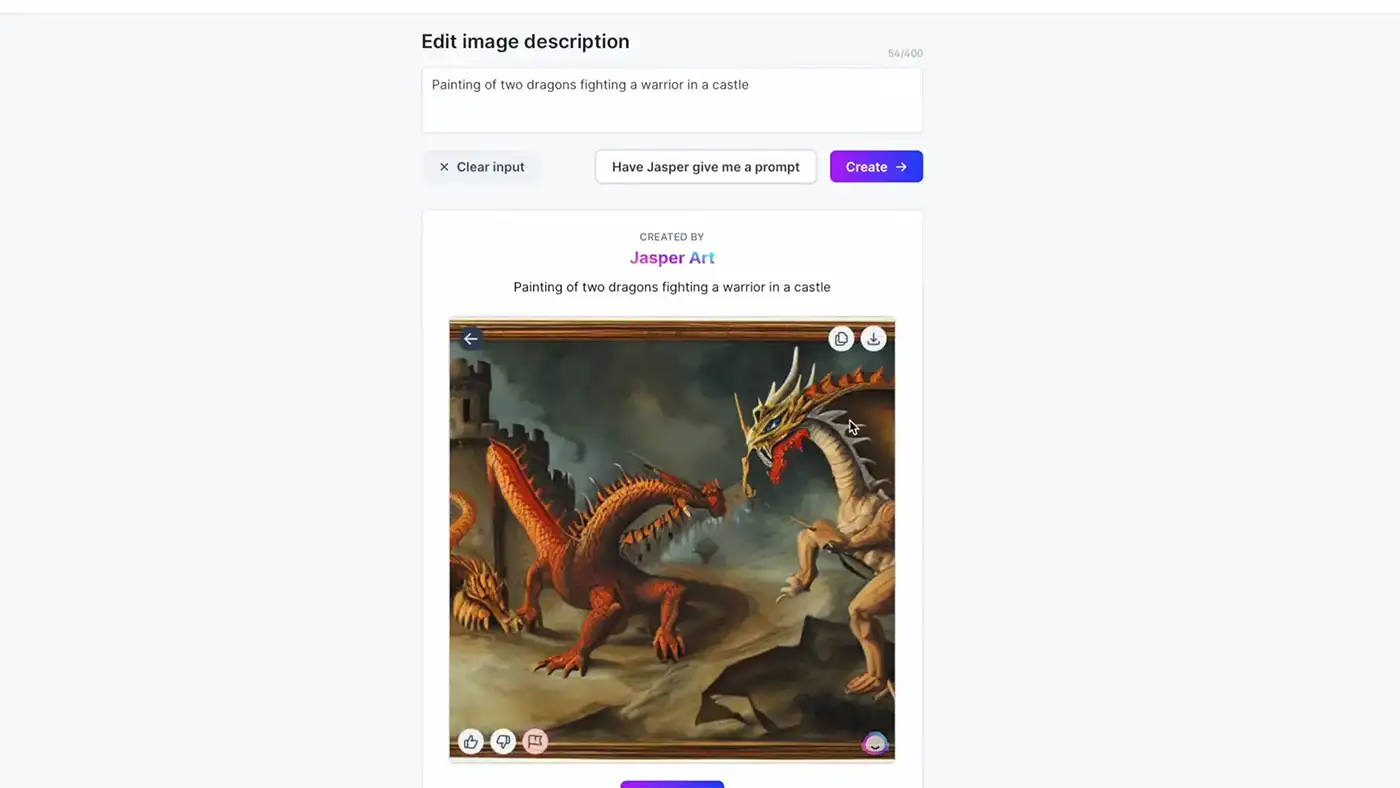
My take on Jasper Art
The tool is very easy to use and it comes with some great tutorials for creating images. Plus, if you want to adjust the style or mood of the image, there are some helpful presets built in.
Jasper Art AI Images Examples
Examples of AI generated images for the prompt: “High quality realistic photograph of a modern house in the middle of a rain-forest”:
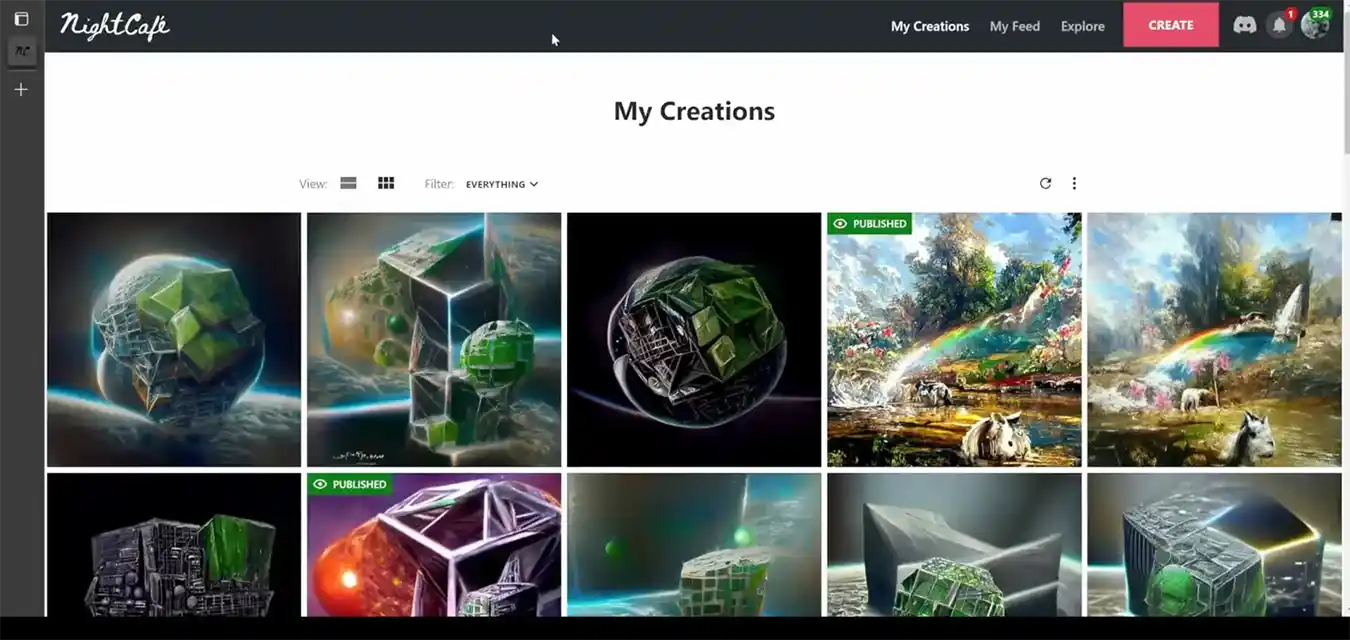
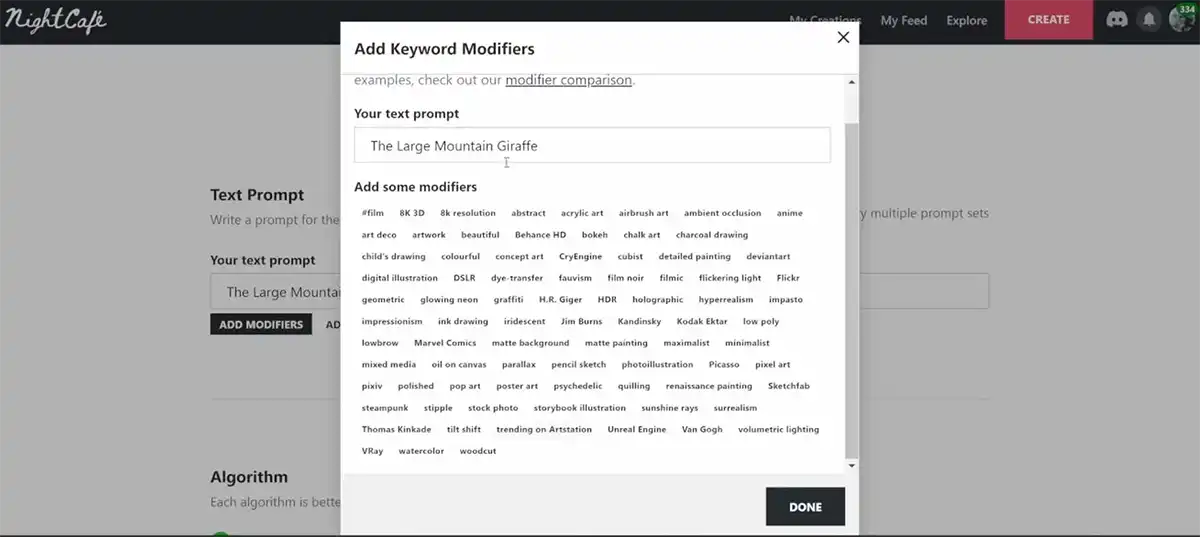
2. Nightcafe
NightCafe is a very popular AI art generator. Not only does it offer more algorithms and options than other similar platforms, but NightCafe is also incredibly user-friendly for those who are new to the world of artificial intelligence-generated artwork.
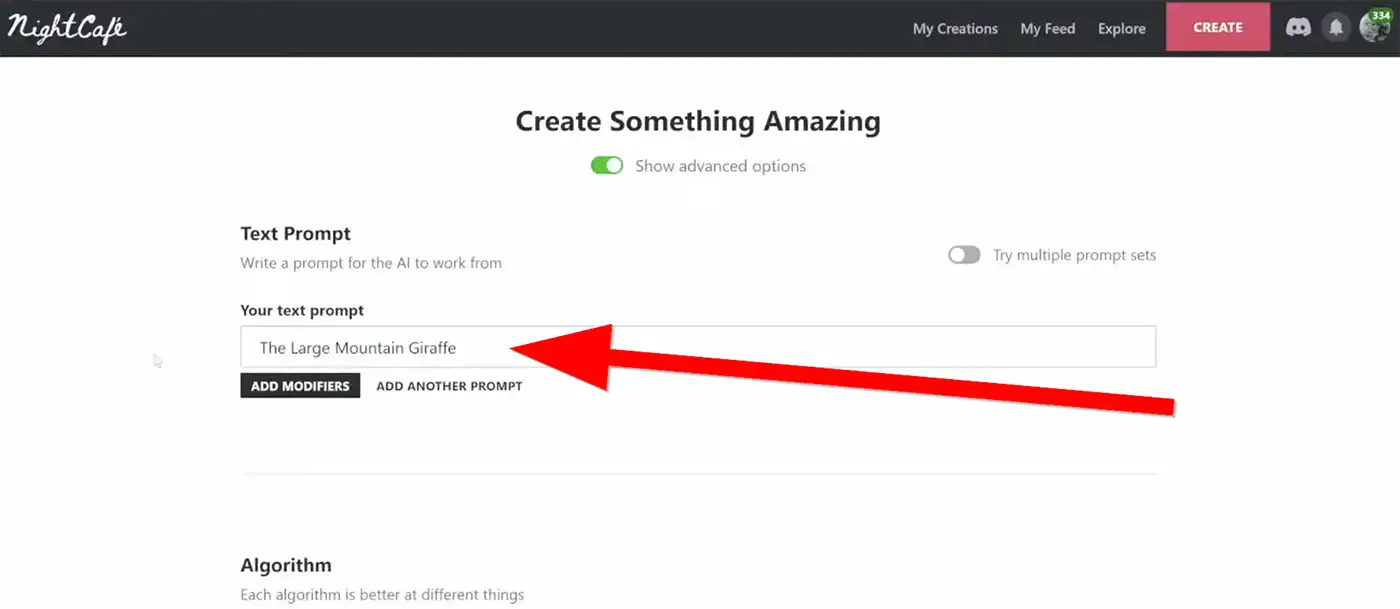
To create a piece of art Nightcafe, go to their website and enter a text prompt based on your imagination. Wait for 30 seconds. Just like that, you have a piece of art.
The art that is outputted is always original and one-of-a-kind because of the special AI algorithms used. These state-of-the-art software programs can generate digital art from scratch. They do this by finding the artwork that best matches the text input you enter. Therefore, all artwork produced by this tool will be unique and something that nobody has seen before.
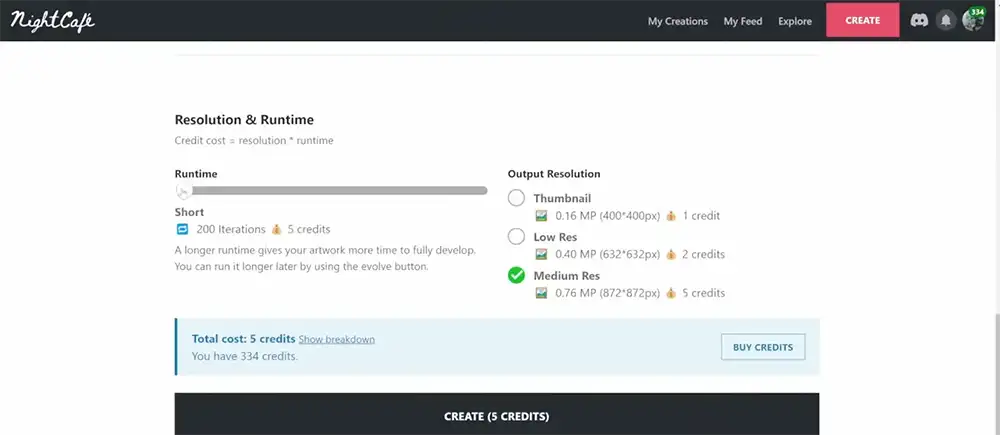
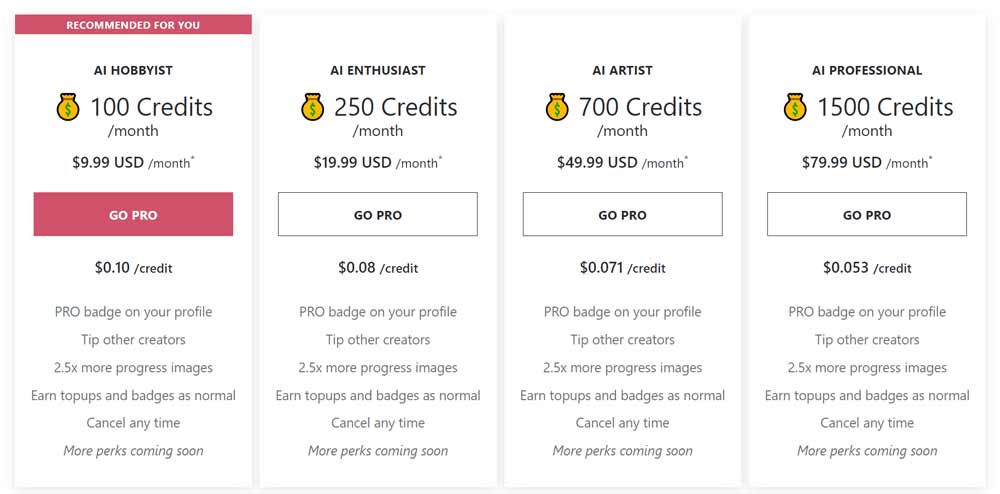
Nightcafe pricing
Nightcafe’s pricing model is based on credits. For each image you generate, you’ll need to purchase a credit.
The community offers ways to earn credits, as well as provides opportunities to purchase them.
One enormous advantage of Nightcafe is the free trial.
You can buy prints of your work, share them with others, or use them to create new pieces of art.
Helpful Discord community and social features.
I chose the style of “dark fantasy”.
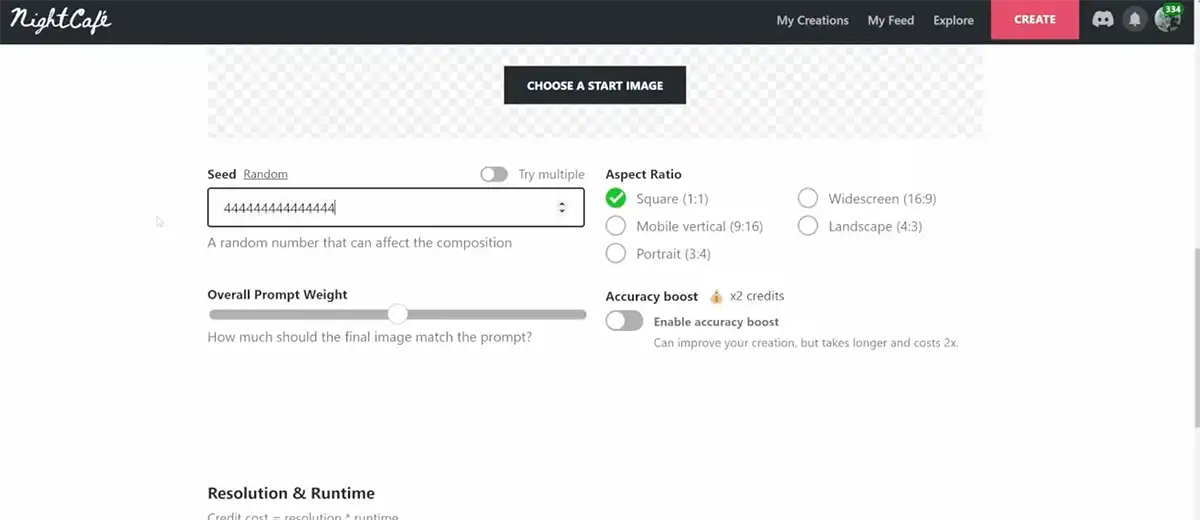
This tool not only helped me produce a second generation of my earlier image, but you can use it for free with other styles and settings. You’re even able to change the advanced settings.
Key features of Nightcafe
Earn 5 free credits at the start and keep on earning them to generate images.
You can buy prints of your work, share it with others, or use it to create new pieces of art.
Helpful Discord community and social features.
You don’t need to have an account to use Nightcafe.
My take on Nightcafe
Nightcafe is the best FREE AI generator for people who aren’t going to need more than 5 images a day. Best for entrepreneurs or website designers who are just starting out and don’t need tons of images.
3. DALL·E 2
DALL·E 2 is the best text-to-image generator for generating photorealistic images.
DALL·E 2 is an AI image generation model developed by OpenAI, the same company that created GPT-3, one of the best natural language processing models.
DALL E 2 has a unique process for generating images.
It’s called “diffusion” and basically, what that means is, the process starts with a pattern of random dots. Then, it fades that pattern until it becomes an image that represents specific aspects of what it is supposed to be.
DALL E 2 is easy to use and doesn’t require any special skills or training. The expansive composition feature is one of the key advantages. It can make images bigger than what is in the original space. This creates new high-quality images with compositions that differ from the original.
Like with other image generators, you need to give it a text prompt.
Key Features
Generate multiple iterations of images.
Expansive composition feature.
Photorealistic results.
Editing and retouching capabilities.
Free trial.
My take on DALL E 2
This AI generator is unique because of the diffusion process, but the biggest con is the potential waiting time to get on the list. It’s not the most accessible option, but once you’re in, it’s an awesome tool that creates excellent images.
4. Midjourney
Midjourney is an AI art generator that’s used through a Discord server to generate images.
If you want to see what an image looks like, you can type in “/imagine” and the AI will show you a picture. If you are specific about what you want, then you will get a more accurate result. But if you are vague, sometimes you will get a better quality image than if you were specific.
Midjourney’s images are so great, that they look real. Midjourney’s AI image actually won an art contest and beat a true, human artist. Check it out here. The main point…Midjourney’s images are superb.
Midjourney pricing
The first 25 pictures are free. Then, if you want to keep using it, here are the plan options:
Plan Name
Cost ($/month)
Fast GPU Hours (hours/month)
Relaxed GPU Hours (hours/month)
Additional Features
Basic Plan
10
200 minutes (3.33 hours)
Not Available
Standard Plan
30
15
Unlimited
Pro Plan
60
30
Unlimited
Stealth Mode
My take on Midjourney
This AI art generator is really the best if you want to create super realistic images. The UX might be a downside for you if you are not familiar with Discord.
Canva’s AI art can be generated in different styles, including Photo, Drawing, Painting, 3D, Pattern, and Concept Art. You can also use the app’s photo editor to further enhance your AI-generated image. Additionally, you can explore Canva’s library of free media elements to add fun and interesting elements to your design project.
Key Features
Easy to use, perfect for newbies
Will give you several options of images when you type in your text
Download and save your image, use it in any way you want!
My take on Canva
Canva is super easy to use and this free feature is great for people who probably won’t need to generate images on the daily.
How to create AI-generated Images using Canva?
To create an AI-generated image using Canva, simply:
To get started, go to the Text to Image app and enter your text prompt.
You can then choose any available image style, or use the “Surprise Me” option to get a random style.
Click on the AI-generated image to add it to your design.
You can then enhance the photo with Canva’s built-in photo editor, including adjusting the image setting sliders, adding depth of field with Autofocus, or applying exciting filters.
You can also add stickers, illustrations, and borders to your AI image, as well as put text on your image and play with different font styles.
When you’re finished, download your unique AI-generated image in a high-resolution image format, or save your design project that contains the converted images.
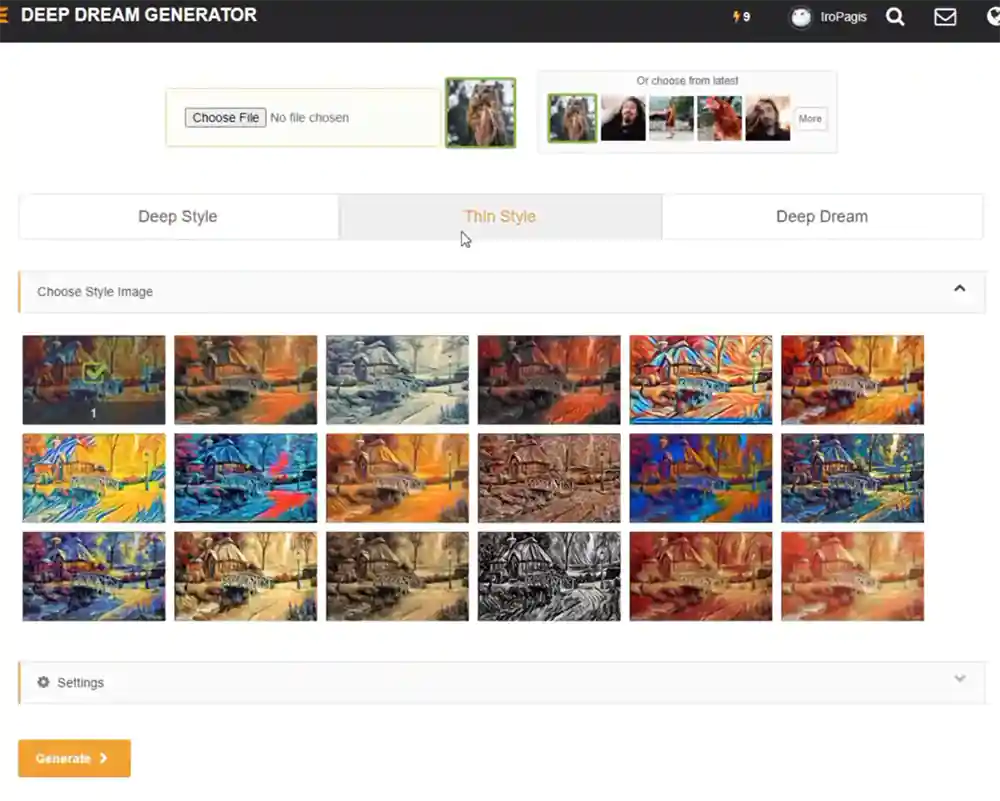
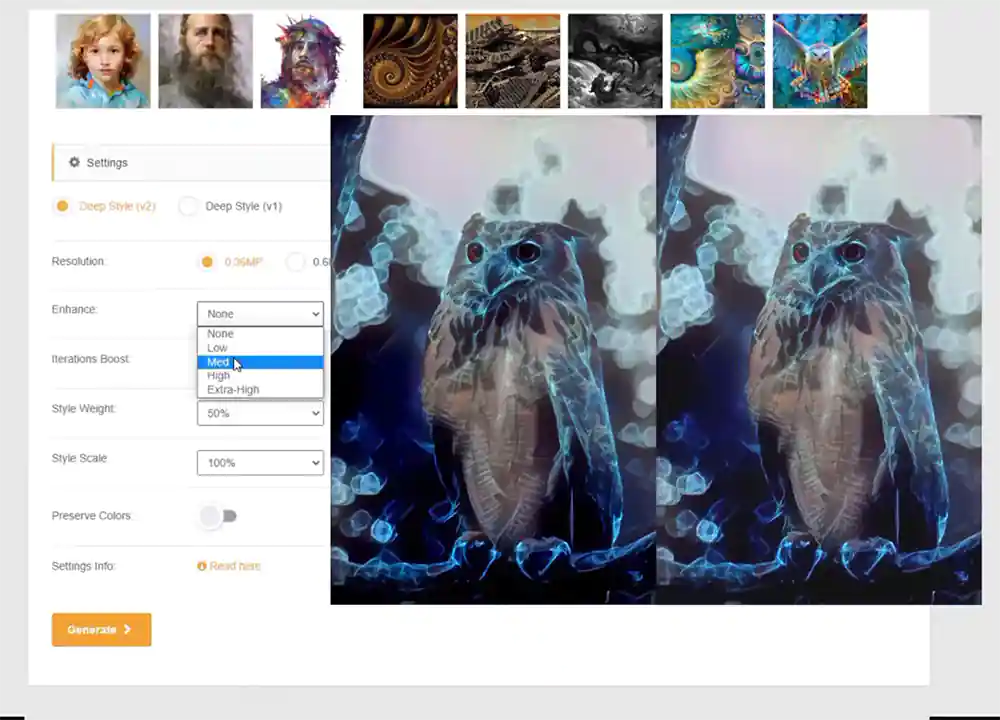
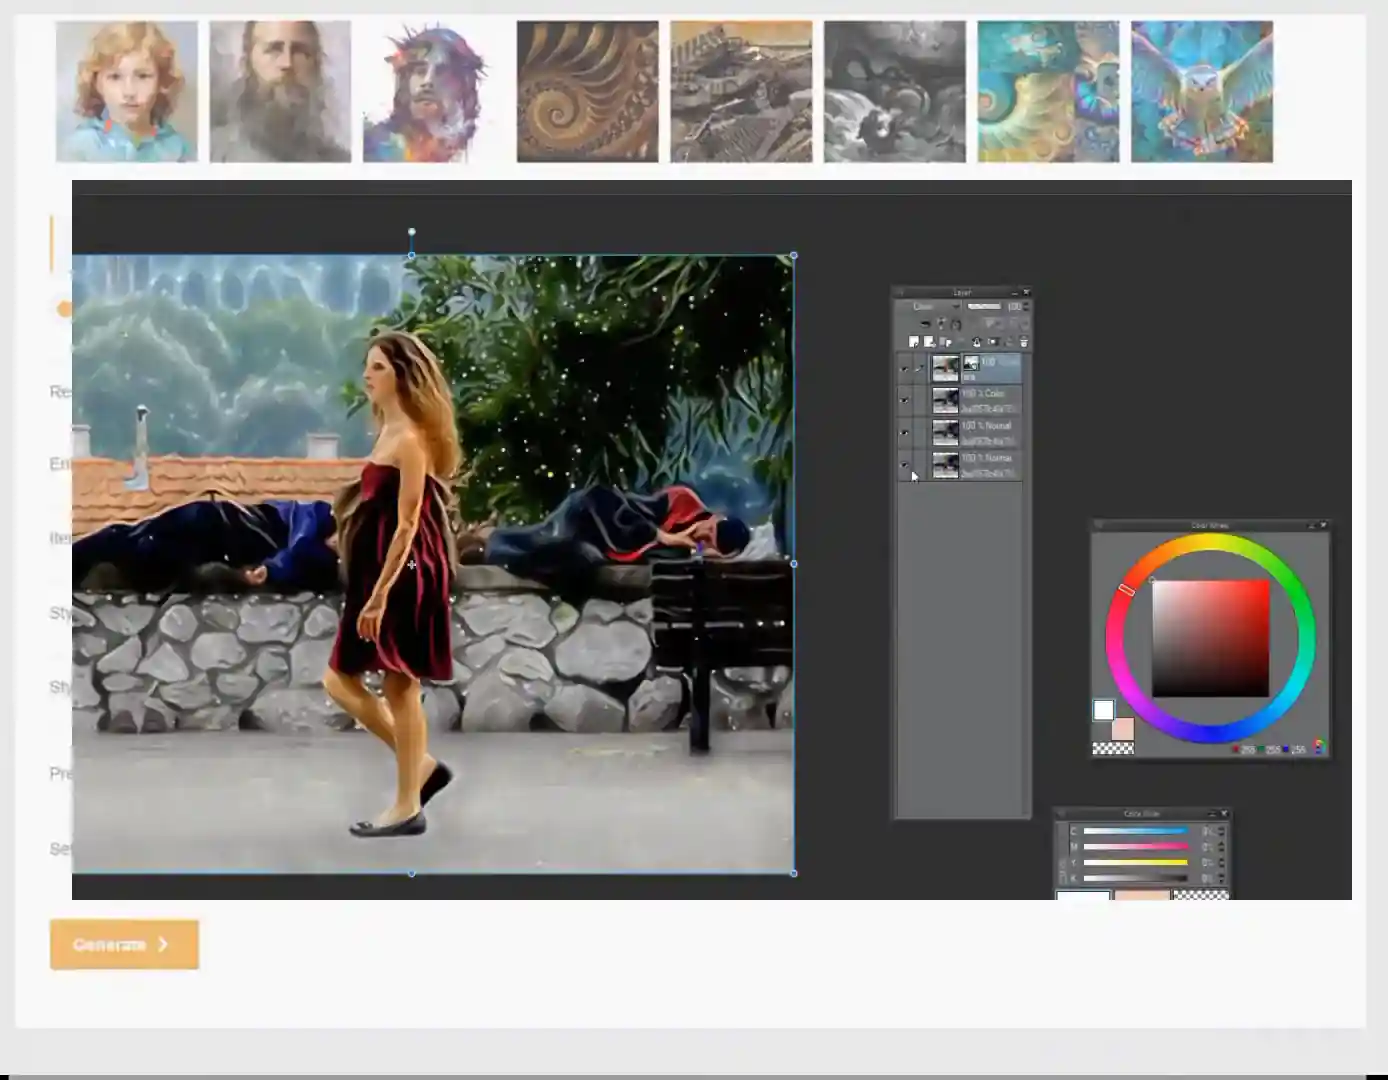
6. Deep Dream Generator
The Deep Dream art generator by Google developer Alexander Mordvintsev is a great tool for creating digital art using AI. With this tool, you can produce realistic images based on existing images quickly and easily.
This is how you use Deep Dream Generator:
Upload an image
Choose a style
Wait a few seconds for the software to output
Boom. Enjoy your image!
The primary usage of Deep Dream is creating digital art because it can use AI to replicate various painting styles from around the world and throughout history.
You can first choose a category, like animals, landscapes, or something more abstract. Then generate an image. You also get to select from a range of styles, including deep style and thin style.
Deep Dream Generator Pricing
My take on Deep Dream Generator
Deep Dream Generator is easy to use because all you need to do is upload an image. I thought it was great for re-creating images I already have and making them more unique. The name really does say it all; in a dream, you might have the same image of a person or place, but it looks all cool and different! That’s Deep Dream Generator for you.
7. Stable Diffusion
Stable Diffusion is a revolutionary text-to-image diffusion model that can generate photo-realistic images given any text input. This innovative technology cultivates autonomous freedom to produce incredible imagery, empowering billions of people to create stunning art within seconds.
Overall, Stable Diffusion is a model that can generate images from text. It is easy to use, high quality, and GPU enabled. There are no limitations on what you can enter, and it is a great tool for generating quick results.
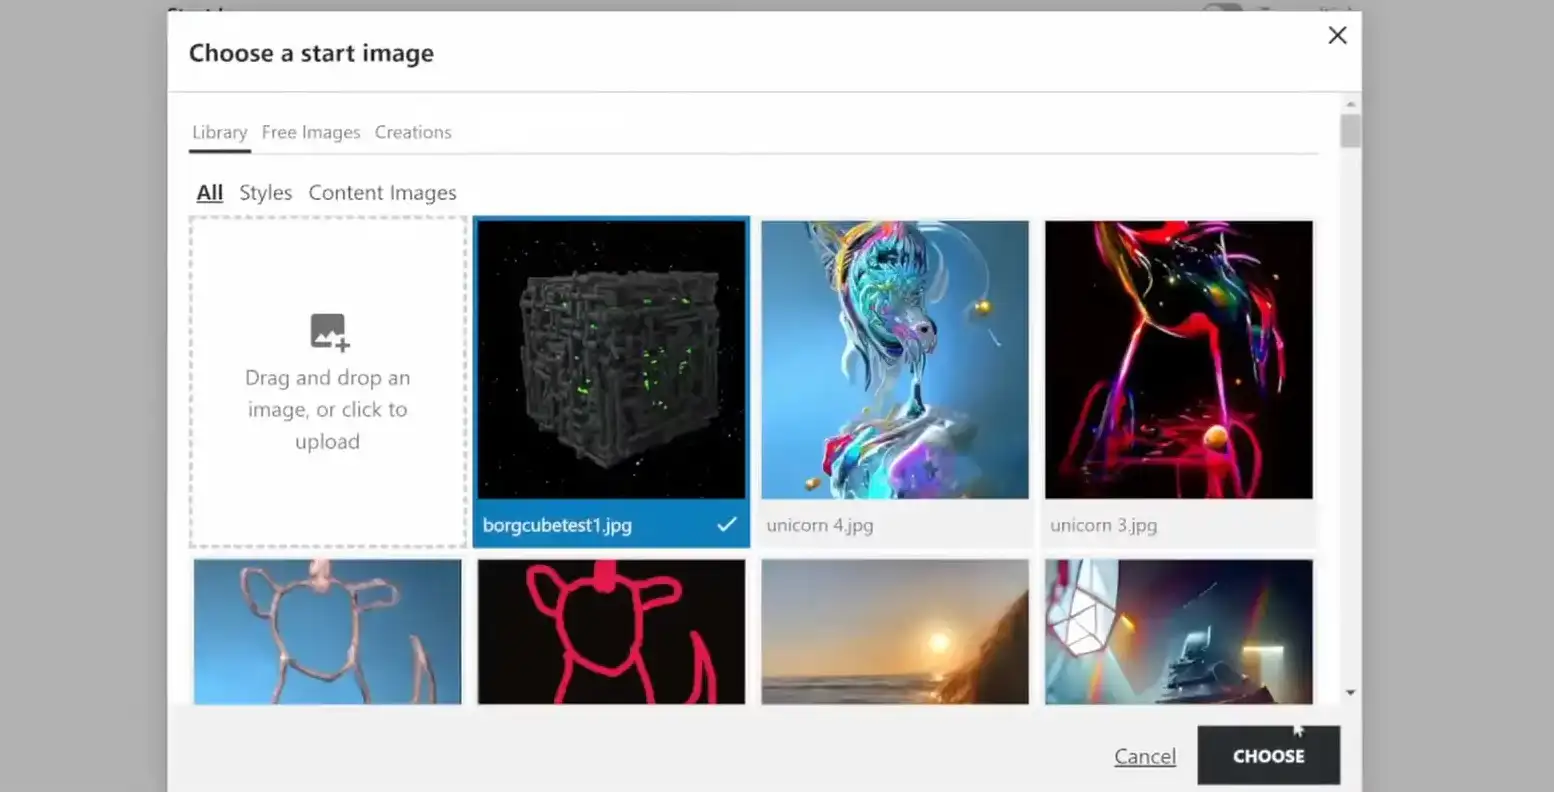
Stable Diffusion is unique because it generates AI art in two ways:
Creates an image by typing out the text.
Upload an image and watch Stable Diffusion transform it into art.
Key Features
No limitations on what you can enter in the text
Generates quick results
Enhance your image and make it artistic
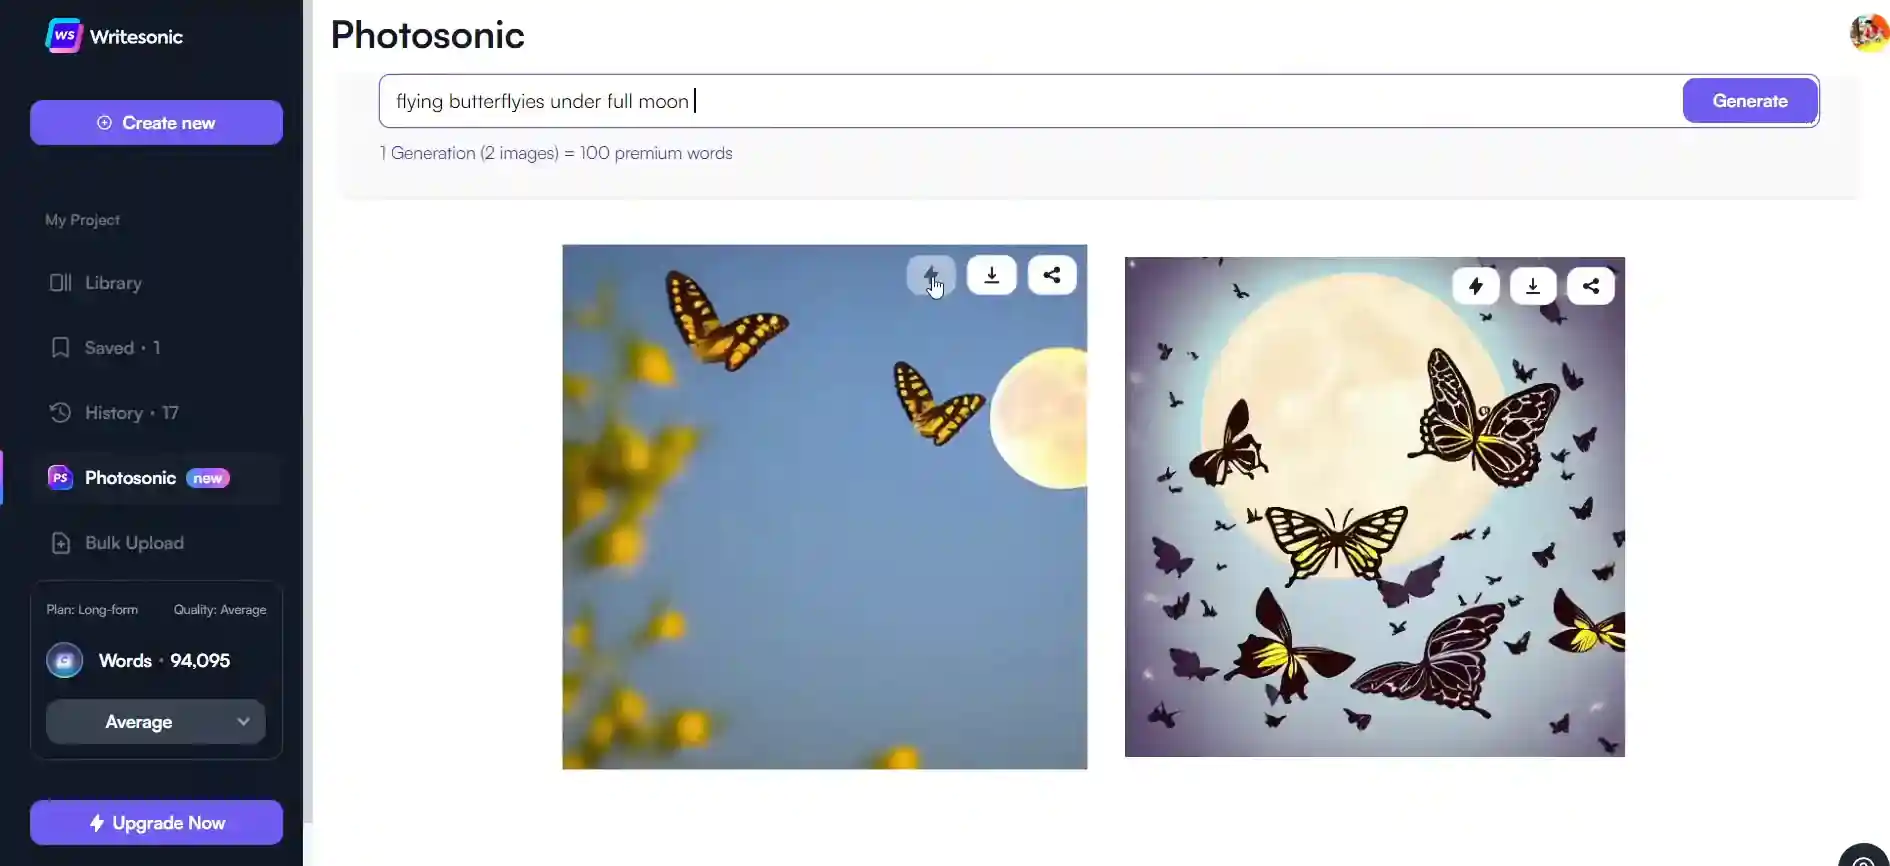
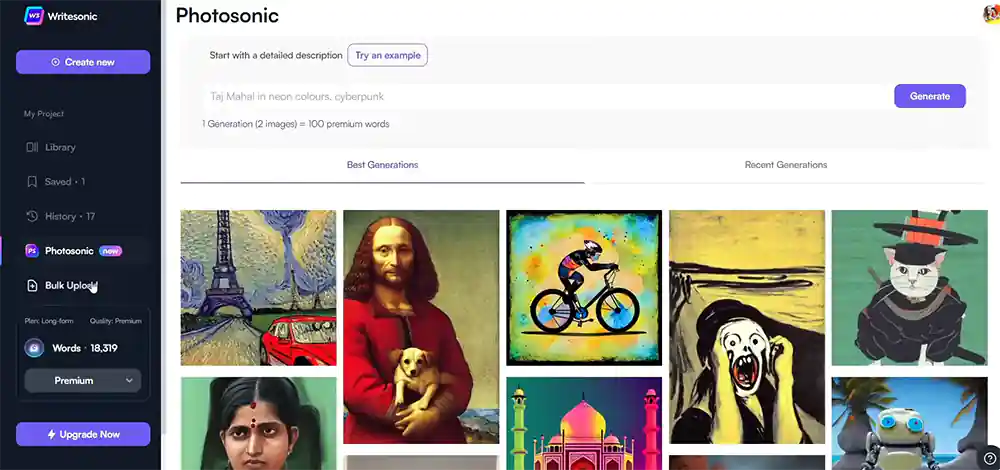
8. Photosonic
Photosonic is a web-based text-to-art generator that lets you create realistic or artistic images from any text description, using a state-of-the-art text-to-image AI model.
The AI model is based on latent diffusion, a process that gradually transforms a random noise image into a coherent image that matches the text.
You can control the quality, diversity, and style of the generated images by adjusting the description and rerunning the model.
Photosonic can be used for various purposes, such as:
Generating inspiration for your creative projects
Visualizing your ideas
Exploring different scenarios or concepts
Or, simply having fun with AI!
You can create art, images of landscapes, animals, objects, characters, scenes, or anything else you can imagine, and customize them with various attributes and details.
You can also use Photosonic to enhance or modify existing images by adding text annotations or filters.
Photosonic Pricing
Photosonic is free to try with 10 image generation credits that you can use to create up to 20 stunning images from any text description.
You can also earn more credits by sharing Photosonic with your friends and inviting them to join the app.
If you want to unlock unlimited image generation and access more features and settings, you can upgrade to a premium subscription for a low monthly or annual fee or purchase pay-as-you-go credits.
My take on Photosonic Pricing
I really enjoyed Photosonic’s free trial because I really got to feel it out for myself before comitting. I think the best thing about Photosonic is its versatility – you have so many options and so many things you can do with your images.
9. Fotor GoArt AI Art Generator
Fotor’s AI art generator lets you turn your photos into amazing pieces of AI-generated artwork with a few clicks. You can choose from a variety of filters to create a unique piece of art that looks like a real painting. You can also add frames or stickers to your photos to make them more interesting.
Fotor helps you create AI art that you can then sell as an NFT. You can export your masterpiece as an NFT and then sell it on different websites that specialize in NFTs.Fotor focuses on the NFT aspect of AI arts. After you create a masterpiece, you can export the NFT and begin selling it on various NFT marketplaces.
Key Features
Easy for newbies to get started
Focuses on the NFT aspect of art
So many templates to choose from
Fotor GoArt AI Pricing
Plan Name
Cost ($/month or annually)
Basic
0
Pro
$8.99/month ($39.99 annually)
Pro +
$19.99/month ($89.99 annually)
My take on Fotor GoArt AI
This one is limiting in a sense, because it’s only an image-to-image generator. You can’t type in text to generate an image. However, this makes it a great option for people who already have images they’d like to enhance. The results are wonderful!
10. Artbreeder
Artbreeder is a website where you can create art by mixing and editing images. You can follow other artists, share your work, and remix others’ work to make it your own. There are a variety of tools available on the site, including a splicer that lets you create images by mixing them together and editing their genes.
Artbreeder has a strong focus on community, and you can join a variety of groups to find others with similar interests. You can also follow a feed of the latest art from the community.
Artbreeder is a great place to find inspiration for your next project or to simply explore the different ways that you can create art.
Artbreeder is completely free. The three main features of the platform are that it is free, provides unlimited images, and offers three image uploads. Additionally, users can download five high-resolution images and 600 animation frames.
Key Features
Build and find a community
Completely free
Provides unlimited images
Find inspiration and learn from others
My take on Artbreeder
Artbreeder is a great one if you’re dipping your toes into the AI image generator world. I thought it was a great one for me when I was starting out because I could find inspiration through other people and see what they were doing. This gave me the confidence to get the hang of it. It’s a great starting block.
11. starryai
starryai is a mobile app that uses artificial intelligence to generate art. Users provide a text prompt and the app creates a work of art based on those instructions. The app is free to download and there are a variety of customization options available.
Key Features
The key features of starryai are:
AI art generator that turns your words into a work of art
Customizable models, styles, aspect ratios, and initial images
The latest AI methods to assist you in your art creation
Available for free on iOS and Android
My take on starryai
One interesting thing about starryai is that it’s accessible only through your phone. Although I did say earlier this was a con, I do think it is great for people who don’t need to fully commit to AI image generators. I think starryai is great for people who need to use AI image generators, but not 24/7.
12. Runwayml
Runwayml is a platform that utilizes artificial intelligence and machine learning to help content creators with their editing process. It allows users to easily mask out unwanted elements from videos and photos, as well as add audio tracks and effects. One really cool effect is, Runwayml can remove the background of your image without using green screen technology!
Additionally, users can collaborate with fellow creators on projects. The platform has received praise from professionals in the industry for its ease of use and time-saving capabilities.
Every time I start I side project, the first thing I make is the logo. I don’t want to spend too much money or time, so I usually hire a freelancer on UpWork for around $100 or $200.
Lately, I’ve been experimenting with AI Logo Generators. The idea is:
spend less money,
get it quicker,
and have more control over the design.
I’ll tell you the truth right away: AI Logo Generators are not that good yet.
You are not going to get a design masterpiece, but you can get a decent logo to kickstart your project.
Looka is an online logo design platform that uses artificial intelligence to give users a feel of working with a professional designer. It allows anyone to easily create custom logos without any prior design experience.
Besides logo generation, Looka includes tools for creating business cards, letterheads, and other visual assets to complete your brand identity.
My Take On Looka
Looka is a user-friendly logo design platform with AI-powered capabilities that make it easy for businesses to create an iconic logo in just 5 minutes.
I found the interface to be intuitive and clean, allowing me to sort through typography easily and mix and match fonts without difficulty. I was also impressed by their AI element which helped me quickly find icons for my logo with minimal effort.
Brandcrowd is an online logo design platform that allows users to create stunning logos, social media headers, banners, and posts.
The platform offers a variety of customizable options such as text, colors and fonts to help users personalize their design. Additionally, they offer an asset library of over 21,000+ icons designed by professional logo designers.
I found the platform very user-friendly and intuitive. It was easy to use the drag-and-drop editor to create my design from scratch or customize one of the existing templates. I also liked that I had access to saved preferences for easy access when creating future projects.
Although there were many features I liked about Brandcrowd’s services, there were some things that I didn’t like as well. For instance, their selection of logo designs is limited compared to other platforms out there.
Additionally, while the quality of designs offered by Brandcrowd may be good enough for most use cases it may not be suitable for higher-end branding projects where more complex graphics are needed.
Asset Library: Access a library of 21,000+ icons designed by professional logo designers.
Custom Fonts: Personalize designs with custom fonts.
Customizable Branding: Modify existing templates to create custom branding designs.
Templates: Utilize pre-made templates for logos, business cards, social media posts, etc.
What I Like/Dislike About BrandCrowd
Pros:
Easy Creation & Editing: Very easy to create, and edit state-of-the-art logos, social media headers, banners, and posts to specific network dimensions.
Affordable Pricing Plans: Offers three different pricing plans ranging from free to $349 depending on the user’s needs and budget.
Satisfaction Guarantee: Offers a money-back guarantee if not satisfied with the product.
Cons:
Limited Logo Design Selection
The quality of designs offered by Brandcrowd may not be the best.
Logomaster.ai is a logo maker and design platform that makes creating a logo easily.
With the Professional Logo package, Logomaster provides web-ready files such as transparent PNGs suitable for websites and social media; print-ready vector files perfect for business cards, banners, and posters; high-resolution 4096px logos suitable for all purposes; and royalty-free logos.
I found Logomaster to be an excellent choice for anyone looking for a cost-effective logo creation tool. The interface was very user friendly which made it easy to navigate the hundreds of templates available on the platform. I also appreciated the customization tools that allowed me to get exactly what I wanted in my final logo design.
The only downside I experienced was that there is no free version available so customers must pay to be able to design any logo. However, if you are willing to invest some money into your brand then Logomaster is definitely worth considering!
Shopify’s free AI logo maker is a nice little tool to create decent-looking logos.
After you provide some basic information about your logo, the AI logo generator creates a list of logos you can choose from. Just don’t expect much. (Hey, it’s free!)
The good thing is that you can make some minor changes to the generated design. For example, you can adjust colors, icons, and fonts.
Another nice thing about Shopify’s logo generator is that you can export the logo package. So you’ll get the logo sized for Facebook profile images, Twitter, Instagram, Pinterest, Linkedin, Youtube, and more.
Brandmark’s generation flow is a bit different than the others in this list. After sharing your business name and tagline, you then input a few keywords that describe your brand so the logo reflects it. If you’re opening a farm-to-table restaurant, you might include terms like “organic” and “upscale.” After choosing a color or color style, you’ll receive a wide variety of options. If there’s one that you like but don’t love, you can click “Ideas” to get alternative color, font, icon and layout ideas. Even then, you still have plenty of customization opportunities.
Features:
Full copyright included in all projects
Unlimited logo revisions and lifetime access to branding tools
Hundreds of brand assets to put your logo on, including business cards, letterheads and brand guidelines.
Pricing:
Basic Plan: $25/package. Includes PNG logo files.
Designer Plan: $54/package. Includes logo source files, brand style guide and brand asset templates.
Enterprise plan: $175/package. Includes Designer features, plus 10 original designs from the Brandmark team.
Like other AI logo generators, Fiverr’s Logo Maker creates designs in a few minutes based on your preferences. Where this tool stands out is that it lets you buy upgraded customization services from Fiverr freelancers, such as color changes, font changes and additional design elements. You can also request that the freelancer make your logo more specific to your industry or target audience. This level of customization can be invaluable for businesses that want a logo that is truly unique and memorable, while still keeping costs low.
Features:
Simple process includes selecting your industry, choosing design preferences and customizing the logo as needed
Logo designs are created by a combination of Fiverr logo designers and AI
Easy access to a full suite of business services
Pricing:
Essential Plan: $30/package. Includes non-editable PNG variants, including one with transparent background.
Professional Plan: $60/package. Includes one revision, print-ready files, brand style guidelines, Zoom backgrounds and more.
Unlimited Plan: $90/package. Includes Professional Plan features, plus unlimited revisions.
9.Midjourney – Best logo generator for AI enthusiasts
Midjourney is one of the most popular and powerful generative AI art platforms and logos are certainly possible with the right input.
The first method is to use the text prompt by itself. It works best by stating that it’s a logo and what the main icon is. For example, “logo design, hamburger.”
Next adding the term ‘vector’, as in vector graphics, is a good way to limit it to the right style. This way it won’t go off and make a photorealistic burger. Adding ‘simple’ and ‘minimalist’ also keeps it from trying to do too much.
In the end, you might end up with: “Logo design, hamburger, vector, simple, minimalist, red and yellow.”
The second method is image-to-image, which lets you input an existing image to guide the AI in creating something unique. You may already have a basic logo design you want the AI to complete or a logo you like, which can act as inspiration and keep the AI from straying away from the logo style.
One thing to remember is that Midjourney doesn’t really do text, even if it adds some gibberish symbols in spirit. You will have to add or edit this later using a traditional graphics program.
Overall, Midjourney’s logo-making can be superb, though the process is more complex than the dedicated logo generators. Go with this if you are already familiar with AI and want to be more hands-on throughout the design phase.
Fotor is one of the best all-around AI image tools, and generating logos is no exception. You get some free credits when you first sign up and can pay for more as you go. Alternatively, it offers premium plans if you will be using it long-term.
It works well for logos because it had a logo creation toolset before AI was even introduced. Now you can combine both features.
Its AI uses text prompts, so all you have to do is enter a description and hit the generate button.
This produces several different variations to pick from, which can then be refined via the toolbar with different style elements and parameters. There is also a shortcut to the original logo editor where you can take what the AI created and polish it manually.
Simply download the finished design and you get full rights to use it for your business or project. Because it’s AI-generated, no other user can create the same logo even if they used the same prompts.
React is open source JavaScript Libraby for building fast and interactive user interfaces.
Entire React application build with independent, isolated and reusable set of component. These component are put together to design to design complex layout. In other words we can say components are the building block of react application.
React simplifies the creation of SPA (Single Page Application) by using Reusable Component.
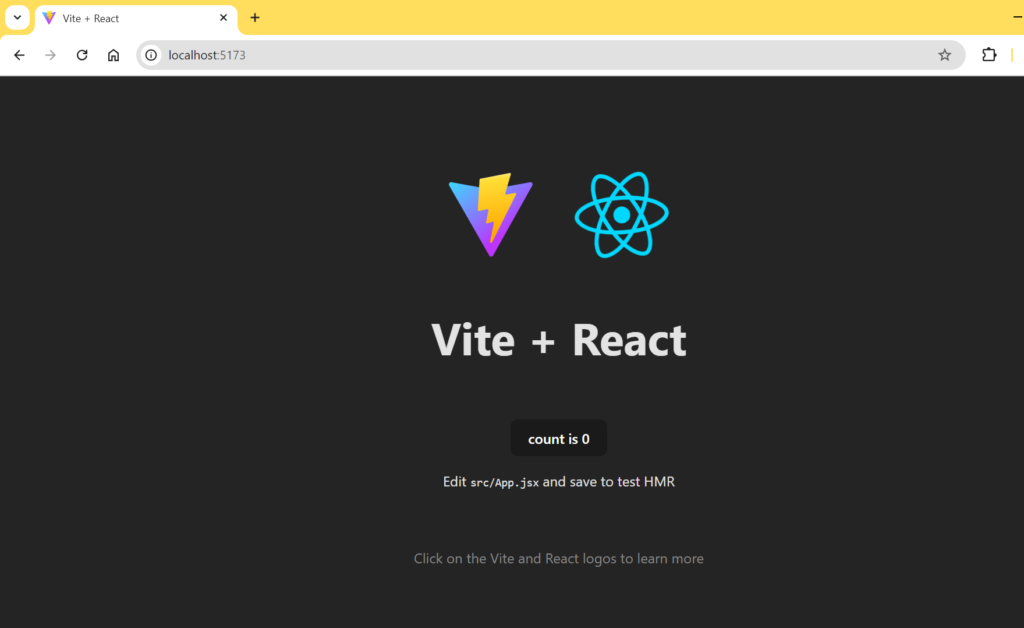
Why React – If we visit a React based application like netflix, we can see navigation of all pages around the application are super smooth, instant and you will never seen any effect to reload a new page.
Library of react help us to build user interfaces because React is a java script library. Clicking of different tabs triggers event listers and kicks of a series of function executions that display content & highlight the selected tab.
What is SPA(Single Page Application) ?
A single-page application is an app that works inside a browser and does not require page reload during use. SPA are all about serving an outstanding user experience(UX) by trying to imitate a “natural” environment in the browser — no page reloads, no extra wait time. It is just one HTML page that we visit which then loads all other content using JavaScript. For Example : Gmail, Facebook, Instagram.
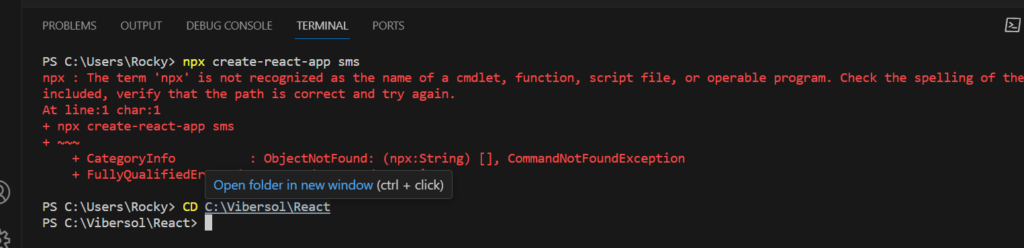
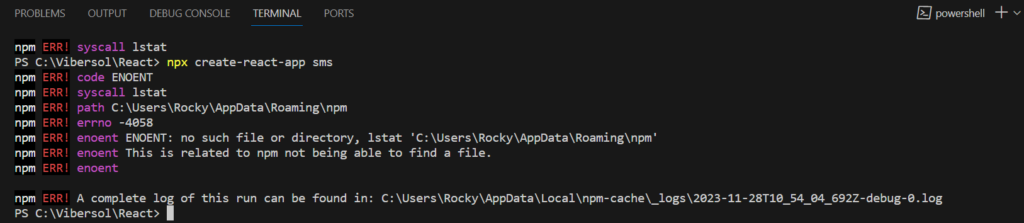
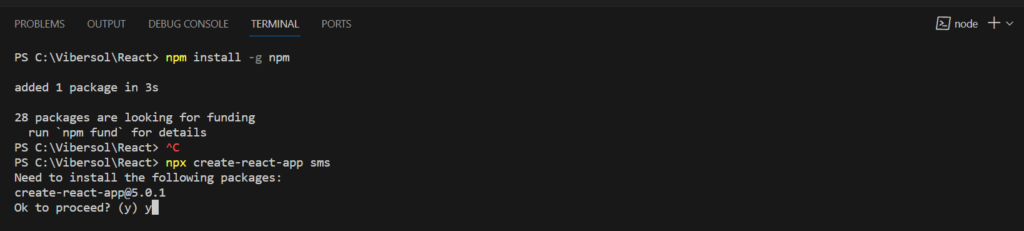
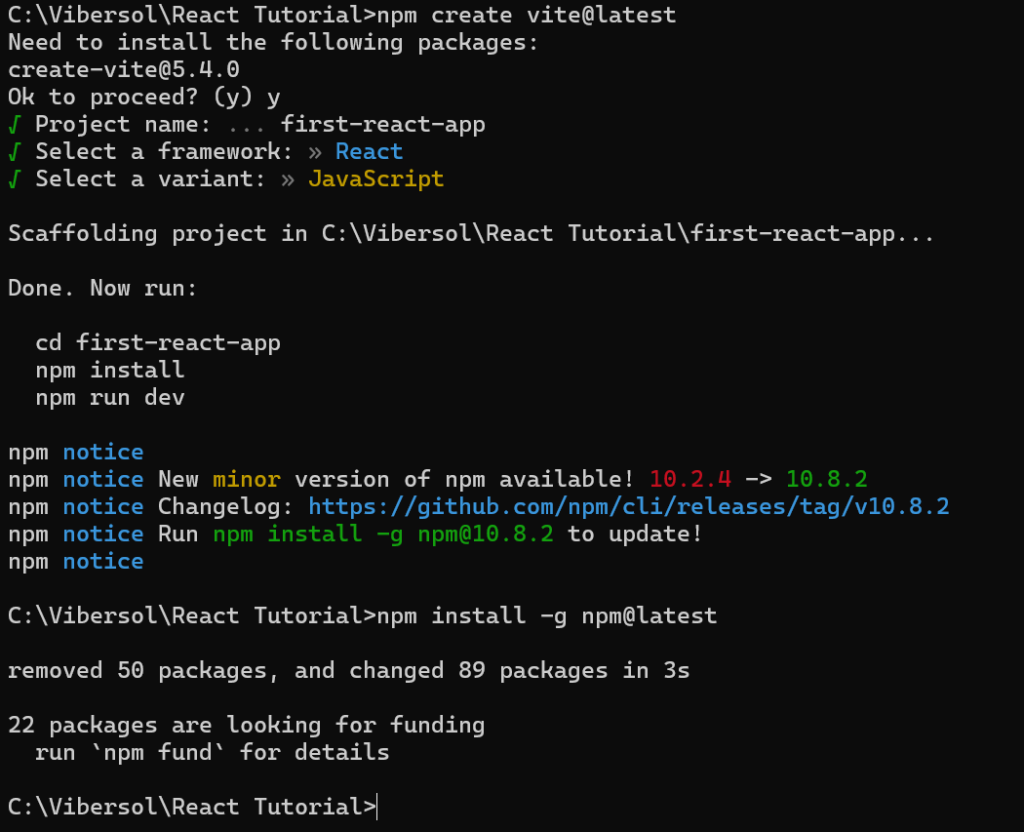
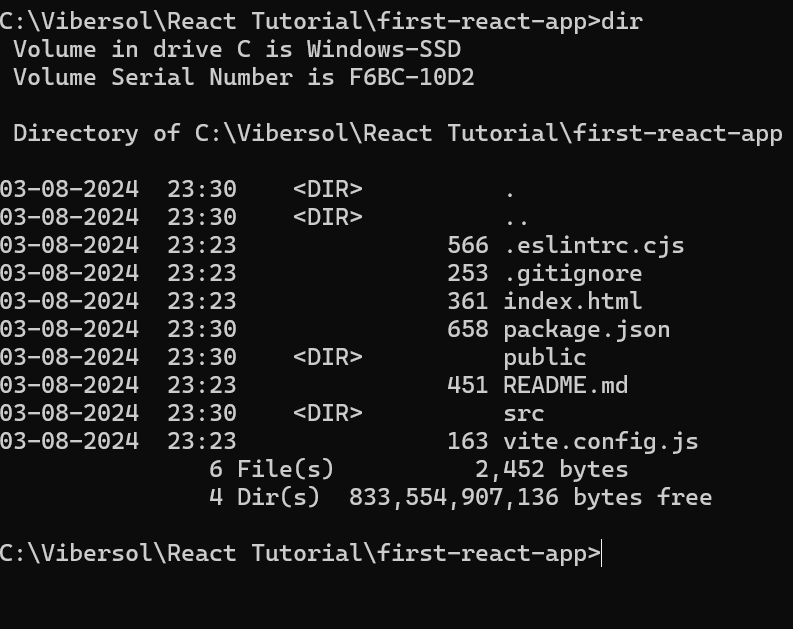
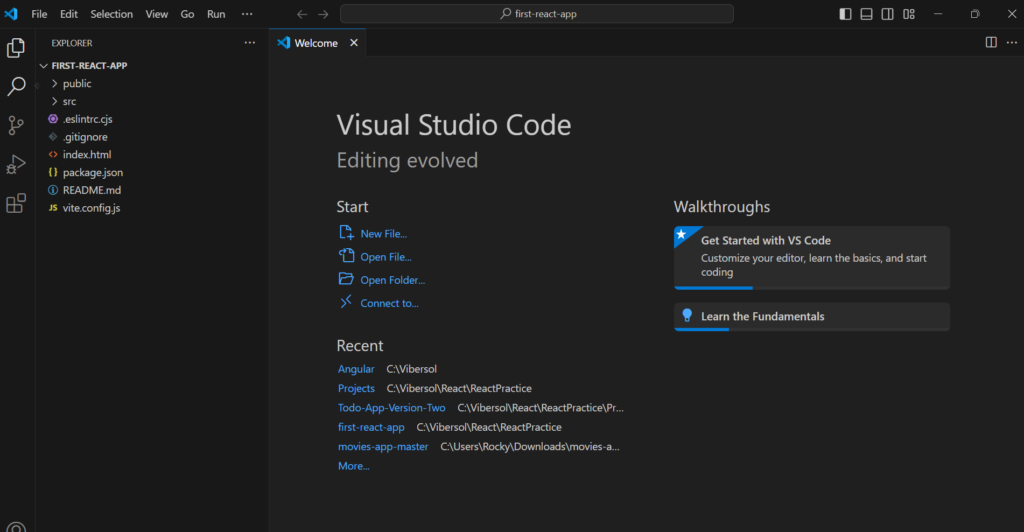
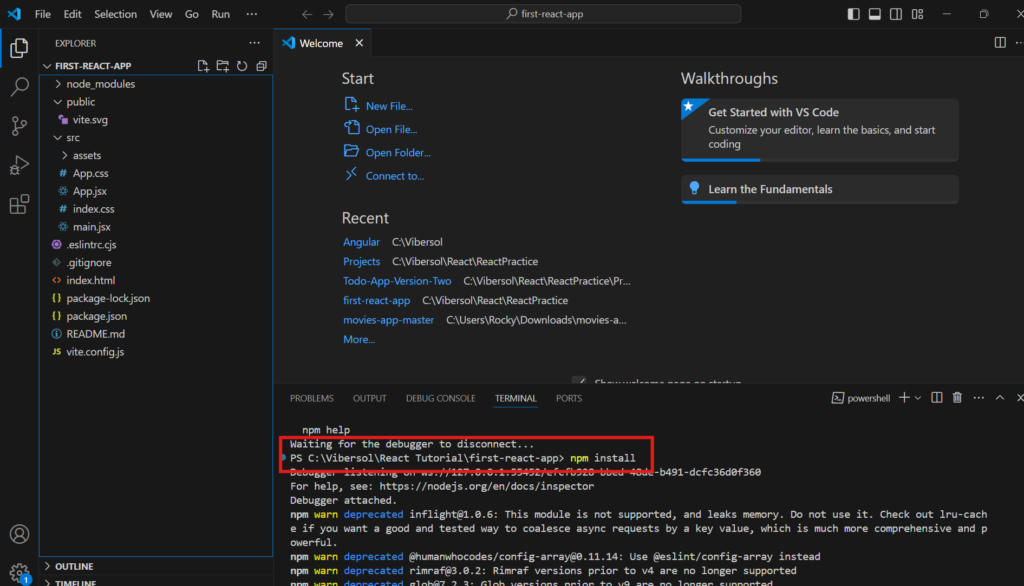
To run any React application, we need to first setup a ReactJS development environment. In this article, we will show you a step-by-step guide to installing and configuring a working React development environment.