React Interview Q&A

React Interview Q&A

TOP 10 Interview Question in React

Q1 : What is React? What is the Role of React in Software Development ?

Answer: 3 points need to remember about React :

  • React is open source Javascript Libraby.
  • React is used for user interfaces.
  • React simplifies the creation of SPA (Single Page Application) by using Reusable Component.

Q2 : What are the Key Features of React ?

Answer: There are 7 Key Features of React.

  1. Virtual DOM
  2. Component based architecture
  3. Reusability & Composition
  4. JSX(Java Script & XML)
  5. Declarative Syntax
  6. Community & Ecosystem
  7. React Hook

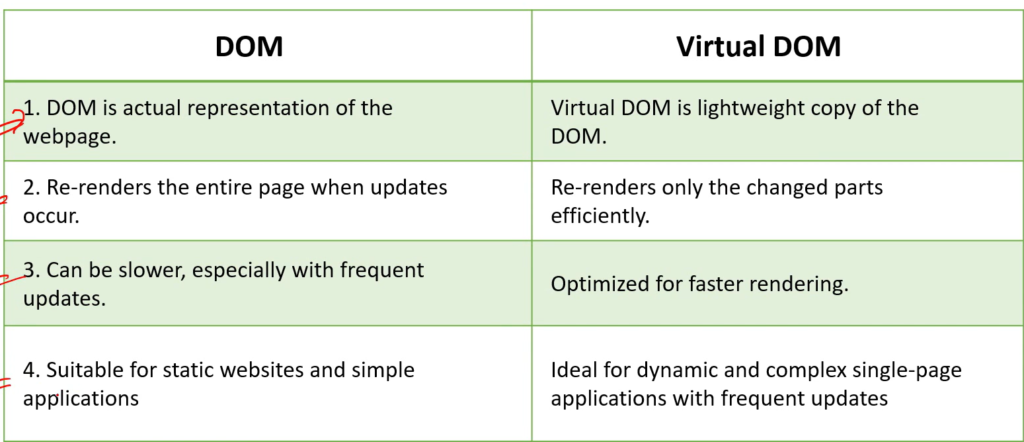
Q3 : What is Virtual DOM? Difference between DOM and Virtual DOM?

Answer : First we discuss about real DOM. whenever the user will do any changes in application basically we are updating the real DOM right, now what is Virtual DOM and why do we need it?

First of all DOM is a general and real concept in all the browsers. Without DOM our application can’t interact or handle JavaScript but Virtual DOM is specific for react only and it is not mandatory. It is developed by Facebook for improve the speed of the application.

Basically there is a performance problem in Real DOM. The problem is even if a user makes very small change in web application in the browser even then the whole layout will render in the DOM. For example, If a user change only one element in title of html even then browser will re-render or refresh whole layout of the entire page. It will very time consuming, that time consumption will increase the loaded time of the page and that will increase the speed and performance problem. To solve the problem we use Virtual DOM.

Learn React In 2024 – A Step-By-Step Guide

In React application, React user open react based website in there browser then in the background React library will make and exact copy of the DOM and show that copy to the front of user. So this exact copy of DOM is Virtual DOM. When the user make some changes to the elements in html it looks like user is interacting with real DOM but actually the user make changes in Virtual DOM.

The specialty of Virtual DOM is if the user makes some changes any element in HTML now Virtual DOM not render whole virtual DOM for small changes. Only the small specific part of the virtual DOM will be updated and In background React algorithm of React Library will keep comparing the changes between Virtual DOM and Real DOM and whatever change has made by user in Virtual DOM only those changes will be updated in Real DOM.

Q4 : What are React Components? What are main elements of it?

Answer : In React, a component is a reusable building block for creating user interfaces. It can be either functional or class-based.

Main element of React :

  • Import
  • Export

Q5 : What are the 5 advantage of React ?

Answer: Advantage of React :

  1. Simple to build Single Page Application by using Component.
  2. React is cross platform and open source (Free to Use).
  3. React is lightweight and very fast(Virtual DOM).
  4. Large community and ecosystem.
  5. Testing is easy.

Q6. What is the role of JSX in React?

Answer : JSX stands for JavaScript XML. The key point of JSX are :

  • JSX is used by React to write HTML-like code within JavaScript.
  • JSX makes easier to write and add HTML in React.
  • JSX uses camelcase notification for naming HTML attribute. For example, username in HTML is used as userName in JSX.
  • To insert a large number of HTML we have to write it in parenthesis i.e, ().

Q7. What is SPA(Single Page Application)?

Answer : A single Page Application(SPA) is a web application that is designed to be displayed as a single, static page. As the user clicks link and interact with the page of the website, subsequent content is loaded dynamically. The result is more fluid and faster without any page refresh.

Q8. What difference between Declarative and Imperative Syntax?

Answer :

Imperative

  • Procedural Programming Paradigm
  • Object Oriented Programming
  • Parallel Processing Approach
  • The User is allowed to make decisions and commands to the compiler.
  • Variable can be mutable
  • It provides step-by-step DOM mutations until we reach desired UI.

Imperative syntax(non-React) using JavaScript

function App(){ const element = document.createElement(“h1”); element.textContent = “Hello World”; document.body.appendChild(element); }

Declarative

  • Login Programming Paradigm
  • Functional Programming
  • Database Processing Approach
  • A compiler is allowed to make decisions.
  • Variable are typically immutable.
  • We doesn’t provide step-by-step instructions to reach the desired UI. Just tell React what to render in component’s logic, and React will figure out how best to display it to the user.

Declarative syntax using JSX

function App(){ return <h1> Hello World </h1>; }

Q9. How to pass data from Parent Component to Child Component in React?

Answer : In React, “props” are a mechanism for passing data from parent component to child component. Props are immutable means if the data are set by the parent component, they can not be changed by child component. The child component can only use it but should not modify.

// Parent component
function ParentComponent() {
    const message = "Welcome from parent!";
    return <ChildComponent greeting={message} />;
}
 
// Child component
function ChildComponent(props) {
    return <p>{props.greeting}</p>;
}

Q10. What are React Hooks? Why Hooks are introduced in React?

Answer : Before React version 16.8, functional component can’t handle state, logic and lots of other React features and we only used them for rendering very simple components to the UI. To resolve this problem React Hooks are introduced.

Each React Hooks name is prefixed with the word “use”. For example useState and useEffect.

Related Topics

CURD Operations Using ASP .Net Core Web API And ReactJS

In this article, we will discuss how to perform CURD operation in React JS and consume ASP.Net Core Web API to fetch student’s data.

We will create step by step instructions to perform CURD operation in React JS.

We recommend please read previous article before starting ReactJS CRUD opteration.

How to create ASP.NET Core Web Api

Prerequisite:

Section we need to follow:

  • Create React Application

Create React Application

Step 1: Open Terminal (Ctrl + ~).

Step 2: Select path where you want to create react application.

Step 3: PS C:\Vibersol\React> npx create-react-app sms

Step 4: If you are getting error while creating application like below:

Solution :

Step 5: Now the project structure look like below:

Step 6: Without any changes let see on the browser whether it is working or not.

PS C:\Vibersol\React\sms> npm start

working as expected.

Step 7 : Install Packages

  • npm install react-bootstrap bootstrap
  • npm install axios
  • npm install react-toastify
  • npm install semantic-ui-react semantic-ui-css

react-bootstrap installed for interface design, look and feel.

axios installed to communicate with the api. It provides more functionality and features that help you to build your application quickly.

react-toastify installed to notification in react application.

semantic-ui-react semantic-ui-css provides themes as CSS stylesheet.

Any packages you have installed in react application is showing in package.json file

Step 8 : Create new “Component” folder

  • src => Component

Step 9: Create new StudentList.js file inside the Component folder

  • src => Component => StudentList.js

Step 10 : Display the employee details in StudentList.js

import {Table,Col,Row, Container} from 'react-bootstrap';
import 'bootstrap/dist/css/bootstrap.min.css';

function StudentList(props){
    return (
        <Container>
            <Row>
                <Col>
                    Id
                </Col>
                <Col>
                    Name
                </Col>
                <Col>
                    City
                </Col>
                <Col>
                    Qualification
                </Col>
                <Col>
                    Phone
                </Col>
            </Row>
            {
             //   props.students 
               Array.isArray(JSON.parse(props.students))? JSON.parse(props.students).map((stu)=>(
                <Row key={stu.sId}>
                    <Col>{stu.sName}</Col>
                    <Col>{stu.sCity}</Col>
                    <Col>{stu.sQualification}</Col>
                    <Col>{stu.sEmail}</Col>
                    <Col>{stu.sPhone}</Col>
                </Row>
               )):null
            }
            
            
        </Container>
    )
}
export default StudentList;
  • props : Get all Student Information.
  • Array.isArray : Check the information that hold in props is in array or not. If the information is in array then return true else return false.
  • map() : map function iterate the props array and accessing individual record.

Step 11 : Call GetStudentInfos api which has been created in previous tutorial

import logo from './logo.svg';
import './App.css';
import StudentList from './Component/StudentList';
import { useEffect, useState } from 'react';
import axios from 'axios';

function App() {
  const[Student,SetStudent] = useState([]);

  useEffect(()=>{
    let ignore = false;
    axios.get("https://localhost:7077/api/Student/GetStudentInfos").then((response)=>{
      if(!ignore){
        SetStudent(response.data);
      }
    })
    return ()=>{ignore=true}
  },[]);

  return(
    <StudentList students= {JSON.stringify(Student)} ></StudentList>
  )
}

export default App;

Here 2 hooks are using useEffect and useState

useEffect : React useEffect() hook is used to eliminate the side effects(out side of the scope of React) of using class based component. The task of useEffect hook is updating the DOM, fetching data from API, setting up subscription and timer etc.

Here you notice the useEffect() hook contains 2 arguments :

  • First Argument return called effect, is either return a function or undefined. Effect is executed when the component is render depend on some condition.
  • Second Argument is an array of dependencies. If you want to control the effect to execute when the component is render then pass the array of dependencies as a second argument. Here we have passed empty array that means we want effect to be executed only on first render.

useState : useState() hooks is the initial state that returns 2 values.

  • First Value : Student, current state that initially hold blank array.
  • Second Value : SetStudent, function that update current state.

For using both hooks need to import hooks from React

  • import { useEffect, useState } from ‘react’

axios : Axios allows you to communicate with the API in your React application. Here, axios using to get Student Information from API.

Step 12 : After executing the react application the record will look like below:

Step 13 : We can also use Semantic React UI instead of Bootstrap. To use Semantic React UI need to change some existing code:

StudentList.js

import 'bootstrap/dist/css/bootstrap.min.css';
import { Fragment } from 'react';
import { Table } from "semantic-ui-react";


function StudentList(props){
    return (
        <Fragment>
            <h1 style={{marginLeft:"30px"}}>
                Student List
            </h1>
            <Table celled style={{
                marginLeft:"30px",
                marginTop:"30px",
                width:"1050px",
                border :"1px solid black"
            }}>
            <Table.Header>
                <Table.Row>
                    <Table.HeaderCell>Id</Table.HeaderCell>
                    <Table.HeaderCell>Name</Table.HeaderCell>
                    <Table.HeaderCell>City</Table.HeaderCell>
                    <Table.HeaderCell>Qualification</Table.HeaderCell>
                    <Table.HeaderCell>Email</Table.HeaderCell>
                    <Table.HeaderCell>Phone</Table.HeaderCell>
                </Table.Row>
            </Table.Header>
            <Table.Body>
                {
                    Array.isArray(JSON.parse(props.students))? JSON.parse(props.students).map((stu)=>(
                        <Table.Row key={stu.sId}>
                            <Table.Cell>{stu.sId}</Table.Cell>
                            <Table.Cell>{stu.sName}</Table.Cell>
                            <Table.Cell>{stu.sCity}</Table.Cell>
                            <Table.Cell>{stu.sQualification}</Table.Cell>
                            <Table.Cell>{stu.sEmail}</Table.Cell>
                            <Table.Cell>{stu.sPhone}</Table.Cell>
                        </Table.Row>
                    )):null
                }
            </Table.Body>
        </Table>
        </Fragment>
    )
}
export default StudentList;

GridDisplay.js

import StudentList from './StudentList';
import {Grid} from 'semantic-ui-react';

function GridDisplay(props){
    return(
        <Grid>
            <Grid.Column width="10">
            <StudentList students={props.students}></StudentList>
            </Grid.Column>
        </Grid>
    );
}
export default GridDisplay;

App.js

import logo from './logo.svg';
import './App.css';
import GridDisplay from './Component/GridDisplay';
import { useEffect, useState } from 'react';
import axios from 'axios';

function App() {
  const[Student,SetStudent] = useState([]);

  useEffect(()=>{
    let ignore = false;
    axios.get("https://localhost:7077/api/Student/GetStudentInfos").then((response)=>{
      if(!ignore){
        SetStudent(response.data);
      }
    })
    return ()=>{ignore=true}
  },[]);

  return(
    <GridDisplay students= {JSON.stringify(Student)} ></GridDisplay>
  )
}
export default App;

After executing application the result look like below:

Step 14 : Add student’s record using interface. To insert details of student we required the form where user can submit the student details. After submitting the form request AddStudent api will call, before creating form we also require Add button where user click on the add button then Add Student form will be open.

Explore Technology

Blog Articles

CRUD operation Asp .Net Core with Entity Framework Data First Approach

In this article, we will discuss Onion Architecture with ASP .NET Core Web API and MySql Entity Framework Core. Using onion architecture our application becomes better testable, Flexible and Maintainable….

CRUD operation Asp .Net Core with Entity Framework Data First Approach

In this article, we will discuss Onion Architecture with ASP .NET Core Web API and MySql Entity Framework Core. Using onion architecture our application becomes better testable, Flexible and Maintainable….

CRUD operation Asp .Net Core with Entity Framework Data First Approach

In this article, we will discuss Onion Architecture with ASP .NET Core Web API and MySql Entity Framework Core. Using onion architecture our application becomes better testable, Flexible and Maintainable….

CRUD operation Asp .Net Core with Entity Framework Data First Approach

In this article, we will discuss Onion Architecture with ASP .NET Core Web API and MySql Entity Framework Core. Using onion architecture our application becomes better testable, Flexible and Maintainable….

CRUD operation Asp .Net Core with Entity Framework Data First Approach

In this article, we will discuss Onion Architecture with ASP .NET Core Web API and MySql Entity Framework Core. Using onion architecture our application becomes better testable, Flexible and Maintainable….

CRUD operation Asp .Net Core with Entity Framework Data First Approach

In this article, we will discuss Onion Architecture with ASP .NET Core Web API and MySql Entity Framework Core. Using onion architecture our application becomes better testable, Flexible and Maintainable….

CRUD operation Asp .Net Core with Entity Framework Data First Approach

In this article, we will discuss Onion Architecture with ASP .NET Core Web API and MySql Entity Framework Core. Using onion architecture our application becomes better testable, Flexible and Maintainable….

ASP .NET Core Web API and Database First Approach Best Practices

Introduction

In this article, we will discuss Onion Architecture with ASP .NET Core Web API and MySql Entity Framework Core (Database First Approach). Basically onion architecture provides us a better way to build application. Using this architecture our application becomes better testable, Flexible and Maintainable.

Onion Architecture in ASP .NET Core Web API
  • Domain Layer : Domain Layer basically a entity layer in which all database table exists.
  • Repository Layer : Repository is an abstraction of the data access layer. It hides the details of how exactly the data is saved or retrieved from the underlying data source.
  • Service Layer : A Service Layer is an additional layer that work as a mediator between controller and repository layer. A Service Layer contains business logic.
  • Presentation Layer : The Presentation Layer is the top most layer of the N-tier architecture used to display result to the user.

Table of Contents

Pre-requisites:

Now Create Database and Table in MySql Server

  • Open MySql Server.

Step 1: Create Database => Create Table

CREATE DATABASE SMS;

CREATE TABLE tbl_StudentInfo
(
s_id int NOT NULL AUTO_INCREMENT PRIMARY KEY,
s_name varchar(100),
s_city varchar(100),
s_qualification varchar(50),
s_email varchar(20),
s_phone varchar(10)
);

Step 2: I assume you have created a default Project API with WeatherForecastController. If not please see me.

Step 3: Add Core.Entity class library under the SMS Solution Explorer.

Right Click on the solution => Add =>New Project => Class Library

Step 4 : Add Entity Framework Tool and MySql Provider to Core.Entity class library.

Right click on Core.Entity=>Manage NuGetPackage

Go to Browse => In Search box type “Microsoft.EntityFrameworkCore.Tools” => Select Microsoft.EntityFrameworkCore.Tools => Install => Apply

Install MySql Server Provider “MySql.EntityFrameworkCore” same as “Microsoft.EntityFrameworkCore.Tools

Step 5 : Build the solution.

Step 6 : Provide project library[Core.Entity] reference to Core.SMS

Step 7: Double click on Core.Entity then csproj will be open. Comment the blow line.

Step 8 : Now using below Scaffold-DbContext command to create a model from existing database. Here you will notice we are creating model in separate class library.

Go to Package Manager Console:

PM> Scaffold-DbContext “Server=localhost;Database=SMS;port=3306;user=root;password=12345;”MySql.EntityFrameworkCore -OutputDir Model -Project “Core.Entity” -Tables tbl_StudentInfo -f

Here you can see SmsDbContext has been created in Model folder under the Core.Entity Project

Now remove the Connection String from here and place it into appsetting.json in Core.Entity

appsetting.json
{
"Logging": {
"LogLevel": {
"Default": "Information",
"Microsoft.AspNetCore": "Warning"
}
},
"AllowedHosts": "*",
"ConnectionStrings": {
"SMSConnection": "Server=localhost;Database=SMS;port=3306;user=root;password=12345;"
}
}

Step 9 : Add new project class library – Core.Service under SMS Solution Explorer.

Step 10 : Add new class IRepositoryBaseService in Core.Service project class library.

Create generic repository base service interface IRepositoryBaseService where <T> indicates class name.

using System;
using System.Collections.Generic;
using System.Linq;
using System.Text;
using System.Threading.Tasks; namespace Core.Service
{
public interface IRepositoryBaseService<T>
{
IQueryable GetAllRecords();
IQueryable GetFilterRecords();
void CreateRecord(T entity);
void UpdateRecord(T entity);
void DeleteRecord(T entity); } }

Step 11 : Create IStudentInfoService interface and inherit to the IRepositoryBaseService

using Core.Entity.Model;
using System;
using System.Collections.Generic;
using System.Linq;
using System.Text;
using System.Threading.Tasks;
namespace Core.Service
{
     public interface IStudentInfoSevice : IRepositoryBaseService<TblStudentinfo>
    {
          IEnumerable GetStudentInfos();
          IEnumerable BetStudentInfoByConditoin(TblStudentinfo tblStudentinfo);
          void CreateStudent(TblStudentinfo entity);
          void UpdateStudent(TblStudentinfo entity);
          void DeleteStudent(TblStudentinfo entity);
    }
}

Step 12 : Create IRepositoryWrapperService interface to store all table repository service interface.

namespace Core.Service
{
    public interface IRepostoryWrapperService
    {
        IStudentInfoSevice studentInfoSevice { get; }
    }
}

Step 13 : Next we have to implement the interface inside the Repository Class Library. Create RepositroyBaseService class inside the SMS project solution.

Add project reference Core.Service to Repository.

Implement IRepositoryBaseService interface in RepositoryBaseService class that is Abstract class.

using Core.Entity.Model;
using Core.Service;
using Microsoft.EntityFrameworkCore;
using System.Linq.Expressions;

namespace Repository
{
    public abstract class RepositoryBaseService<T> : IRepositoryBaseService<T> where T : class
    {
        private SmsContext _context;
        public RepositoryBaseService(SmsContext context)
        {
            _context = context;
        }

        public IQueryable<T> GetAllRecords() { 
            return  _context.Set<T>().AsNoTracking();
        }
        public IQueryable<T> GetFilterRecords(Expression<Func<T, bool>> expression)
        {
            return _context.Set<T>().Where(expression).AsNoTracking();
        }
        public void CreateRecord(T entity)
        {
            _context.Set<T>().Add(entity);
        }
        public void UpdateRecord(T entity)
        {
            _context.Set<T>().Update(entity);
        }
        public void DeleteRecord(T entity)
        {
            _context.Set<T>().Remove(entity);
        }
    }
}

Step 14 : Add new class StudentInfoService to implement RepositoryBaseService and IStudentInfoSevice interface inside the Repository.

using Core.Entity.Model;
using Core.Service;
using Microsoft.EntityFrameworkCore;

namespace Repository
{
    public class StudentInfoService : RepositoryBaseService<TblStudentinfo>,IStudentInfoSevice
    {
        public StudentInfoService(SmsContext smsContext):base(smsContext) 
        {
            
        }
       public IEnumerable<TblStudentinfo> GetStudentInfos()
        {
            return GetAllRecords().OrderBy(m => m.SName).ToList();
        }
       public IEnumerable<TblStudentinfo> GetStudentInfoByCondition(Guid SId)
        {
            return GetFilterRecords(m => m.SId.Equals(SId)).ToList();
        }
       public void CreateStudent(TblStudentinfo entity) 
       {
            CreateRecord(entity);
       }
       public void UpdateStudent(TblStudentinfo entity) 
       {
            UpdateRecord(entity);
       }
       public void DeleteStudent(TblStudentinfo entity) 
       {
            DeleteRecord(entity);
       }
    }
}

Step 15 : Now Create RepositoryWrapperService to implement IRepostoryWrapperService.

using Core.Entity.Model;
using Core.Service;
using System;
using System.Collections.Generic;
using System.Linq;
using System.Net.NetworkInformation;
using System.Text;
using System.Threading.Tasks;

namespace Repository
{
    public class RepositoryWrapperService : IRepostoryWrapperService
    {
        private SmsContext context;
        private IStudentInfoSevice studentInfo;
        public RepositoryWrapperService(SmsContext smsContext) 
        {
            context = smsContext;    
        }

        public IStudentInfoSevice studentInfoSevice
        {
            get
            {
                if(studentInfo == null)
                {
                    studentInfo = new StudentInfoService(context);
                }
                return studentInfo;
            }
        }
    }
}

Step 16 : Create Controller under the Core.SMS Project file.

Right click on Controller folder => Add=>Controller

Under the Common section select API => select API controller-Empty => Click Add

Rename the ValueController to StudentController.

Add Core.Service project reference to Core.SMS Project.

Now get all student records :

using Microsoft.AspNetCore.Http;
using Microsoft.AspNetCore.Mvc;
using Core.Service;
using Core.Entity.Model;

namespace Core.SMS.Controllers
{
    [Route("api/[controller]")]
    [ApiController]
    public class StudentController : ControllerBase
    {
        private IRepostoryWrapperService _repostoryWrapperService;
        private SmsContext SmsContext;
        public StudentController(IRepostoryWrapperService repostoryWrapperService, SmsContext smsContext)
        {
           _repostoryWrapperService = repostoryWrapperService;
           SmsContext = smsContext;
        }
        [HttpGet]
        public IActionResult GetStudentInfos()
        {
            var students = _repostoryWrapperService.studentInfoSevice.GetAllRecords();
            return Ok(students);
        }
    }
}

Step 17: Go to Program.cs class to register IRepostoryWrapperService and RepositoryWrapperService. No need to register all the Services because here WrapperService work as a parent service.

Configure your connection string in Program.cs

var connectionString = builder.Configuration[“ConnectionStrings:SMSConnection”];
builder.Services.AddDbContext<SmsContext>(option => option.UseMySQL(connectio
n));

Lifecycle

  • Transient :- Transient objects are always different, a new instance is provided to every controller and every service.
  • Scope :- A scope is typically associated with a single HTTP request. The same instance is shared within the same scope, but different scopes will have different instances.
  • Singleton :- A Singleton objects are the same for every object and every request.
using Core.Entity.Model;
using Core.Service;
using Microsoft.EntityFrameworkCore;
using Repository;

var builder = WebApplication.CreateBuilder(args);


var connectionString = builder.Configuration["ConnectionStrings:SMSConnection"];
builder.Services.AddDbContext<SmsContext>(option => option.UseMySQL(connectionString));

// Add services to the container.
builder.Services.AddScoped<IRepostoryWrapperService, RepositoryWrapperService>();
//builder.Services.AddScoped<IStudentInfoSevice, StudentInfoService>();

//Add Controller
builder.Services.AddControllers();
// Learn more about configuring Swagger/OpenAPI at https://aka.ms/aspnetcore/swashbuckle
builder.Services.AddEndpointsApiExplorer();

//Set Cors Policy
builder.Services.AddCors(options =>
{
    options.AddPolicy("CorsPolicy",
     builder => builder.AllowAnyOrigin()
                .AllowAnyMethod()
                .AllowAnyHeader());
});

//Add Swagger Functionality
builder.Services.AddSwaggerGen();

var app = builder.Build();

// Configure the HTTP request pipeline.
if (app.Environment.IsDevelopment())
{
    app.UseSwagger();
    app.UseSwaggerUI();
}

app.UseHttpsRedirection();

app.UseAuthorization();

app.MapControllers();

//Allow Cors
app.UseCors("CorsPolicy");

app.Run();

Execute your API and See the Result:

Now Add Student information to tbl_StudentInfo table:

[HttpPost]
public IActionResult AddStudent(TblStudentinfo tblStudentinfo)
{
    try
    {
        _repostoryWrapperService.studentInfoSevice.CreateStudent(tblStudentinfo);
        SmsContext.SaveChanges();
        return Ok();
        
    }
    catch (Exception ex)
    {
        return BadRequest(ex.Message);
    }
}

Now Update Student information to tbl_StudentInfo table:

[HttpPost]
public IActionResult UpdateStudent(TblStudentinfo tblStudentinfo)
{
    try
    {
        _repostoryWrapperService.studentInfoSevice.UpdateStudent(tblStudentinfo);
        SmsContext.SaveChanges();
        return Ok();

    }
    catch (Exception ex)
    {
        return BadRequest(ex.Message);
    }

}

Now Delete Record from tbl_StudentInfo :

[HttpPost]
public IActionResult DeleteStudent(TblStudentinfo tblStudentinfo)
{
    try
    {
        _repostoryWrapperService.studentInfoSevice.DeleteRecord(tblStudentinfo);
        SmsContext.SaveChanges();
        return Ok();

    }
    catch (Exception ex)
    {
        return BadRequest(ex.Message);
    }
}

Related Topics

How to consume Dot Net Core API in React Application.

ASP.Net Core API

Introduction

In this Article, We will discuss about Asp.net Core Web Api. After reading this article you will completely aware with Web Api. At the end of the topics some interview Q&A are available.

Let’s Start :

Topics that will cover in this article is mentioned below :

  • What is API?
  • Why Web Api is popular than previous Api ?
  • Why Web Api is required?
  • How to create Web Api in Asp.net Core?

What is API ?

Application Programming Interface(API) is an intermediate software agent used to communicate between more than one applications with the help of HTTP Method.

In above diagram, API is directly connected with database and Web application or Mobile Application connected with the API. API can take the request from multiple source (Web Browser, Phone Devices or Google devices) and passes all request to the Database(SQL, MySQL, Oracle, NoSQL, MongoDb etc..) . Database process the request and passes response to the API. Now API get the response and provides the result to requesting devices.

Why Web API is popular than other API ?

Web API supports various formats like JSON, XML, BSON and url-encoded data. User just need to pass content-type to get expected result format otherwise by default Web API return result in XML format.

Web API use model-view-controller(MVC) architecture that allows better separation of concern that means it keep’s separate data access layer(DAL) from business access layer(BAL);

  • How to Get JSON Result ?

GET http://localhost:15192/api/customer/1 HTTP/1.1
User-Agent: Fiddler
Host: localhost:15154
Content-Type: application/json

  • How to Get XML Result ?

GET http://localhost:15192/api/customer/1 HTTP/1.1
User-Agent: Fiddler
Host: localhost:15154
Content-Type: application/xml

  • How to Get BSON Result ?

GET http://localhost:15192/api/customer/1 HTTP/1.1
User-Agent: Fiddler
Host: localhost:15154
Content-Type: application/bson

  • How to Get URL-Encoded Data ?

GET http://localhost:15192/api/customer/1 HTTP/1.1
User-Agent: Fiddler
Host: localhost:15154
Content-Type: application/x-www-form-urlencoded

Why Web API Required ?

As we discussed, the user wants to access the result from different-2 devices like web browser, mobile, google devices etc. Here, Web API is works as a centralized services that takes request from multiple platform and passes the corresponding output.

How to create Web API in Asp.net Core ?

Step 1 : Install Visual Studio

Step 2 : Open Visual Studio => Create a new project

Step 3 : Select ASP.NET Core Web API => Click Next

Step 4: Configure your new project

  • Project Name : Enter your project name
  • Location: Browse your path where you want to save the project.
  • Solution Name : Enter the name of the solution where entire projects will store. By Default Project name and Solution name is same.

Step 5: Additional Information

  • Framework : Select Target Framework.
  • Authentication Type: None, Microsoft Identity Platform, Windows.
  • None : No authentication Required.
  • Microsoft Identity Platform : Authenticate with Microsoft Azure Active Directory. Azure AD creates and manages credentials that help enterprise user sign-in and access both internal and external resources.
  • Window Authentication : Users are authenticate with the help of Operating System. It is useful in intranet application where user are in the same domain.

Step 6: By Default Microsoft has created one API(WeatherForecast). You can see the project structure:

Step 7: Lets execute(F5) the API without making any changes.

By Default Weather API is executed with the help of Swagger. It is an open source software tool to design, build and use RESTFul web api. Generally Web Api uses HTTP VERBS for (Create, Read, Edit and Delete) operation.

  • HTTP GET: Read Operation.
  • HTTP POST: Create Operation.
  • HTTP PUT: Update Operation.
  • HTTP DELETE: Delete Operation.

Related Topics

Learn React In 2024 – A Step-By-Step Guide

What is React ? Why would you use it ?

  • React is open source JavaScript Libraby for building fast and interactive user interfaces.
  • Entire React application build with independent, isolated and reusable set of component. These component are put together to design to design complex layout. In other words we can say components are the building block of react application.
  • React simplifies the creation of SPA (Single Page Application) by using Reusable Component.

Why React – If we visit a React based application like netflix, we can see navigation of all pages around the application are super smooth, instant and you will never seen any effect to reload a new page.

Library of react help us to build user interfaces because React is a java script library. Clicking of different tabs triggers event listers and kicks of a series of function executions that display content & highlight the selected tab.

What is SPA(Single Page Application) ?

A single-page application is an app that works inside a browser and does not require page reload during use. SPA are all about serving an outstanding user experience(UX) by trying to imitate a “natural” environment in the browser — no page reloads, no extra wait time. It is just one HTML page that we visit which then loads all other content using JavaScript. For Example : Gmail, Facebook, Instagram.

React Interview Q&A

React Environment Setup

To run any React application, we need to first setup a ReactJS development environment. In this article, we will show you a step-by-step guide to installing and configuring a working React development environment.

Prerequisite :

  • Setup IDE
  • Create a React App
  • Project Structure

Integrated Development Environment(IDE)

Some of the basic features of IDE are :

  • Increase Productivity.
  • Offers a unified workplace.
  • Code Autocomplete.
  • Syntax Highlighting.
  • Error Checking.
  • IDE designed to improve developer efficiency.
  • Easy for problem identification.
  • Version Control.

Setup IDE

  • Install latest Node
  • Install VS Code
  • VS Code Extension and Setting
    1. Live Server / Live Preview
    2. Prettier (Format on Save)
    3. Word Wrap
    4. Tab Size from 4 to 2

Live Server / Live Preview

Prettier (Format on Save)

Go to File => Performance => Settings

Type on Search box “Format on Save” and enable check box Format On Save.

Word Wrap

Again Type on Search box “Word Wrap” and switch to ON

Tab Size from 4 to 2

All the necessary tools has been installed and configured all the settings. Now we have to create React APP. There are 2 different way to create app.

CRUD operation Asp .Net Core with Entity Framework Data First Approach

Create a React App

  • Official tool is CRA(Create React APP)
  • Vite is a modern tool to create React Project
  • Vite produces Quick and Small bundle size
  • Vite : Use “npm run dev” to launch dev server.
  • Use “npm start” for CRA.
If you are a first time react learner I will strongly recommend to use Vite to create React Application.

Go to your command prompt for window operation system or open terminal for Mac Operating System and install latest version of Vite.

  • Place Command : npm create vite@latest
  • Enter Project Name which you want : first-react-app
  • Select a framework : React
  • Select a Variant: JavaScript
  • If you install previous version of NPM then update with new one
    • npm install -g npm@latest

Now go inside the first-react-app

If you want to see all the files and folder then place ls(Mac User) and dir(Window User)

All these steps has done in command prompt for window’s operating system. Now open your visual studio code which you have installed earlier.

Open VS Code => Go to File => Open Folder => Select the application folder

Click on the option “Yes, I trust the authors” then your project structure looks like below:

Now execute the application without any changes in application to check the application is successfully created or not.

Select View => Terminal to open terminal and install NPM.

npm install” install all the dependencies of the application along with the supported version.

Now we have to run the application to the browser.

Command : npm run dev

You can see application is successfully run to the browser on Port : 5173

Related Topics